Getting Started with PicoVision
PicoVision is a powerful digital video stick for bold audio visual adventures. It uses two RP2040 chips (one as a CPU and one as a GPU) and you can plug it in to just about any HDMI display. Here's how to make it do some stuff!
This beginner friendly tutorial will cover:
how to plug everything in
how to get to navigate our launcher and examples
how to get talking to PicoVision with MicroPython and Thonny
how to make it run DOOM (important!)
What you'll need
A HDMI display of some sort
Some powered speakers (if you want to make noise)
A USB keyboard (if you want to play DOOM).
If you didn't get the accessory kit, you'll need
A USB-A to micro-USB cable for power and programming
Assembling the PicoVision Accessory kit
Here's what you get in the Accessory Kit:
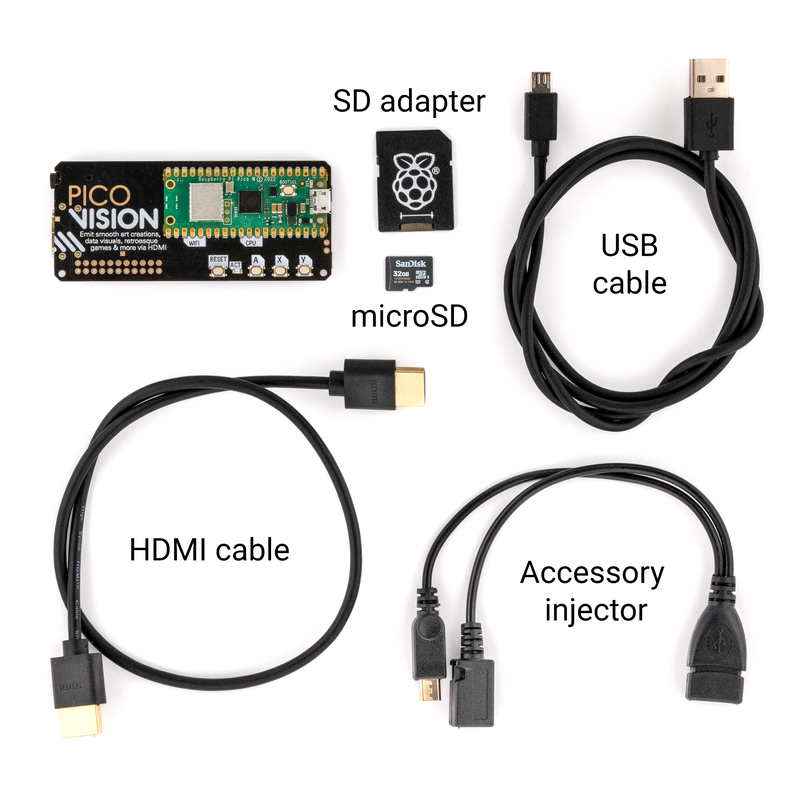
To get started, plug one end of the HDMI cable into a spare HDMI connector on your monitor or TV. The other end plugs into the HDMI shaped connector on PicoVision (it's labelled DV, for legal reasons).
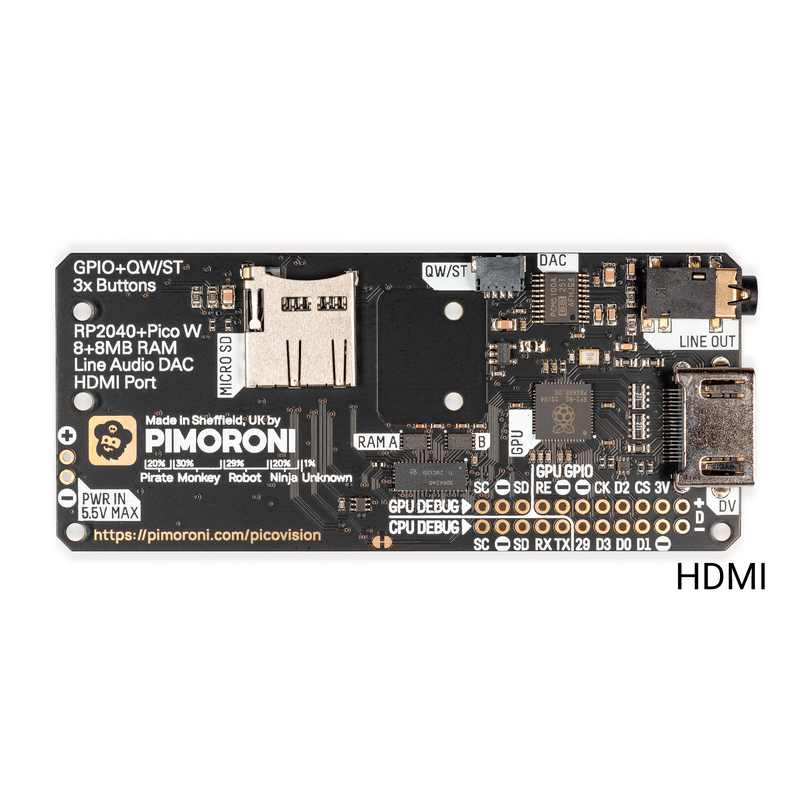
The USB cable goes from your computer to the micro USB port on the Pico W, this is how we'll provide it with power and also how we'll program the board. If you're just checking out the pre-loaded examples and aren't planning on programming the board just yet you could plug it into any convenient USB power source (perhaps your TV has one?).

That's all you need to plug in to get started, set aside the microSD card and the cursed accessory injector cable for later :)
Using the launcher (PicoVisiOS)
PicoVision comes with MicroPython, examples, and a launcher pre-installed for your comfort and convenience.
Once you've connected up both the HDMI cable and USB power, hopefully you'll see our launcher on your display (there's a short delay whilst the GPU firmware fires up). If you don't, double check that you've got your TV or monitor set to the correct HDMI channel. If that doesn't help, try hitting PicoVision's reset button in case something's gone awry on start up. The blue ACT light should pulse whenever the RP2040 GPU is happy and doing its thing.
Once you're up and going, you can navigate up and down the launcher with the A and X buttons. Press Y to run an example.
Hit RESET when you're done with an example and want to return to the menu. Note that the RESET button cuts power to both CPU and GPU, so your monitor might flicker/ reset momentarily as it loses connection.
Talking to PicoVision with Thonny
To program PicoVision (or to edit the files on it), you'll need to talk to it through an interpreter - we're using Thonny, which is available for Windows, Mac or Linux.
- Install the latest version of Thonny. We recommend downloading it from the Thonny website as package managers do not always have the newest version.
- Open up Thonny. Make sure the interpreter (shown in the box on the bottom right corner) is set to 'MicroPython (Raspberry Pi Pico)'.
- Plug your PicoVision into your computer, if it's not plugged in already. Because PicoVision is busy running the launcher program, main.py will already be running, you may need to interrupt it with the stop button in Thonny before sending it any instructions. In recent versions of Thonny, there's an option to interrupt running programs automatically - if you want to turn that on it's under Tools > Options > Interpreter > Interrupt working program on connect.
- After you press stop, you should get a MicroPython prompt that looks something like this. The >>> in the 'Shell' box tells you that PicoVision is talking to your computer and is ready to accept instructions.

If you're having trouble using Thonny to communicate with your board, there's some troubleshooting suggestions at the link below:
Editing files
Using Thonny, you can open up the .py example files on the device and edit them. To see the files on your board, you will need to have the Files window visible - if you can't see it, you can make it show up with View > Files.
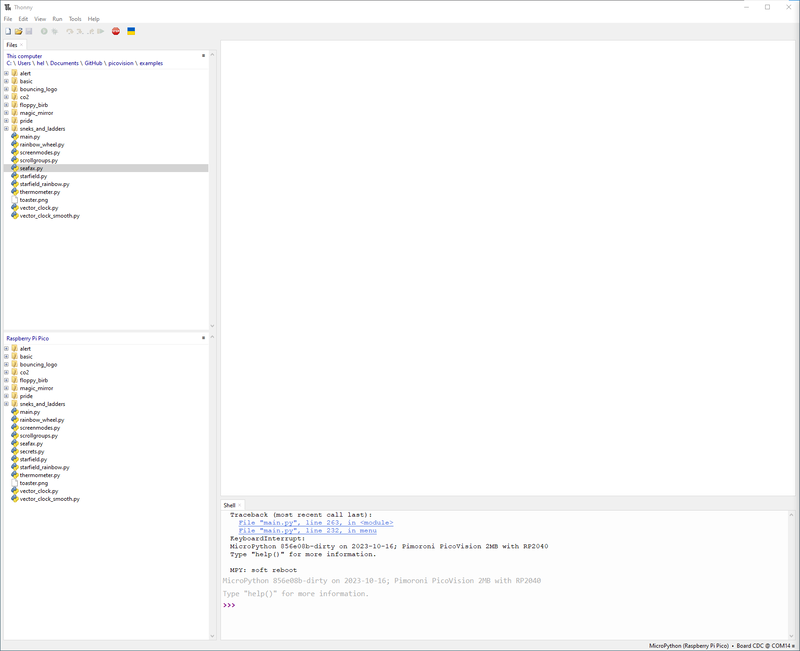
The top box can be used to browse the local files in on your computer, and the bottom box shows the files on your board. If you want to transfer files to (or from) your board, right click on the file you want to copy and select 'upload to /' or 'download to /'.
Adding your wi-fi credentials
Some of the examples (like Seafax) need to connect to the internet to do anything fun. To connect to your wi-fi network PicoVision will need to know your wireless network details - these will be stored in a file called secrets.py which should already exist on your board.
Double click on it in the Files window to open it up, and edit in your network's SSID and password - both SSID and password should be between quote marks "like this". Note that SSID and password are case sensitive!
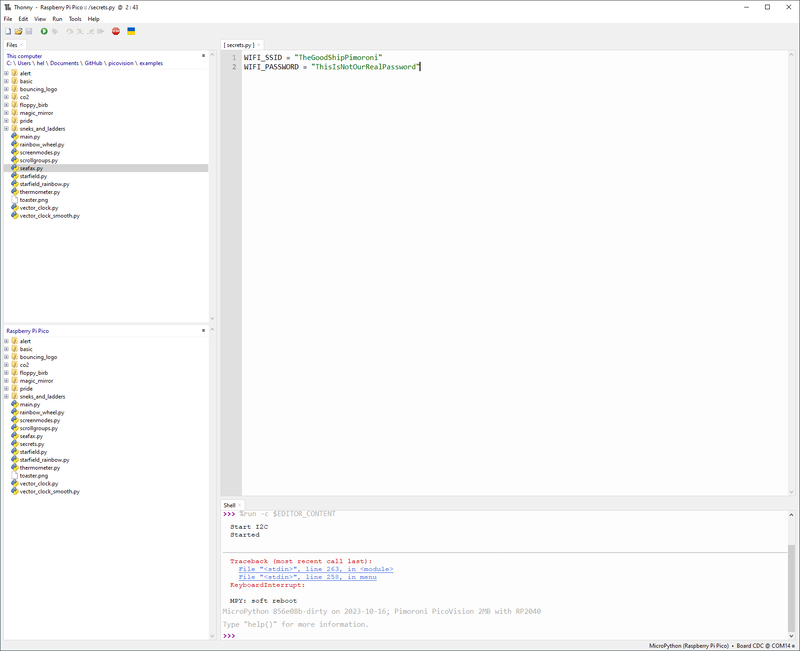
Once that's done, click the save icon in the toolbar to save your changes.
Hit the RESET button on the board to reload the launcher - if you got your credentials correct hopefully now the wireless examples should be able to connect to the internet!
Running examples through Thonny
You can run any of the .py example files stored on PicoVision by double clicking on them in the Files window to open them up and then pressing the green run button in Thonny. Running files like this instead of through the launcher has the advantage that you can view any console messages and errors that your code produces - this is very useful when writing your own code.
Writing your own code
Perhaps you'd like to try that now? Here's how to do some basic stuff with PicoVision.
Hello World
Here's a basic example you can run to get some text on your display, quick stat! Copy and paste it into a new tab in Thonny, and press the green run button.
from picovision import PicoVision, PEN_RGB555

display = PicoVision(PEN_RGB555, 640, 480)

WHITE = display.create_pen(255, 255, 255)

display.set_pen(WHITE)
display.text("Hello PicoVision!", 0, 0, 640, 4)
display.update()
You'll need to specify a few things when setting up your PicoVision display. Firstly the pen type - we're using PEN_RGB555 which is 16 bit / 32k colour. You'll also need to specify the width and height of your display (here's we're using 640 x 480 pixels). You'll want to set these to a resolution that your monitor is capable of supporting.
Note that higher resolutions (and larger pen types) are slower to refresh, so you might need to experiment with these a bit to find the best settings for your application.
We've added some convenient shortcuts for common pen type/resolution combos, so as an alternative you could do this:
from modes import VGA

display = VGA()

WHITE = display.create_pen(255, 255, 255)

display.set_pen(WHITE)
display.text("Hello PicoVision!", 0, 0, 640, 4)
display.update()
Click here to find out more about pen types and modes.
Here's what the rest of the code does:
create_pen creates a pen colour for us to draw with. The numbers specify the RGB colour on a scale between 0 and 255 - in this case white. We then specify what colour we want to draw with set_pen.
text writes text to the screen buffer. When using a bitmap font, the '0, 0' is the x/y co-ordinates of the top left of the text. '640' is when text will start wrapping onto the next line (so needs to be the width of the screen in most cases). The final number '4' is the scale of the text, reduce or increase it to shrink or embiggen!
update updates the screen. You can of course draw multiple things to the screen buffer before triggering an update.
The default font is bitmap6, which is all uppercase and a little small and blocky. Check out the other hello world examples in the /basic directory for examples of how to change the font and how to use fancy new vector fonts 👀
Using the buttons
Here's a simple demo of how to read the buttons on PicoVision. Note that the Y button is wired to the CPU / Pico W - this means you can read it with standard MicroPython machine commands. Buttons A and X are wired to the GPU / RP2040 so you'll need to read them slightly differently (using your PicoVision display class):
from picovision import PicoVision, PEN_RGB555
import machine
import time

display = PicoVision(PEN_RGB555, 640, 480)

button_y = machine.Pin(9, machine.Pin.IN, machine.Pin.PULL_UP)

print("Press a button!")

while True:
    if button_y.value() == 0:
        print("Y is pressed")
        time.sleep(0.5)
    if display.is_button_x_pressed():
        print("X is pressed")
        time.sleep(0.5)
    if display.is_button_a_pressed():
        print("A is pressed")
        time.sleep(0.5)
Making noise
We've ported some of the synth functions that we wrote for our Space Unicorn boards to PicoVision - here's a simple demo of how you can use these functions to play notes.
The audio jack on PicoVision outputs unamplified line level audio, so you'll need to connect it to powered speakers or similar to hear noise.
How to play DOOM
Okay, on to serious business!
Here's how you can run Doom on PicoVision to thrill, impress and awe your lovely nerdy friends.
Formatting the SD card
Our SD cards come with Raspberry Pi OS pre-installed on them, so you'll probably want to format it before use so that you don't have a load of unnecessary files cluttering up the place and causing confusion.
Raspberry Pi Imager (available for Windows, MacOS or Linux) is a nice way of doing this as it get rids of any partitions for you as well as formatting the SD card in a Pico-friendly format. After you've downloaded and installed it, click on the 'CHOOSE OS' button and scroll down to the bottom of the list till you get to the 'Erase' option.
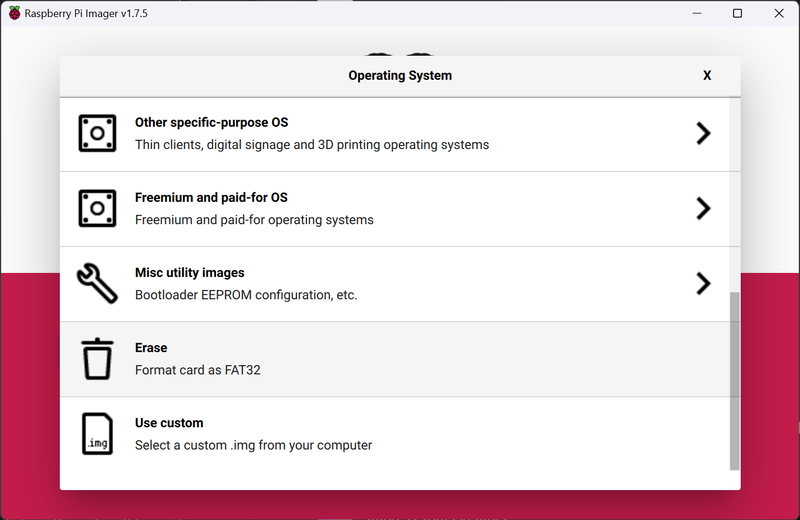
Connect the microSD card to your computer (if you have a laptop with a SD/microSD sized slot this is easy, otherwise you may need to use a USB card reader). Click the 'CHOOSE STORAGE' button, choose your SD card and then click 'WRITE' to start the format.
Downloading the files
Head over to our pal Mike's fork of rp2040-doom to download the files.
First of all you'll need to download the data file doom1.whx (this is the shareware DOOM1.WAD compiled into a Pico-friendly compressed format). Here's a direct link:
- https://github.com/MichaelBell/rp2040-doom/blob/picovision/doom1.whx (click on the 'download raw file' button at the top right).
Once you've downloaded it, this file then needs to be copied to your PicoVision's SD card.
Then head to the releases page to download the firmware to run on the Pico W:
The zip file you need to download is called something like rp2040-doom-vx.x-vision.zip . Unzip it somewhere on your computer.
Hold down the BOOTSEL button, and tap RESET to put your board into bootloader/DFU mode. You should see a new drive called RPI-RP2 pop up on your computer. Copy doom_tiny_usb.uf2 across to this drive (the board will reboot once you've done that).
Connecting the cables
Locate the accessory injector cable that we set aside earlier. Plug a USB keyboard into the USB-A port (that's the big rectangular end). Plug the micro-USB cable that's plugged into your computer into the cable's micro-USB socket. You can then connect the micro-USB plug on the accessory injector to the power connector on PicoVision.
If you want to hear noise, connect the 3.5mm audio jack on PicoVision up to some powered speakers.
If all of that went to plan, your PicoVision now should be running Doom. You can play the game with your USB keyboard - just remember that it's cursor keys to move around, we didn't have WASD back then :)
Putting it back to how it was
Once you're done with playing Doom, you might want to get MicroPython back. You can download the most recent MicroPython .uf2 from the PicoVision releases page:
As before, hold down the BOOTSEL button, and tap RESET to put your board into bootloader/DFU mode. Copy the MicroPython .uf2 across to this drive - after it's restarted, you should be able to talk to it with Thonny once again.
Next steps
Hopefully you should now feel equipped to start writing your own PicoVision programs - as always, drop us a line on social media and let us know how you're getting on! If you're reading this before 17 November 2023, do consider entering our demoscene competition - there's some sizable pirate gift cards to be won.
Search above to find more great tutorials and guides.