Pico C/C++ Development Using Windows
If you want to use C or C++ to program your Raspberry Pi Pico (or other RP2040 board) but would quite like to develop from the comfort of your Windows PC - read on! This quick guide will show you how to set up and run a basic C/C++ development process on a Windows machine using our preferred method - Windows Subsystem for Linux (WSL).
WSL
What is WSL and why should I use it?
Windows Subsystem for Linux is a tidy way of setting up a Linux virtual machine on your Windows PC, with minimal impact on system performance and without the faff of a traditional dual boot setup.
There are instructions in the Raspberry Pi Pico Getting Started guide for installing the Pico SDK and toolchain on a Windows machine natively but it's quite a complicated process - we've found using WSL and installing the toolchain on a virtual Linux machine to be much more straightforward.
Assumptions
- You're using an up-to-date version of Windows 10 (version 2004 or higher). WSL should also work on Windows 11.
- Your computer's hardware is capable of running a virtual machine (most modern motherboards compatible with Windows 10 should be fine).
- You're happy running commands from the terminal.
If you're brand new to Pico/RP2040/microcontrollers in general, we'd strongly suggest trying MicroPython before you attempt C/C++ - check out our beginner friendly tutorial!
Installing WSL
Open up an administrator command prompt on your Windows machine (find it in the start menu or via the search box, right click on it and choose 'Run as Administrator') and type:
wsl --install
This command will execute all the necessary steps to set up WSL and install an Ubuntu distribution for you, discreetly running in the background of your Windows machine. Magic! If you want to know exactly what the command does before you run it or want to choose a different Linux distro, check out this guide.
Note - we got this error after running that command, so we had to go into our computer's BIOS and turn on a CPU setting to enable virtualisation support.
You'll need to reboot your Windows machine once you've installed WSL.
Installing the Pico SDK and toolchain
Next we're going to install the Pico SDK on your new Linux virtual machine, along with the software needed to build the examples.
You can find your VM in the Windows start menu, named 'Ubuntu' - click on it to open up a terminal. If it's the first time you've fired it up, you'll be prompted to set up a username and password - remember the password, you'll need it in a bit.
Once you've done that, you should have a terminal prompt that looks something like this (but, hopefully with your username).

Make sure you run the following commands at this prompt, identifiable by the orange Ubuntu blob, to execute them on the virtual machine. If you try to run them in a Windows command prompt things will get confusing.
Start off with a sudo apt update to make sure all your sources are up to date (you might be prompted to enter the password you just set up the first time you use a sudo command). Then you can use the apt package manager to install the software that the Pico SDK needs to be able to compile and build files:
sudo apt update
sudo apt install git cmake gcc-arm-none-eabi libnewlib-arm-none-eabi build-essential libstdc++-arm-none-eabi-newlib
Make a new directory to keep everything Pico-related in and navigate into it:
cd ~/
mkdir pico
cd pico
Then clone the Raspberry Pi Pico SDK (you'll always need to have this installed for Pico dev):
git clone -b master https://github.com/raspberrypi/pico-sdk.git --recursive
The --recursive flag tells git to also download any external modules that are referenced in the repo. Not all repos use external modules, but pico-sdk and some of the others mentioned below do.
Downloading additional repos
You'll probably want to download some example code to build next, like the official Raspberry Pi Pico examples.
git clone -b master https://github.com/raspberrypi/pico-examples.git
If you want to play with Pimoroni addons, boards or breakouts, you'll want to grab our pimoroni-pico repo:
git clone -b main https://github.com/pimoroni/pimoroni-pico.git --recursive
Or if you want to program a PicoSystem with C/C++, you'll need:
git clone -b main https://github.com/pimoroni/picosystem.git
The pico directory on your virtual machine should now contain a number of other directories that contain the cloned repos:

Building from the terminal
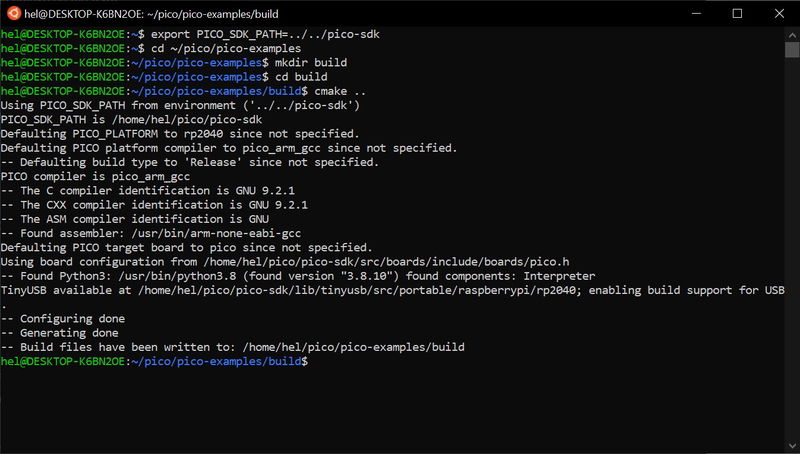
Let's build the pico-examples, and get the LED blinking on your Pico. Before you can configure and build them, you'll need to set the path to the Pico SDK with:
export PICO_SDK_PATH=../../pico-sdk
Create a build directory in pico-examples and navigate into it:
cd ~/pico/pico-examples
mkdir build
cd build
Then...
cmake ..

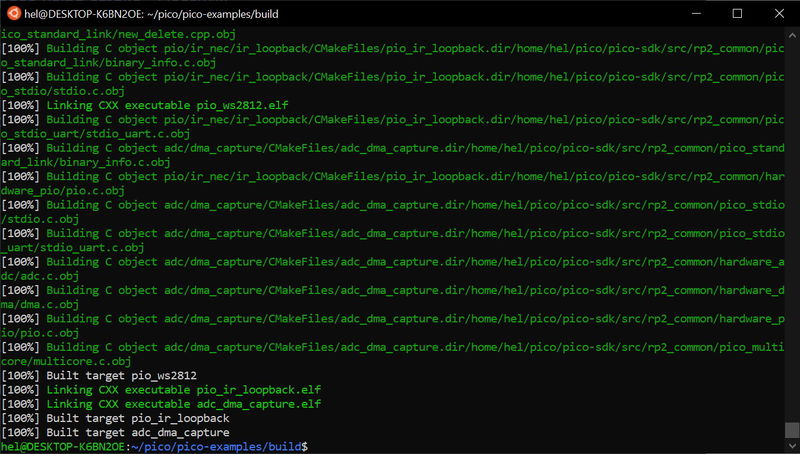
... and:
make -j8
You could just use make here, but adding -j8 runs parallel processes and speeds up this step considerably. A good rule of thumb is to set this number to however many CPU cores you have.

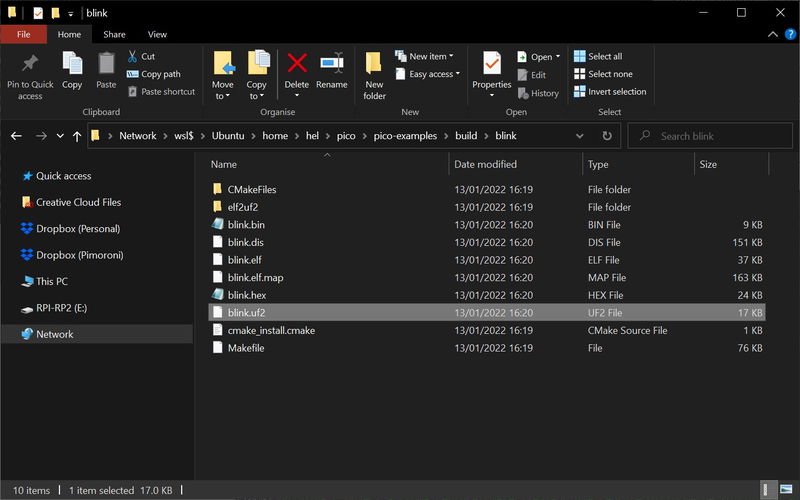
If everything worked correctly, the build directory should now contain a bunch more directories with files in them, including some tasty .uf2 files ready to be flashed to your Pico.
Copying files to your Pico
If Linux is not your first love, you might find moving files about using the command line to be tedious. Let's use WSL's Windows integration to make it easy - type
explorer.exe .
to open your build directory in Windows Explorer.
Put your Pico into FS / bootloader mode by holding down the BOOTSEL button whilst plugging it into your PC - it should now show up as a drive called RPI-RP2. Once you've navigated to your chosen uf2 file, you can just drag it over to the RPI-RP2 drive on the left to copy it to your Pico - simples.

Building other examples
You can use exactly the same process to build the examples in pimoroni-pico and picosystem - just create a build directory within the appropriate folder and navigate into it before building as above.

Next steps
To start modifying the example code, you'll need to hunt down and edit the *.c or *.cpp source files. You can do this from the Linux command line (nano whatever.c) or you can use that useful explorer.exe . command to navigate to them with Windows Explorer, and open and edit them in a nice editor like Notepad++.
If you'd rather have all the conveniences of a fully featured development environment with code auto-completion and tons of handy extensions, you might want to consider hooking your WSL install up to Visual Studio Code. You can find out more about how to do that in this fine tutorial!
Troubleshooting
Cmake problems: pico-sdk not found
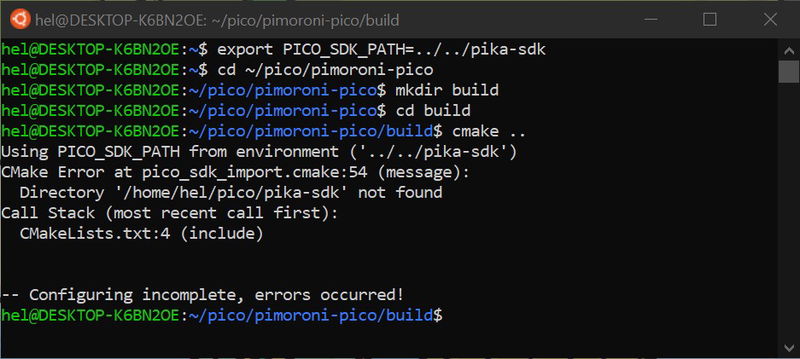
If the cmake step fails, you might get an error that looks something like this:

Oops - looks like cmake can't find the SDK due to a typo in our export PICO_SDK_PATH. You'll see a similar error if you forget to set the path at all!
You can run the command again to set the path to your pico-sdk directory correctly. If your directory structure differs from the way we've set it up, be sure to change the path accordingly. It can be an absolute path rather than a relative path if you want -
export PICO_SDK_PATH=~/pico/pico-sdk
Before you try the cmake .. again though, make sure to delete and recreate the build directory (rm -r build). A failed cmake creates files that can make errors persist in a confusing manner.
Search above to find more great tutorials and guides.