Beginning with Blinkt!
This tutorial will guide you through how to do some things with your Blinkt! lights. There is more detail and explanation in this tutorial than there is in Sandy's tutorial, so if you already know about RGB colours and are comfy with using Python, you might be better off using his one!
Blinkt! is a strip of LED lights that you can control with your Raspberry Pi. It doesn't require any messing around with wires or breadboards so it's quick to get started.

Blinkt! uses eight APA102 pixels. The code APA102 tells you what type they are. If you look closely on the strip, you will see some tiny rectangles between the LEDs, which are other components to help it work better. There is a resistor under the letter N, which makes sure any weak little signals don't get through and make the lights come on by mistake. It's not a very strong resistor though, so when you send your signals they are strong enough to get past it. All the others are capacitors, which are like little stores for electricity so the lights don't get a bumpy flow and instead get a nice smooth supply.
The tutorial is in small sections, that will take a few minutes each. You could do them all at once, or stop between sections and come back later! If you get stuck on any bits you can use our forums to get more help.
Joining the Blinkt! to your Raspberry Pi
To start off, you will need a Raspberry Pi 3 or a Raspberry Pi Zero with a male header on - that's the sticky up pins.
If you already have pins you can skip this bit.
The Pi 3 has them on already, but the Pi Zero might need some soldering or hammering on if you haven't already got them. Soldering is not scary and there is a guide to how to do it here. If you haven't got access to a soldering iron you could use hammer headers that don't require any soldering at all. Our hammer header kit comes with a male header, female header, and a jig to safely and secure attach them to your Pi Zero/Zero W. You won't need the female header this time because the Blinkt! already has one.
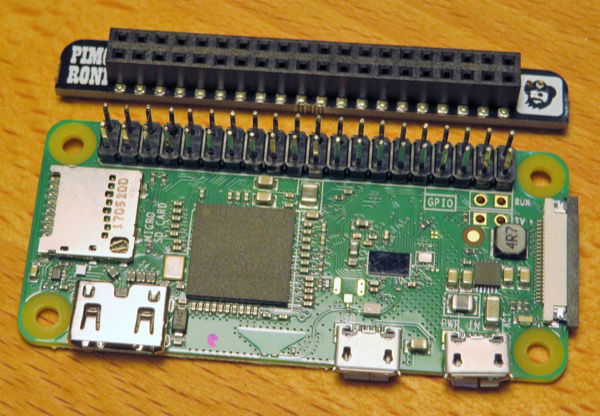
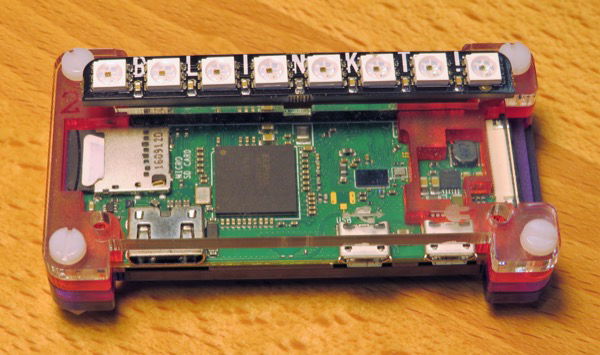
The pins on the Pi connect to the holes in the header on the back of the Blinkt! There is a right way and a wrong way. If you look at the Blinkt! you'll see it has rounded corners on one side. This side goes towards the outside of your Pi. The straight edge goes towards your Pi. Push them together gently and you are almost ready to start!
Making the Pi play nicely with the Blinkt!
The Pi does not have the right code to speak to the Blinkt! properly yet, so you need to tell it to go and get it. This is a bit like when you get a new printer and it doesn't work until you install the printer driver or the right app for it.
When your Pi is running you need to connect to the internet. After you've done this, you should look for the Terminal icon on the toolbar.
![]()
Click on it and a black window should appear on your screen. Type the following line into it and press Enter.
curl https://get.pimoroni.com/blinkt | bash

This does all the hard work, goes and gets the right code, puts it in the right place, and has it ready for when you next need it. You don't need to do it again on the same Pi, and it will always know how to communicate with the Blinkt! now.
Start Python 3
We use the Python 3 IDLE code editor that you can find in the programming menu of Raspbian.

Click on the Raspberry in the top corner and pick Programming from the menu. Pick Python 3 (IDLE) from that menu and a white box will load. Click on File and New file and then you get a nice fresh box to write in.

This is it... this is where you start coding!
Import Blinkt!
In most programs, you start by telling the computer what instructions it will be using. We're using a Blinkt!, so we tell it to go to where we put all the Blinkt! instructions and import (bring in) the functions we want this time.
You can type in the code as we go, or skip to the bottom and cut and paste it all into your file.
from blinkt import set_pixel, set_brightness, show, clear

import time
We've asked it to go to the Blinkt! place, and bring back four functions to use. Here are their names and what they do:
set_pixel picks the light and lets you give it instructions.
set_brightness makes it brighter or less bright.
show lights the lights up as you've chosen.
clear turns the lights off.

Instead of going 1, 2, 3, 4, programmers count 0, 1, 2, 3. We choose the pixel by the number in the row it sits at.

So the green pixel on this Blinkt! strip is number 4, because we count along from the left going 0, 1, 2, 3, 4. Using these functions we can pick a light and tell it what colour to be, we can tell it how bright to be, and we can tell it to light up. When we're done, we can tell it to go off.
We also told it to import time because if it can't tell the time, we can't tell it how long to wait before it switches the lights off.
We also need to know how computers talk about colours before we can tell it what to set the pixel to. One of the ways we tell a computer what colour we want, is to tell it what colours to mix together. When you use paint, you can make most colours using red, yellow, and blue. When you use light, you can make most colours using red, green, and blue. Here is an example:
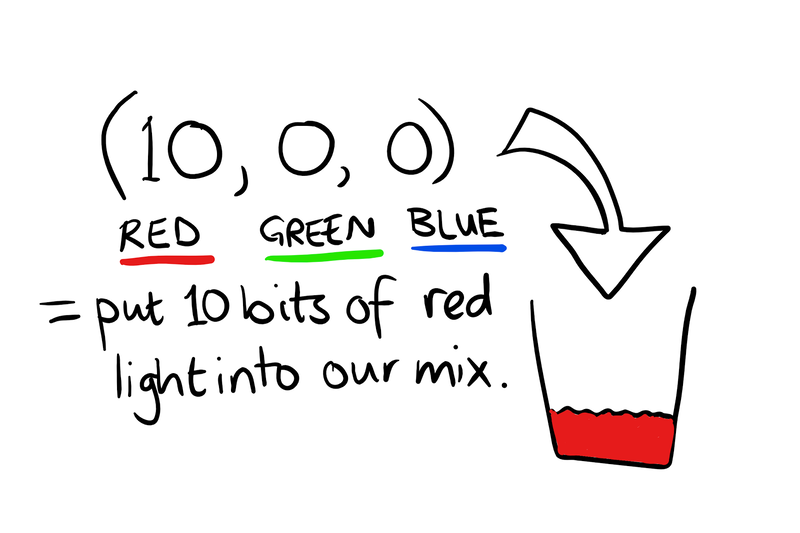
So if you wanted to do red, you could type
(10, 0, 0) and it would put 10 bits of red in the mix.
Light mixes in mysterious ways. If you want to make yellow you need to put in some green and some red.
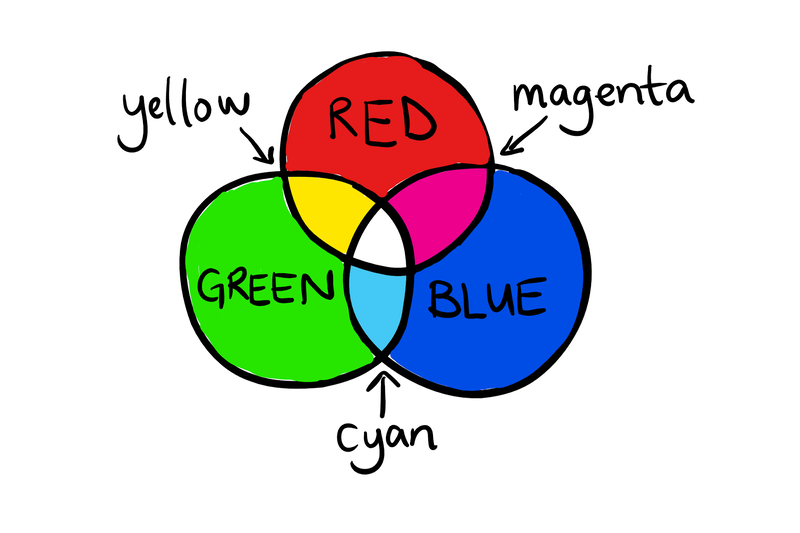
The code for yellow is (255, 255, 0). The amount of each colour light you can put in goes from 0 (no light) to 255 (all of that colour of light).
This next bit of code tells the lights what to do.
clear ()

set_pixel (1, 0, 255, 0)

show ()

time.sleep (1)
First, they all clear so they're not showing anything. Then we talk to pixel 1 (which is the second one along) and tell it no red, all the green, and no blue. Then we ask it to show us what we asked for, and wait 1 second.
By now you should have all of this code typed in:
from blinkt import set_pixel, set_brightness, show, clear

import time

clear()

set_pixel(1, 0, 255, 0)

show()

time.sleep(1)
Now all you need to do is save it, and run it!
Click File and then Save As, and give it a name like mylights.py.
In the same program, you can run your code and see if it works. Go to the top bar where it says Run and give it a whirl!
Your Blinkt! should do what you asked it to! If it doesn't, check your program for spelling or typing mistakes. Computers can be very picky about commas or brackets in the wrong place (they're not as clever as you!)
If you go back to the code editor (the white screen) you can change things, but don't forget to save your changes before you try to run it again.
- Try changing your code to light up different pixels in different colours
- Try making it light one up, then clear, then light a different one up
- Try making it light more than one pixel up at a time
What do you know now?
- How to connect a Blinkt! to your Raspberry Pi
- How to install the library for a Blinkt!
- How to change the colour of a pixel
- How to address an individual pixel
- How to save and run a Python program
And remember, if you're stuck we are just an email away (you'll find our email addresses at the top right corner of all of the tutorial pages)!
Search above to find more great tutorials and guides.