Let's make rainbows
Aaaar G B
First off, you're most likely familiar with RGB. If you're painting any colours onto Unicorn HAT you're probably using it already. It's easy to understand- you have an amount of Red, Blue and Green ( from 0 to 255 usually ) and they mix together ( using the rules of additive colour mixing ) to create a possible 16,777,216 colours. Whew, that's a lot!
RGB is easy- if you want something to be more red you add more red, if you want something to be more green- well, you get the idea.
The 3 channels of RGB can be placed along the edges of a cube, and the inside of that cube has a point for every single possible colour. A bonkers artist decided it would be a good idea to turn this into a book: http://taubaauerbach.com/view.php?id=286
But what if you want rainbows? How on earth do you know how much red, green or blue to add to get the next colour in the rainbow? The short answer is; you don't. Someone has already solved this problem for us, and it's called HSV.
HSV - Hue, Saturation, Value
In order to make RGB colour more intuitive, HSV instead maps all the colours you're familiar with in RGB into a cylinder. Let's visualize the HSV cylinder.
Hue
Around its circumference is mapped the "Hue". We create the Hue value by placing our Red, Green and Blue colours side-by-side;
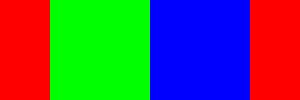
But they don't just sit there. They all mix together to produce every possible intermediate colour, here's the first step;
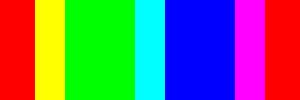
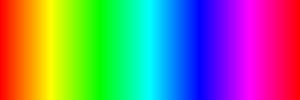
And that keeps going until we get:
Value
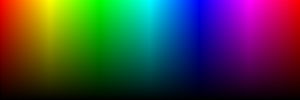
From top to bottom is mapped "Value". This is often also referred to as "Brightness" and it's much easier to understand what it does if you call it that. Let's add 4 steps of brightness:
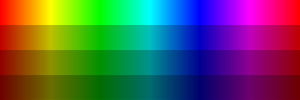
And the whole lot;
Saturation
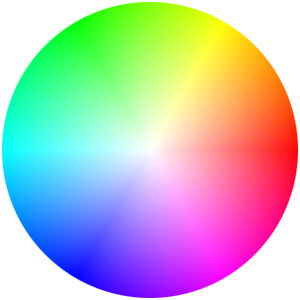
I left saturation to last because it requires us to step into 3 dimensions. From the innermost point in our HSV cylinder is mapped the Saturation value. Here the cylinder is completely white, the colours are utterly desaturated. On the outer edge the colours are fully saturated and full of life.
If we viewed it from the very top, it would look like this:
So how does this help us make rainbows?
By now you've probably noticed that the bright, top edge of an unrolled HSV cylinder is basically already a rainbow. Granted there are some problems with it- the area of green looks way bigger than the area of blue for example- but unfortunately we have our eyes to blame for those.
So to create a rainbow, we need to pick some coordinates along this top edge. Since we don't want our rainbow to be saturated, or bright/dark we can ignore the other two axis and all we have to do is produce some evenly spaced numbers from 0.0 to 1.0.
Putting it into code
Python has an awesome module called coloursys which helps us take an HSV colour and turn it into an RGB one that we can use to light Unicorn HAT. Let's have a quick look at it:
>>> import colorsys as col
>>> print(col.hsv_to_rgb(1.0,1.0,1.0))
(1.0, 0.0, 0.0)
We've asked for the colour right on the top right corner of our flattened out cylinder. That's 1.0 Hue, 1.0 Saturation and 1.0 Value.
Python gives us back Red. The result is in RGB, 1.0 Red, 0.0 Green, 0.0 Blue. These floating point numbers are useless for Unicorn HAT, though, so we'll multiply them all by 255:
import colorsys as col
rgb = col.hsv_to_rgb(1.0,1.0,1.0)     # Returns 1.0, 0.0, 0.0
rgb = map(lambda x:int(x*255), rgb)   # Returns 255, 0, 0
We'll gloss a little over my cheeky use of lambda here- a lambda is basically just an unnamed, inline function which we use for this one specific purpose. In this case it's taking the input given to it by map and, multiplying it by 255 and making sure we get a nice round integer out.
There's a much more Pythonic way to do this using list comprehension, that's what we'll use from now:
import colorsys as col
rgb = col.hsv_to_rgb(1.0,1.0,1.0)     # Returns 1.0, 0.0, 0.0
rgb = [int(x*255) for x in rgb]       # Returns 255, 0, 0
Now we've got a way to deal with HSV colours, let's wrap it up in a nice tidy function:
import colorsys as col
import unicornhat as uh

def set_pixel_hsv(x, y, h, s, v):
  r, g, b = [int(x*255) for x in col.hsv_to_rgb(h,s,v)]
  uh.set_pixel(x,y,r,g,b)
Painting Rainbows
Now it's time to paint some rainbows. We want to automatically step through each pixel on the X and Y axis of Unicorn HAT so we'll use range to do this:
for y in range(8):
    for x in range(8):
        # Stuff!
Now we want to call our set_pixel_hsv function for every combination of X/Y. But how will we know what values to pass in?
It's easier than you think. The total range of our rainbow is from 0.0 to 1.0. The Unicorn HAT is 8 pixels by 8 pixels so we have 8 steps to paint. Simply divide 1.0 by 8 to get the amount of rainbow for each step: 1.0/8.
Then, to pick the right step, we multiply it back up by x or y: (1.0/8) * x. Easy! This will scale our rainbow to the Unicorn HAT and give us equally spaced steps from red through to pink.
Let's just test this works:
>>> for x in range(8):
>>>    print((1.0/8) * x)
0.0
0.125
0.25
0.375
0.5
0.625
0.75
0.875
Looks pretty good! Note; we don't want to go all the way to 1.0 since that's effectively the same colour as 0.0 so these steps will work great!
The Code
import unicornhat as uh
import colorsys as col

uh.brightness(0.1) # Unless you have welding goggles

def set_pixel_hsv(x,y,h,s,v):
  r, g, b = [int(c*255) for c in col.hsv_to_rgb(h,s,v)]
  uh.set_pixel(x,y,r,g,b)

for y in range(8):
    for x in range(8):
        set_pixel_hsv(x,y,(1.0/8)*x,(1.0/8)*y,1.0)

uh.show()
Run this code and your Unicorn HAT will explode with rainbow goodness! It should look something like this:

Go forth and experiment!
Now go play with range and the values you pass into set_pixel_hsv and see what rainbow patterns you can make!
You can do some cool things by playing with value ( brightness ) for example. Here's a function to fade in a pixel:
def fade_pixel_hsv(x,y,h,s,v,t):
    end = int(v*100)
    delay = float(t)/end
    for v in range(end):
        set_pixel_hsv(x,y,h,s,v/100.0)
        uh.show()
        time.sleep(delay)
This takes the x and y coordinates you should be familiar with by now, and also the values for Hue, Saturation and Value. But it also takes t, which is the amount of time in seconds you want the fade-in to take.
You'll need set_pixel_hsv to make this work, and don't forget to import time!
Search above to find more great tutorials and guides.