 Advanced
Build a Home Assistant Touchscreen Controller with Presto
Use Presto, MQTT and Zigbee to switch smart plugs, show live power use and get doorbell alerts from Home Assistant.
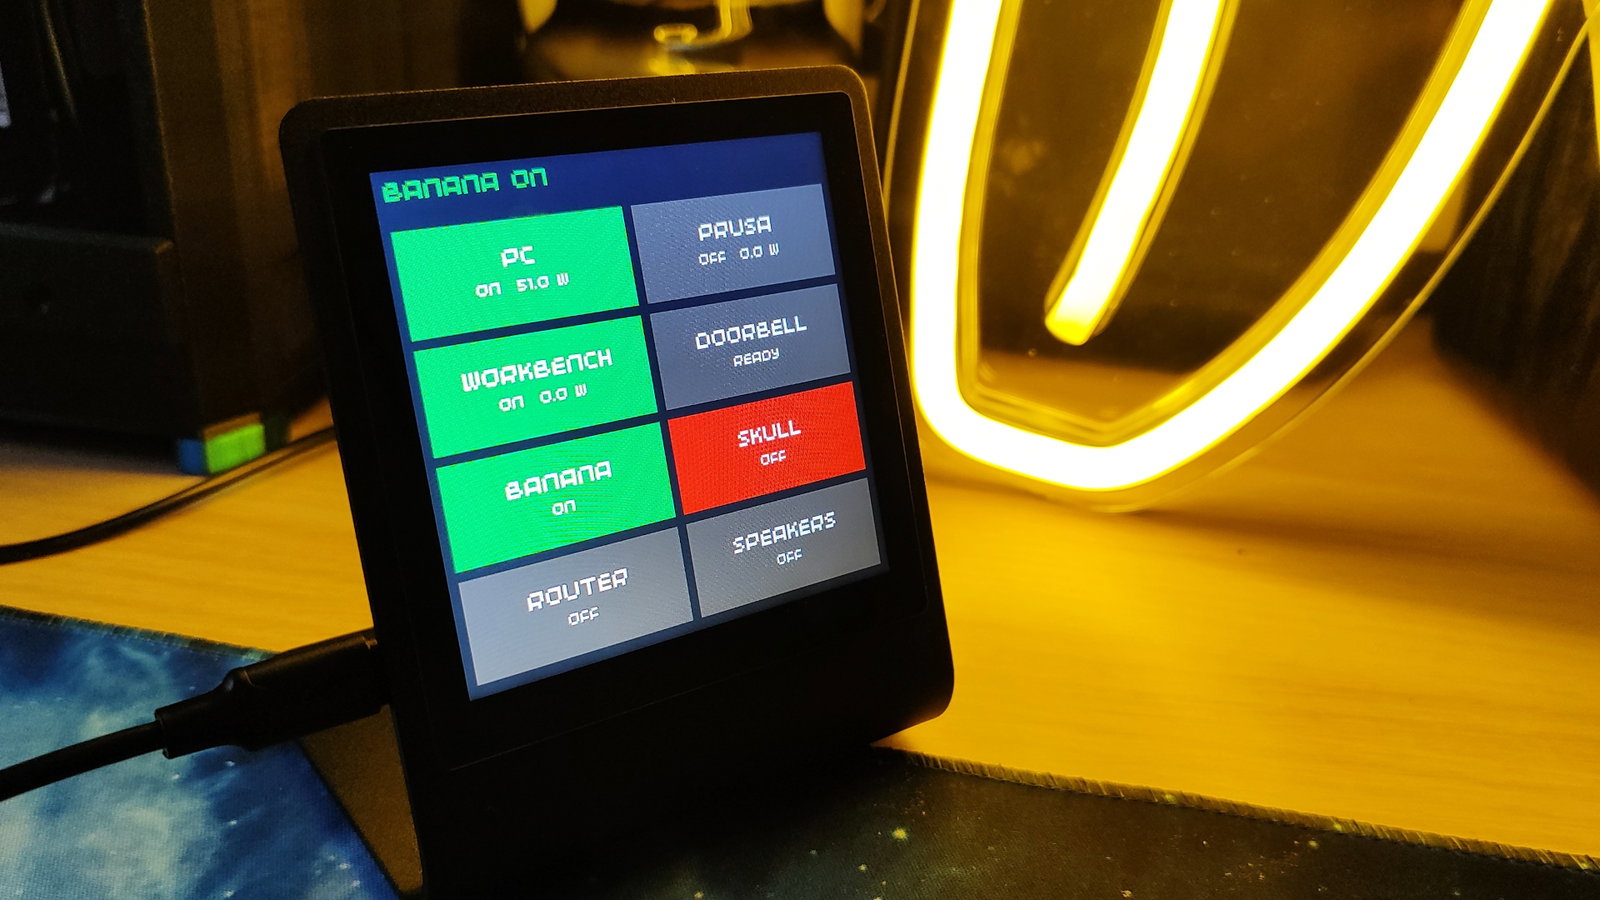
What if one device could enable you to turn on devices, read power consumption and notify you of visitors? Such a device is possible and in this guide we will build it using Presto, our RP2350-powered desktop companion. The entire 4 inch square, 480 x 480 pixel display will be used to keep total control of our smart home devices.
What Are The Project Goals?
- To control sockets / devices over Home Assistant.
- Report device power consumption.
- React when the doorbell is pressed.
We break down the project into sections before launching into the code.
- Set up MQTT.
- Set up Zigbee.
- Connect Zigbee devices to control them.
- Receive live power data using a Zigbee to MQTT bridge.
- React to a doorbell press.
What You'll Need
- Presto or alternatively use the Presto Screen Kit and mount it inside a 3D printed case or embed it into a wall or desk.
- The latest firmware for Presto
- A good quality USB C cable
- A computer running Thonny.
- Sonoff Zigbee Smart Plug
- Sonoff Zigbee Wireless Switch
- Home Assistant Green
- Or a DIY Home Assistant server using
- Raspberry Pi 4 running Home Assistant
- Sonoff Zigbee 3.0 USB Dongle Plus
Setting Up Home Assistant
Home Assistant is an open source, smart home automation tool that enables owners to connect to a range of devices. These devices can be smart power sockets, temperature sensors, window / door sensors, even water leak sensors. The goal of Home Assistant is to enable anyone to easily add smart technology to their home, without sending data to external parties.
We're using Home Assistant Green, a ready to go Home Assistant server. Alternatively, you can build your own, using a Raspberry Pi 4 or better (even an old laptop or x86 PC would do the job) and a Sonoff Zigbee 3.0 dongle, but we won't be covering that in this guide.
Home Assistant is extremely configurable, but our focus is on just two features. MQTT and Zigbee.
- MQTT is a lightweight protocol for transferring data. It uses a publish / subscribe model that is very similar in concept to YouTube. Devices can publish information (like a content creator) which is sent to a broker (YouTube) who serves the content to subscribers.
- Zigbee is a power efficient radio protocol that is common in most smart home projects.
Setting Up MQTT
MQTT is the glue for this project. Presto cannot directly connect to a Zigbee device, so our Home Assistant server will bridge the traffic between MQTT and Zigbee. To use Zigbee, our Home Assistant Green has a Home Assistant Connect ZBT-2 antenna. It also works with competing protocols like Matter or Thread. The antenna is plug and play, so we can concentrate on getting our project started without any additional configuration.
Our first task is to set up MQTT on our Home Assistant server.
- Open Home Assistant in a browser and go to Settings >> Apps. Your Home Assistant install is typically configured to http://homeassistant.local but check this before moving forward.
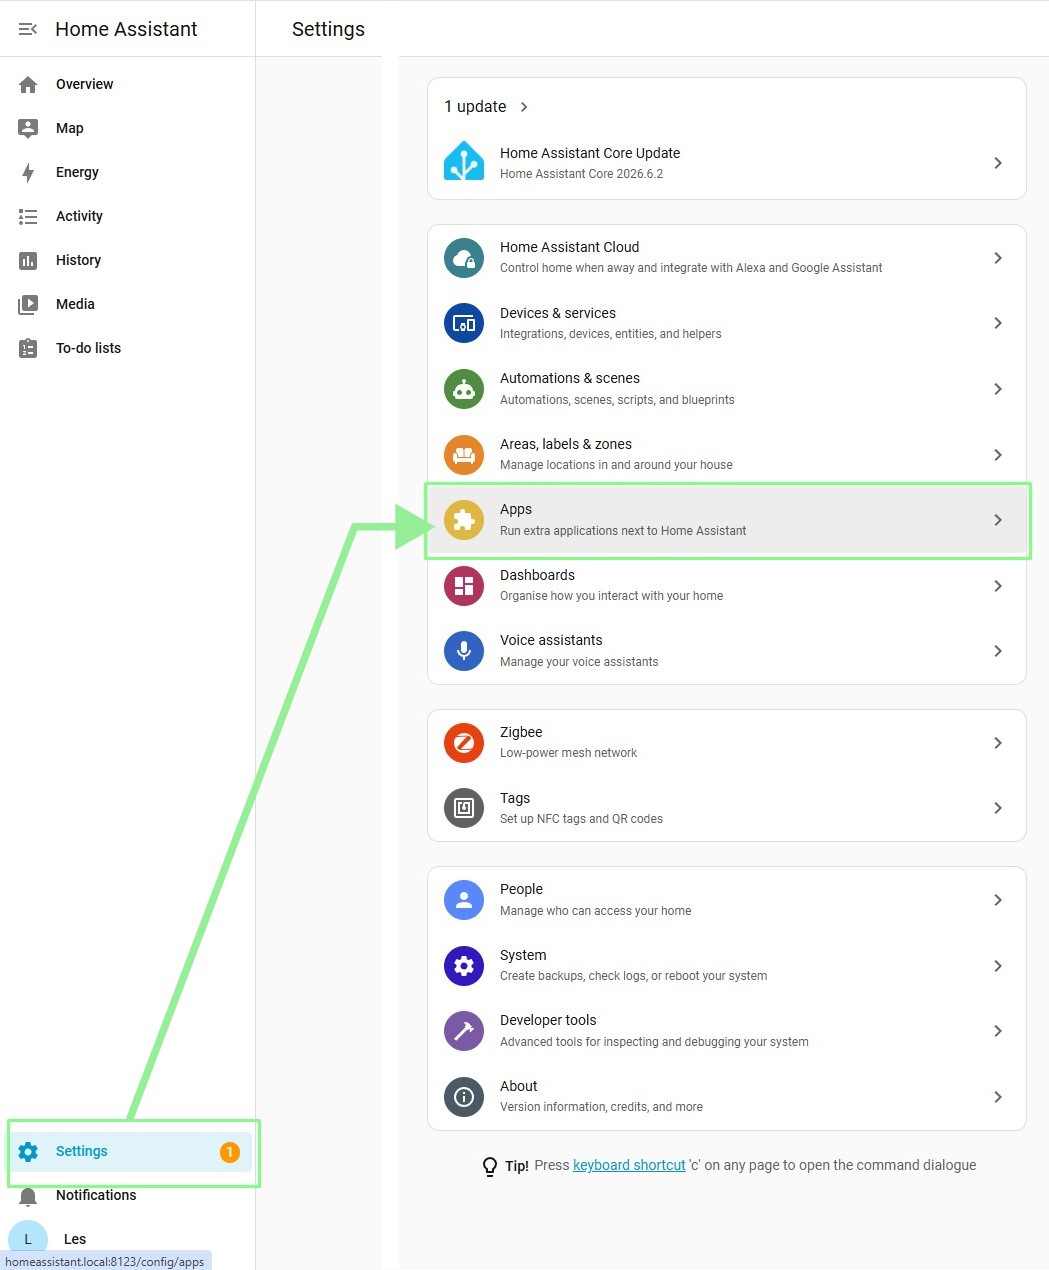
- Click on Install App.
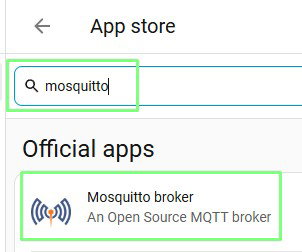
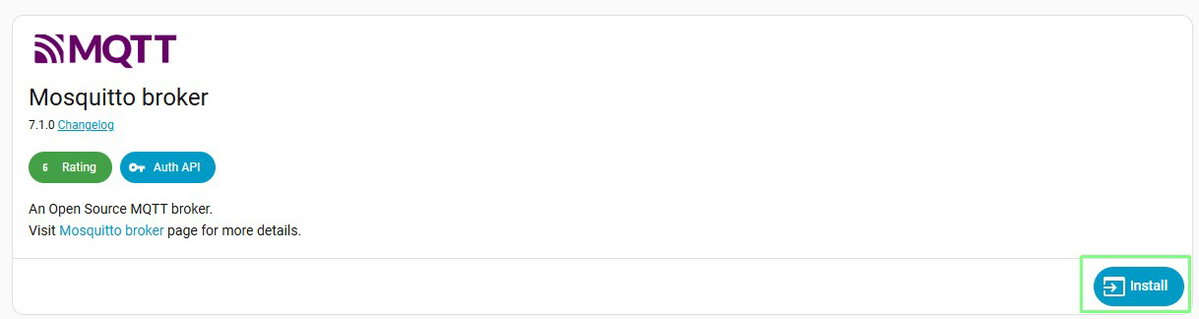
- Search for Mosquitto and click to open the app page.
- Click on Install.
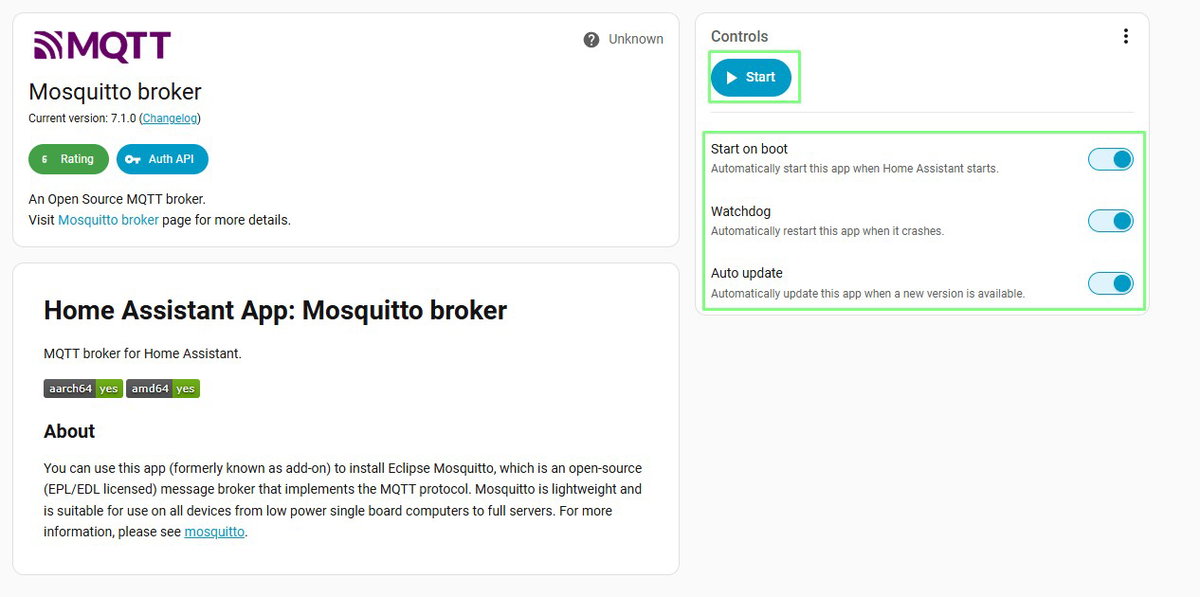
- Set Mosquitto to start on boot, run a watchdog (to restart if it crashes) and to auto-update. Then click on Start to activate the Mosquitto MQTT broker.
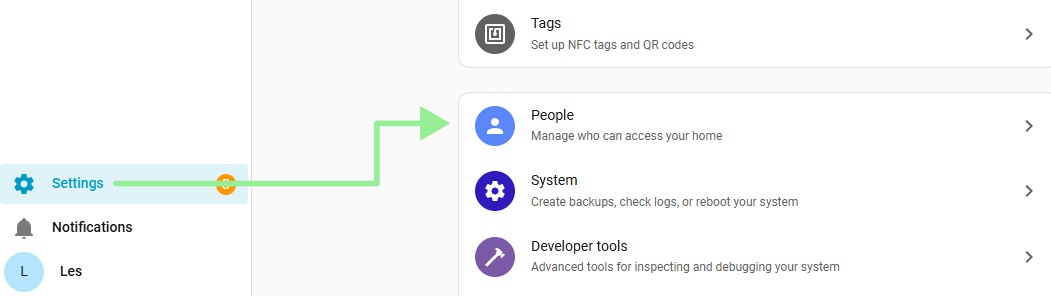
- Now go to Settings >> People.
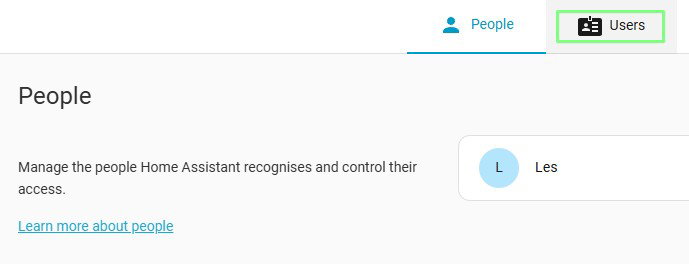
- Click on Users tab.
- Click on Add User button

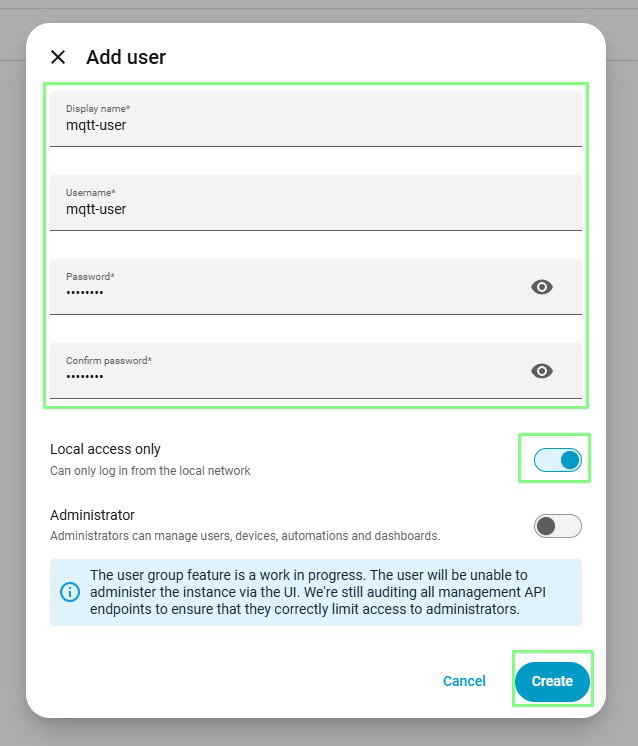
- Create a new mqtt-user and give the account a strong password. Set the user to have local access. Click Create when done.
- Click on Settings and look to the top right of the screen for three dots. Click there and select
Restart Home Assistant. Doing this ensures that our changes are freshly updated and ready for use.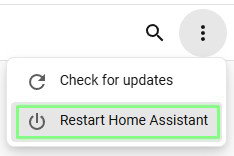
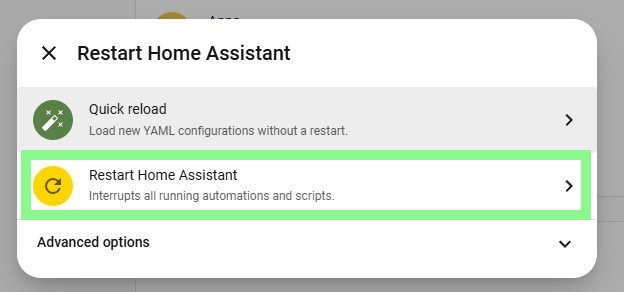
- Select a full restart of Home Assistant. Wait for the restart to finish before moving on. This can take a couple of minutes.
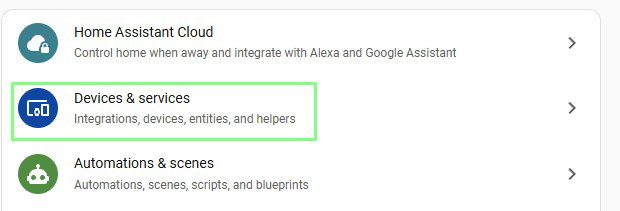
- Click on Settings >> Devices & Services.
- Click on Add. Home Assistant will automatically discover MQTT.
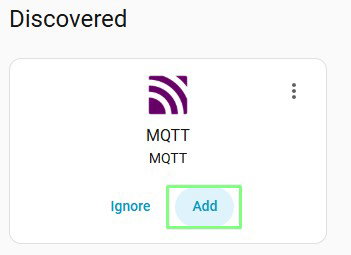
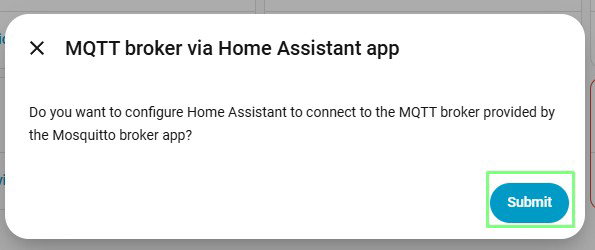
- Click on Submit to automatically configure the MQTT broker. Click Finish when prompted.
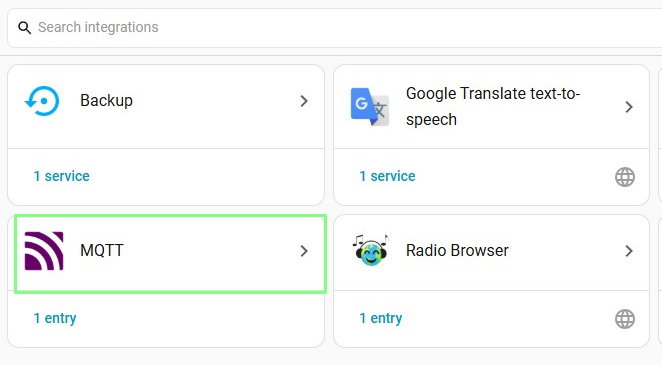
- Click on Settings >> Devices & Services and then MQTT.
- Click on the three dots and select Reconfigure.
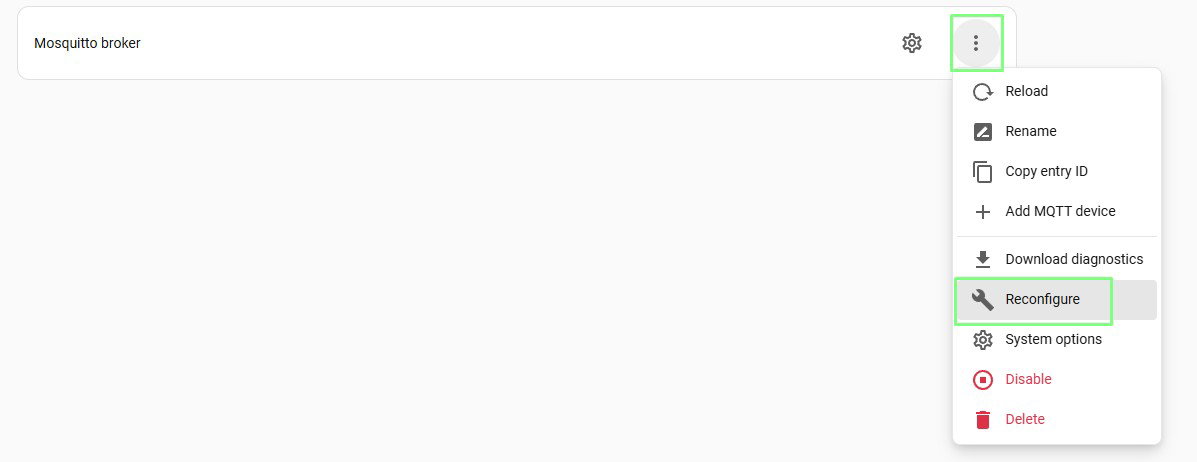
- Change the MQTT username and password to the user account that we created earlier and then click Submit.
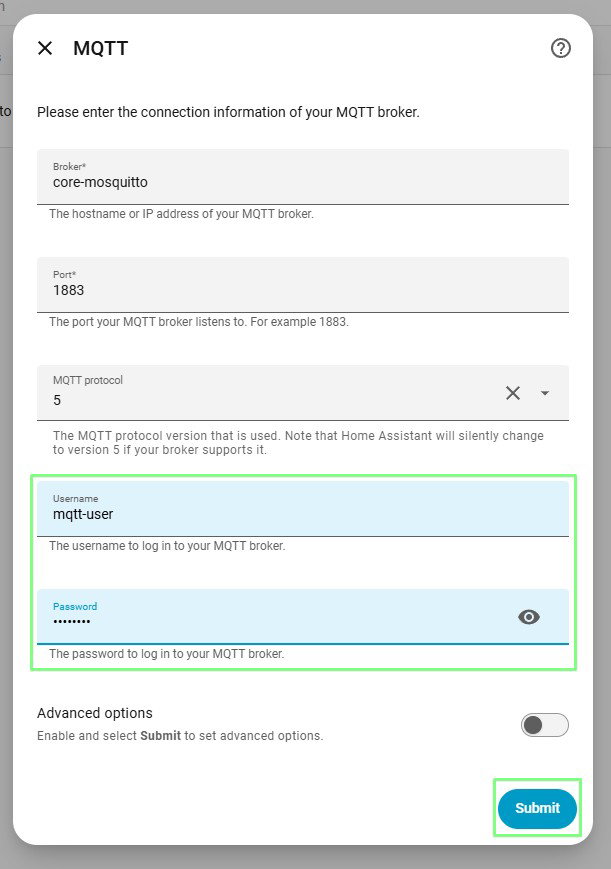
MQTT is now configured and ready for use. Now let's turn our attention to setting up our Zigbee devices.
Connecting a Zigbee Device to Home Assistant
There are two main Zigbee devices in this project.
- Sonoff Zigbee Smart Plugs which will be used to control power sockets and to read power consumption.
- Sonoff Zigbee Wireless Switch which is our doorbell.
Both of these will need to be connected to our Home Assistant setup before we can build the project.
- Connect your Zigbee device to a power source and it will enter pairing mode. This is the default behaviour when first using a Zigbee device. If the device doesn't enter pairing mode, follow the guide for your Zigbee device to start pairing mode. Typically this is a long press of a button. If the device has been used before, its entry will need to be deleted in Home Assistant before pairing can occur.
- Open Home Assistant in a browser window and click on
+ >> Add Device. The+is found in the top right corner of the window.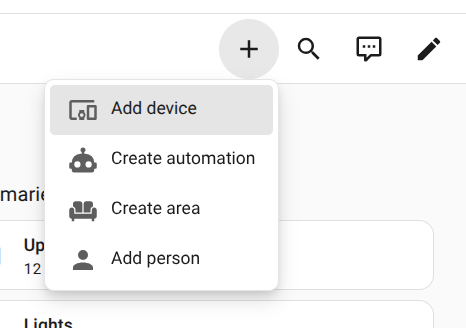
- Select
Add Zigbee device. This will start a search for any Zigbee devices which are in pairing mode.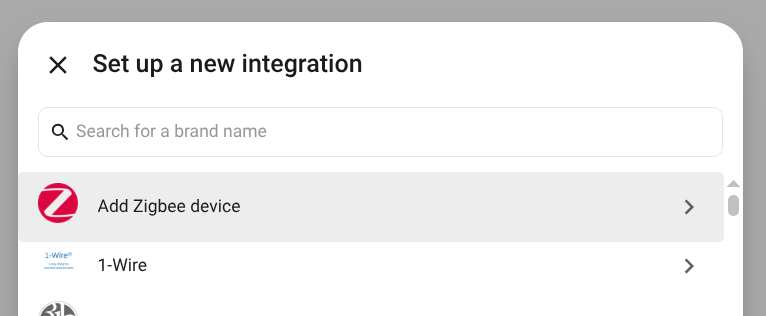
- The Zigbee interview process will start and in a short while your device will be ready for use. The Interview process is where Home Assistant determines what features (entities) the Zigbee device has. At this step, you can optionally give the device a unique name and place it in an area. When done, click on the left arrow next to
Add device.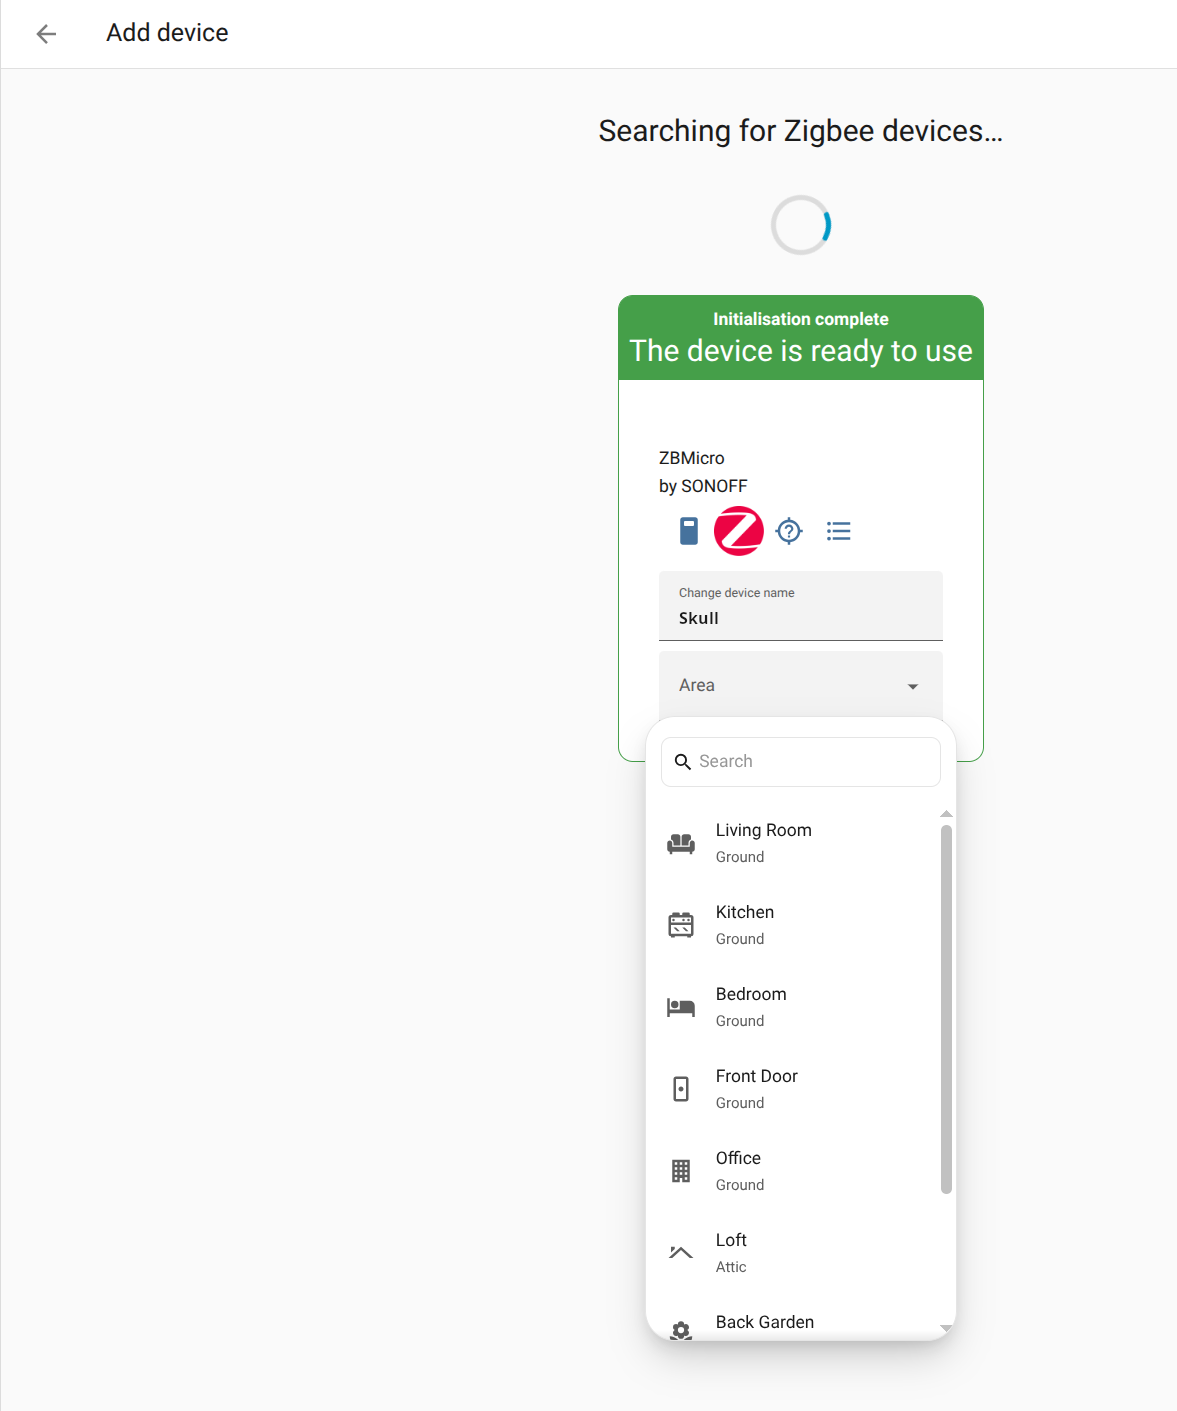
Repeat this process for all of the Zigbee devices that you wish to connect. Our next task is to trigger the device on / off using a specially crafted MQTT message.
Controlling a Zigbee Device Using MQTT
We're going to create automations to turn the Sonoff Smart Plugs on and off. You will need to repeat these steps for all of the smart plugs and other Zigbee devices that you wish to control.
- Click on
+ >> Create automation. The+is found in the top right corner of the window.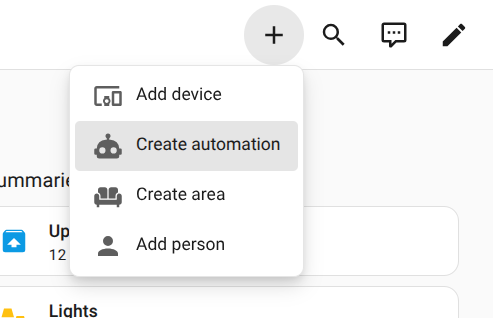
- Select
Create new automationfrom the list.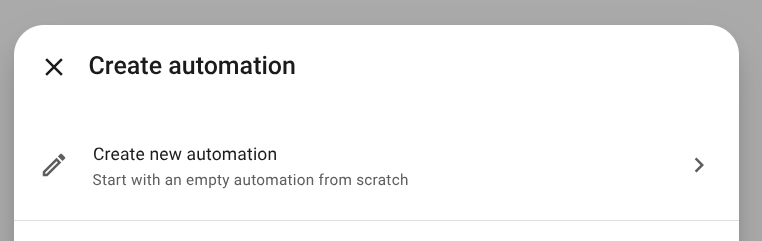
- Under When, click on
+ Add Trigger.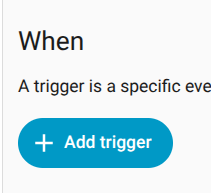
- Click on
Type, then select MQTT from the list. Then selectMQTT message received.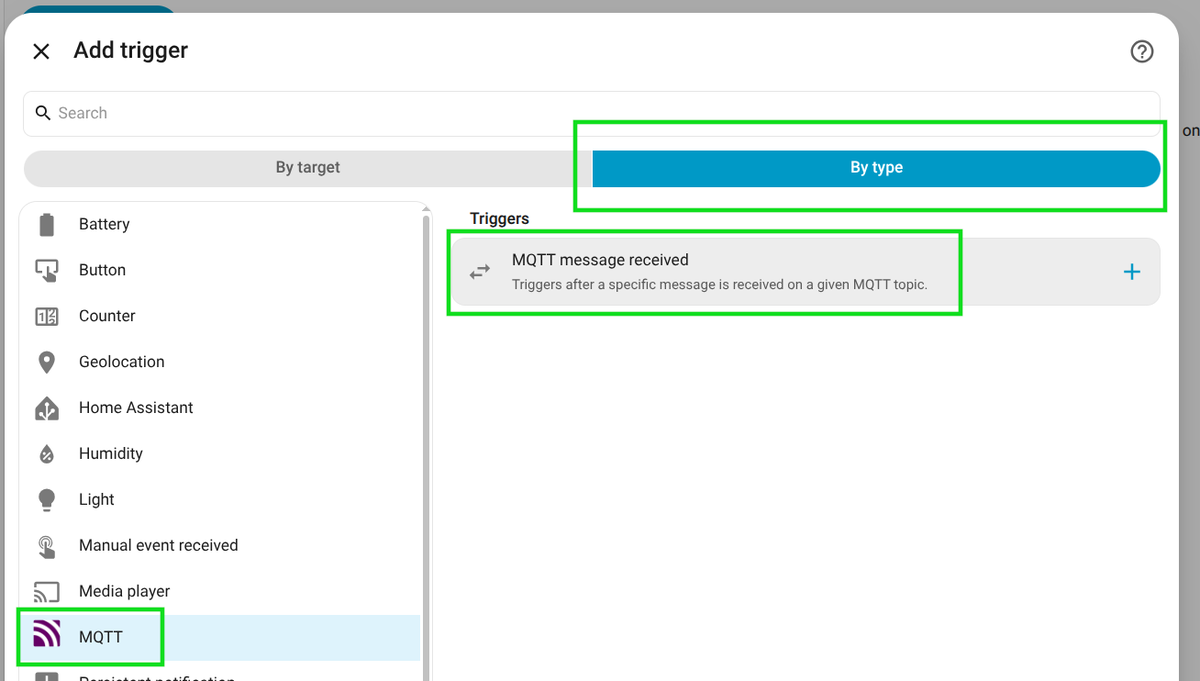
- Set the Payload to
ONand the Topic tooffice/skull. An illuminated skull was a recent discount store purchase, which is now connected to a smart plug.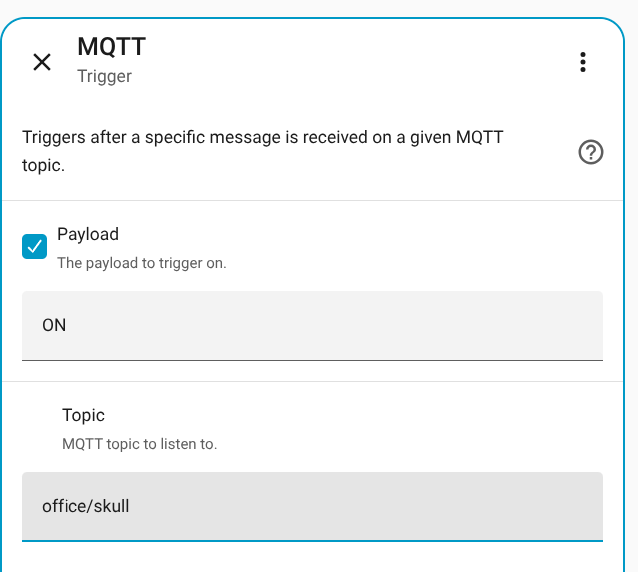
- Under Then, click on
+ Add action.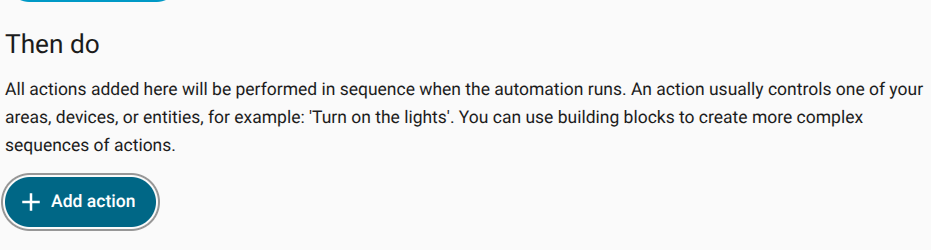
- Click on
By targetand then select the location and the device that you want to control. Then, selectTurn on switch. This will turn on power to the skull device.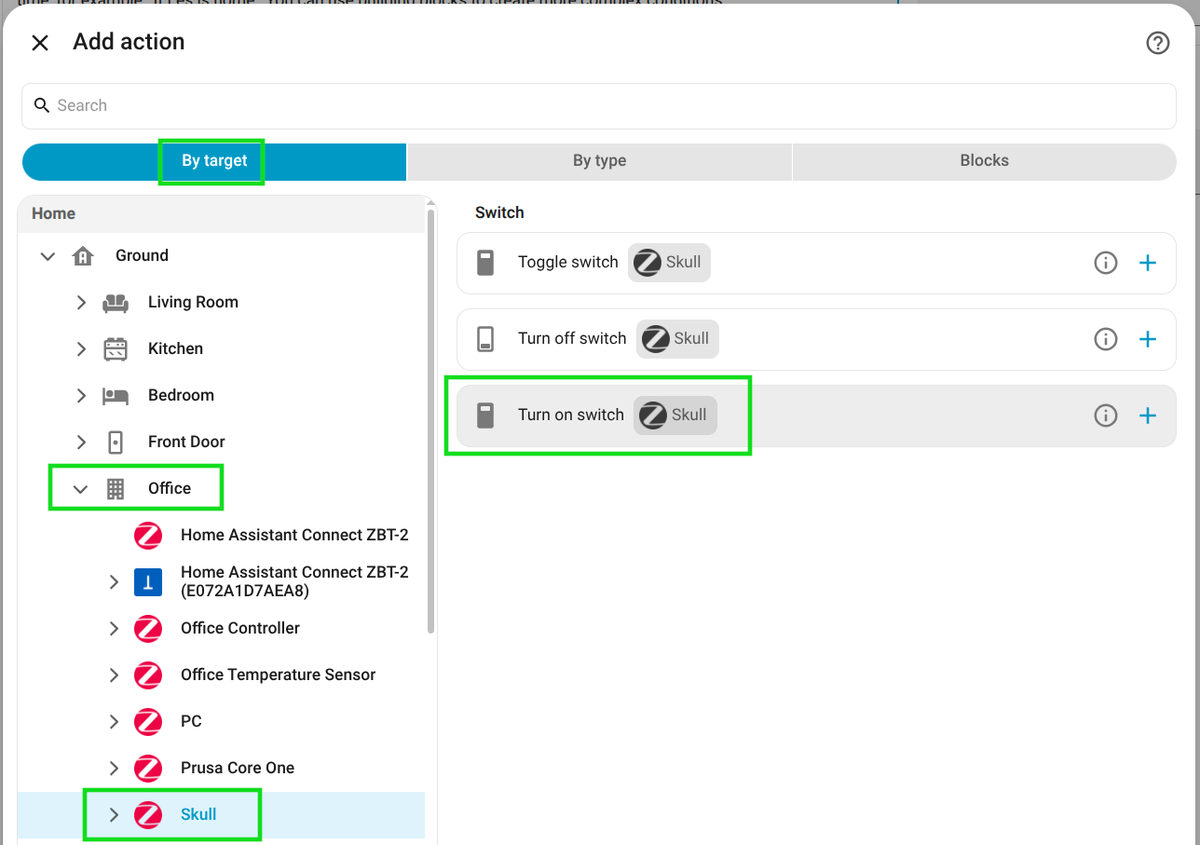
- At the bottom of the screen, click on
Saveand in the new dialog give the automation a clear name and click onAdd areaand set the location of the device. Finally, click onSave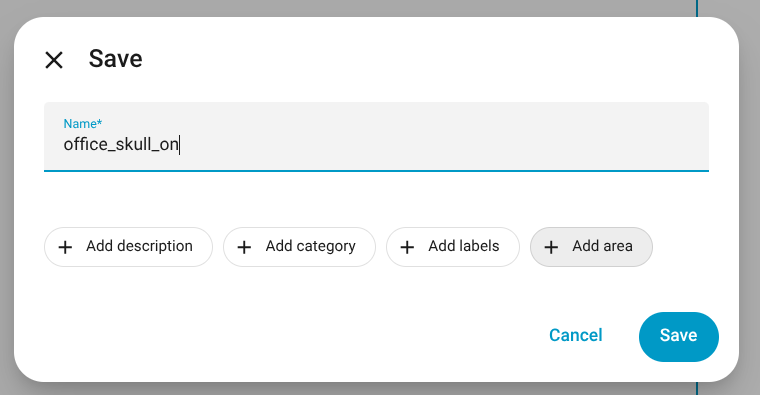
- Repeat this process with the same topic but this time use
Turn off switchand set the payload toOFFto turn off the device.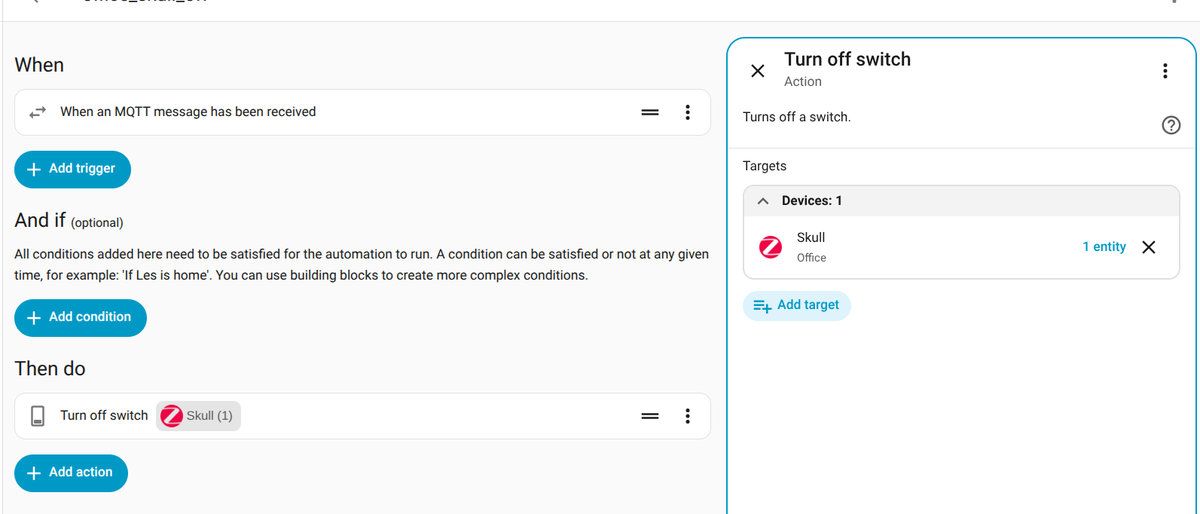
Live Power Details Over MQTT
Our Presto Home Assistant app will have buttons that control Sonoff Zigbee Smart Plug sockets, turning them on / off. But we also want to see how much power a socket is consuming. To do that we need to tell Home Assistant to send data via MQTT. Presto will be configured to listen for a specific topic for each socket and that will provide the power usage text for that button.
Below is a matrix for our Presto Home Assistant controller setup for three Sonoff sockets that will report power usage to the Presto app.
| Button Name | Sensor Name | MQTT Power Topic |
|---|---|---|
| PC | sensor.pc_power | home/devices/pc/power |
| Prusa | sensor.prusa_core_one_power | home/devices/prusa/power |
| Workbench | sensor.workbench_power | home/devices/workbench/power |
You will need to change the name of the button / sensor / power topic according to how you have configured your Home Assistant set up.
Click on
+ >> Create automation. The+is found in the top right corner of the window.Select
Create new automationfrom the list.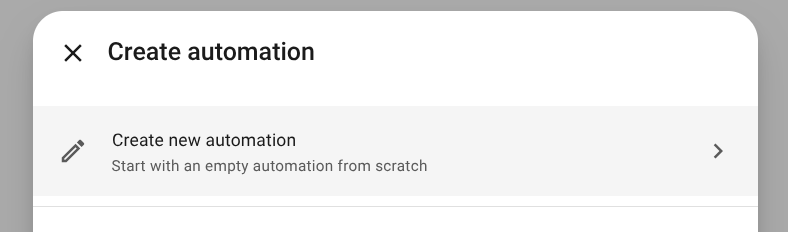
Under When, click on
+ Add Trigger.Select
By target >> Timeand then selectTime pattern.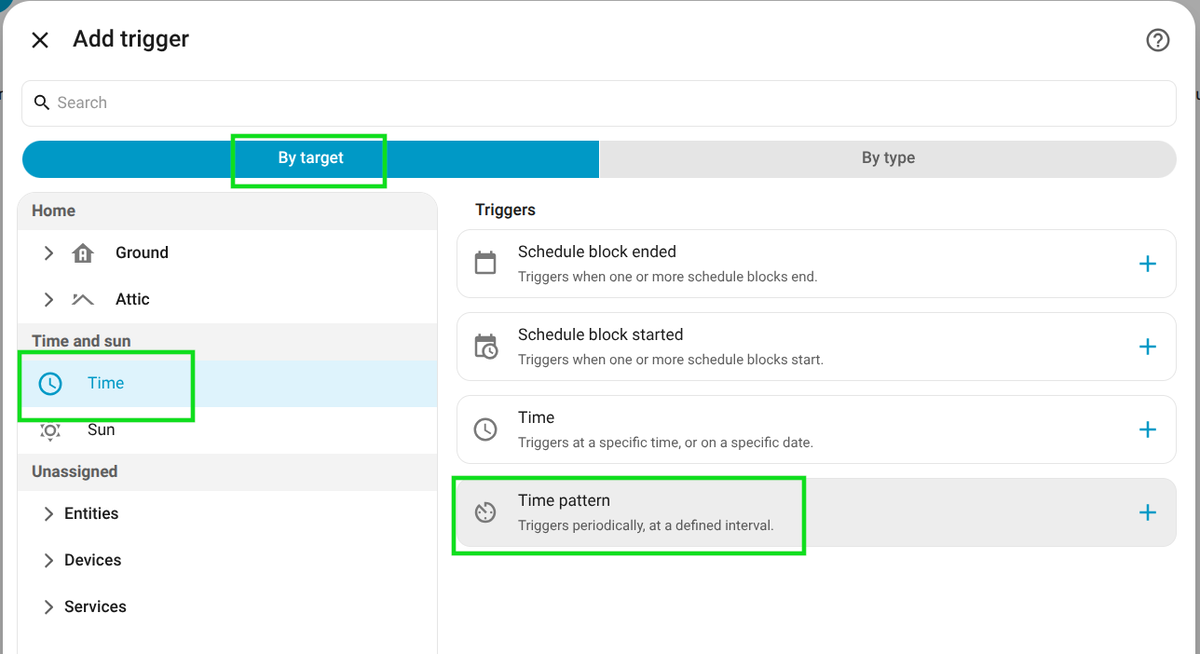
Set the trigger to happen every 10 seconds using
/10in theSecondsfield. Notice how the text underWhenchanges to show how often the trigger will action.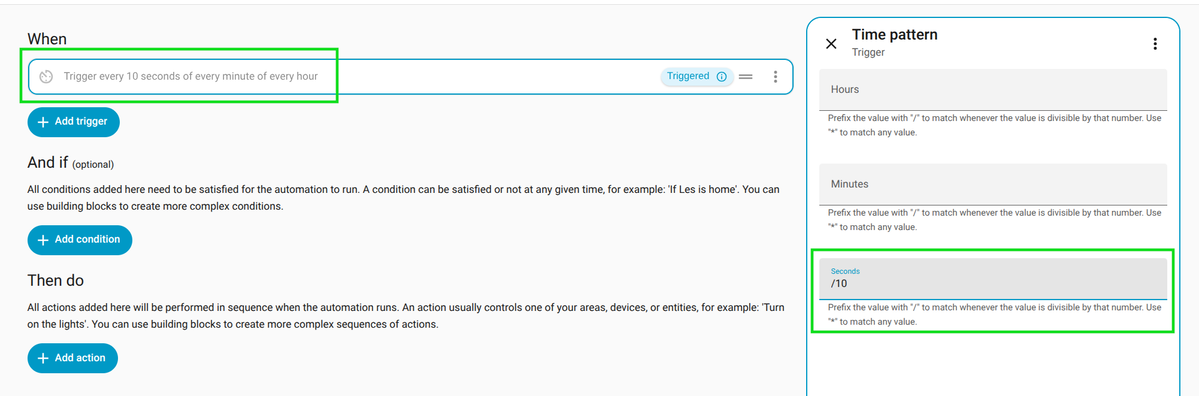
Under
And ifclick onAdd condition.
Select
By typeand then scroll down toTemplateand then selectTemplate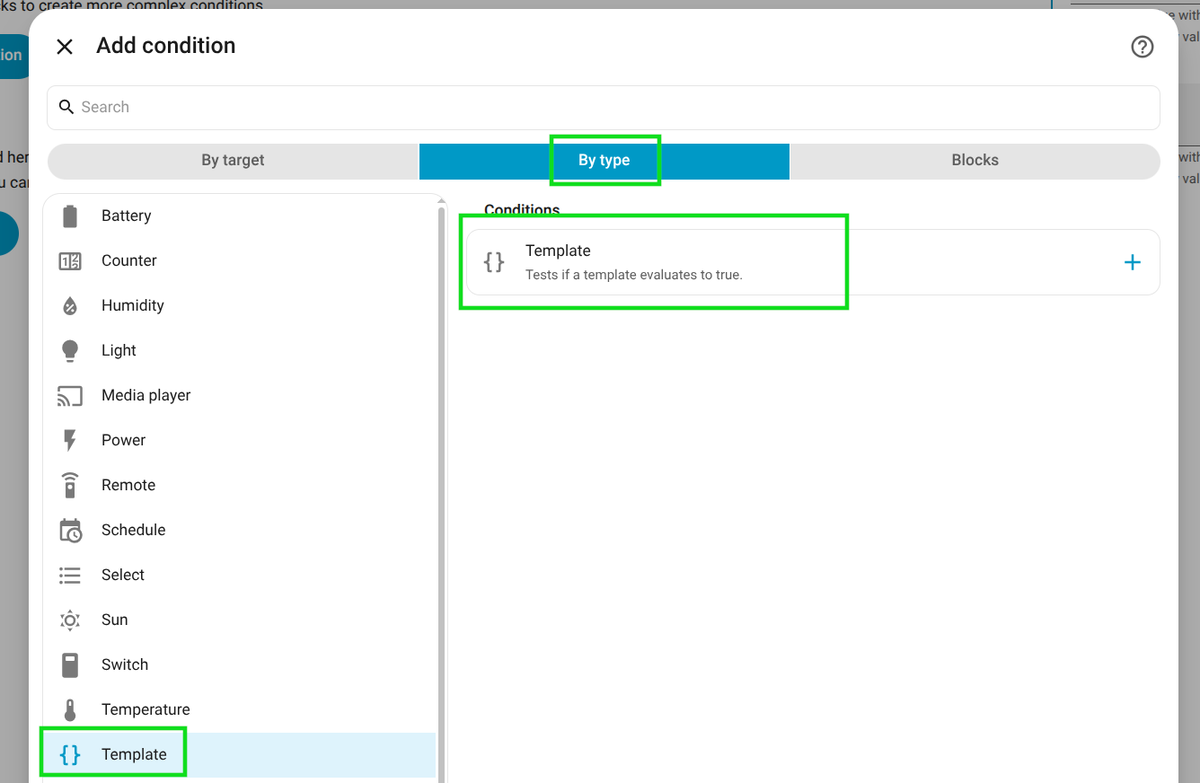
Add this code to the template. Note: This is for reading the sensor inside my PC Zigbee device, which is a Sonoff Zigbee Smart Plug (Type G). You may need to change this to reflect your setup and device names. My PC socket is called
PCand we are using thesensorto read thepower. If you start typing the name of the device,sensor.pc_then the editor will suggest suitable targets.{{ states('sensor.pc_power') not in ['unknown', 'unavailable', 'none'] }}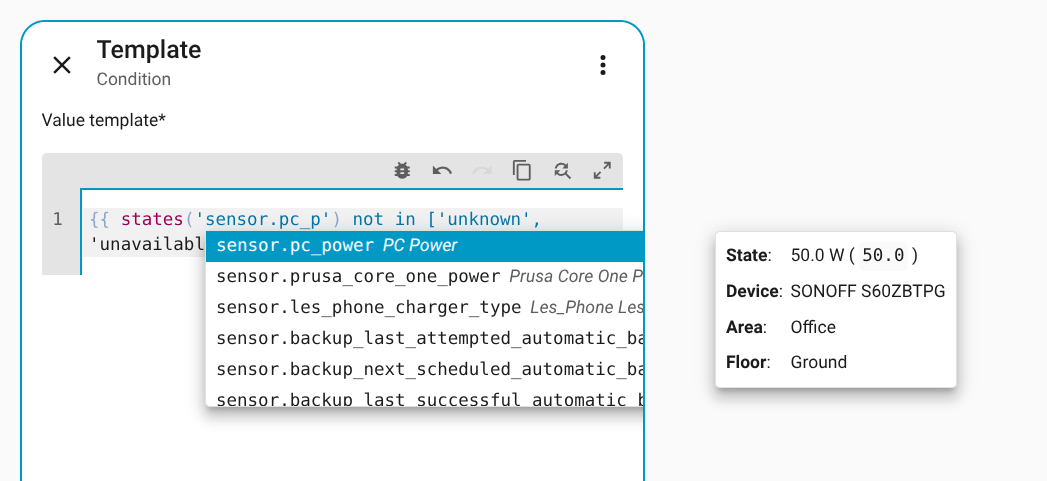
Click on
Add action.
Select
By Typeand scroll down toMQTTand then selectMQTT: Publish.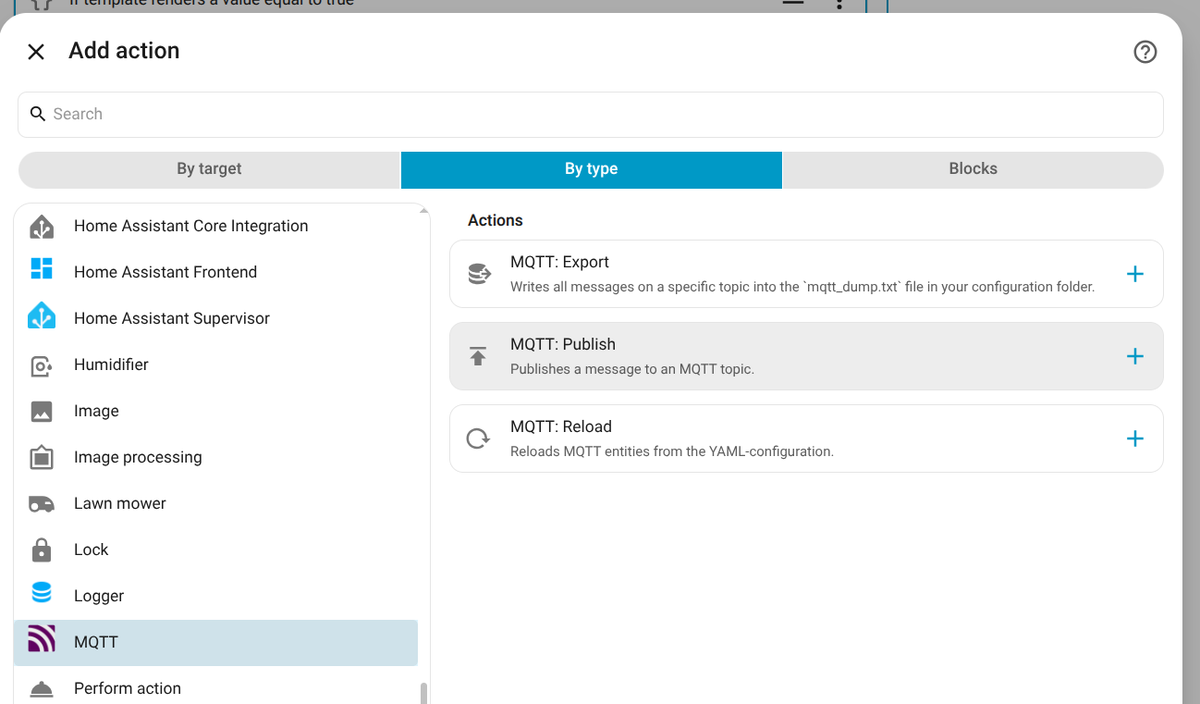
Set the topic to be
home/devices/pc/powerand set the payload to the code below. The payload is the Sonoff Zigbee Smart Plug's power sensor data, rounded to one decimal place. The topic is the channel where our subscriber (Presto) is waiting to hear via the broker. Changehome/devices/pc/powerandsensor.pc_powerto the names of the devices that you are using.{{ states('sensor.pc_power') | float(0) | round(1) }}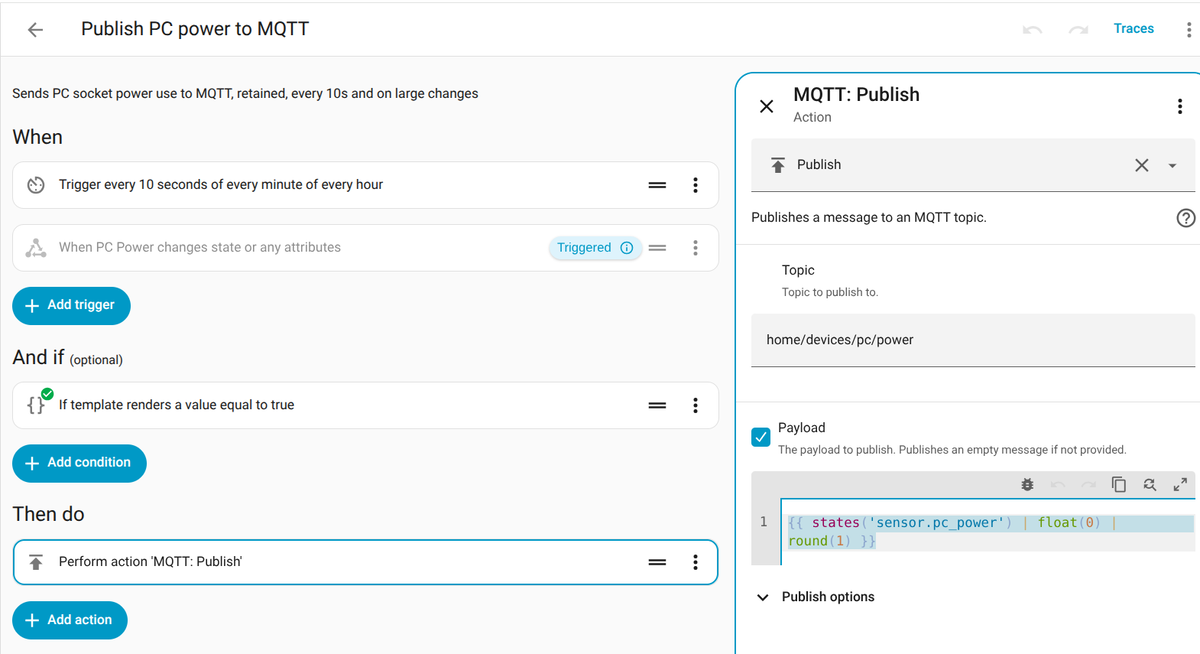
Select
Saveand give your automation a clear and relevant name, description and assign it an area before clickingSave.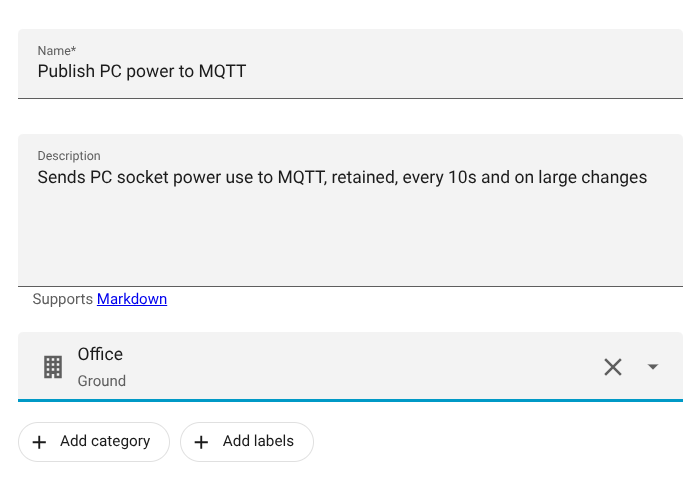
Repeat these steps for any other sockets that you wish to monitor.
Adding a Doorbell
The doorbell is a Sonoff Zigbee Wireless Switch inside of a handy 3D printed case. When the doorbell is pressed, it will send a Zigbee signal to Home Assistant Green, which will then trigger an MQTT message to be published. Presto will be subscribed to the doorbell topic and will react accordingly.
We're going to assume that you have already followed the steps in Connecting a Zigbee Device to Home Assistant and that your Sonoff Zigbee Wireless Switch is ready to be used. If not, go back and do so.
- Click on Settings >> Devices & Services.

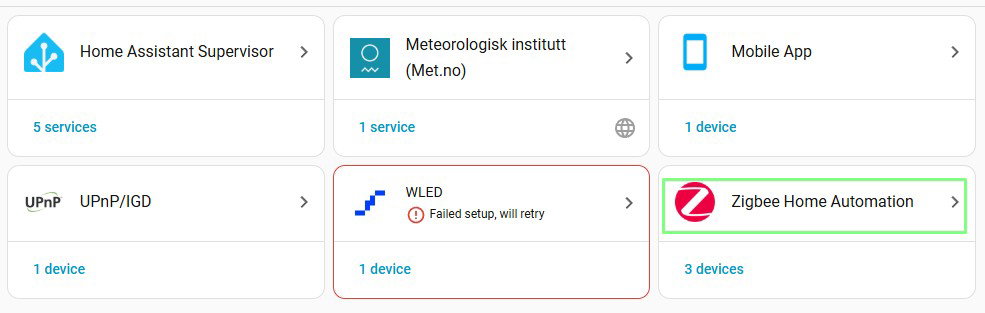
- Select Zigbee Home Automation.
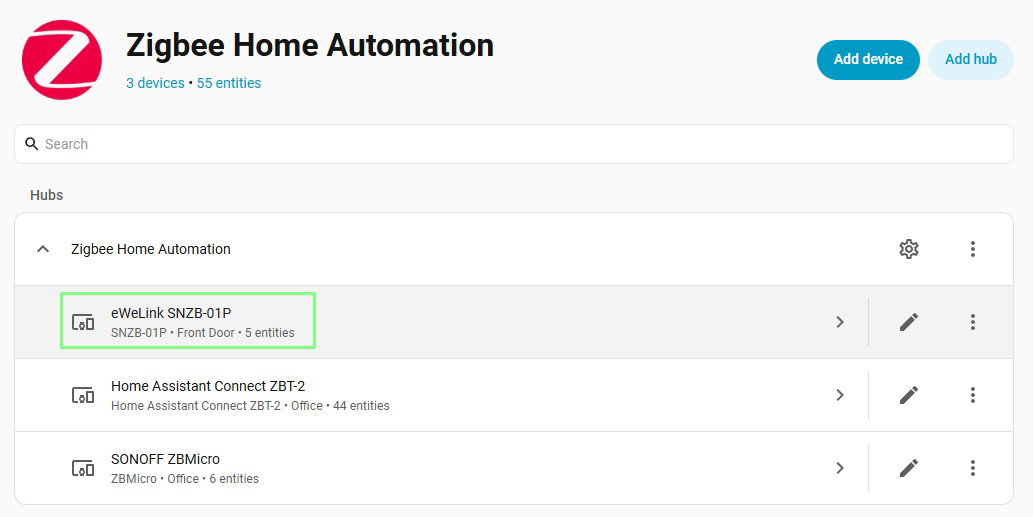
- Select the eWeLink SNZB-01P (Sonoff SNZB-01P) button.
- Under Related, click on Add to.
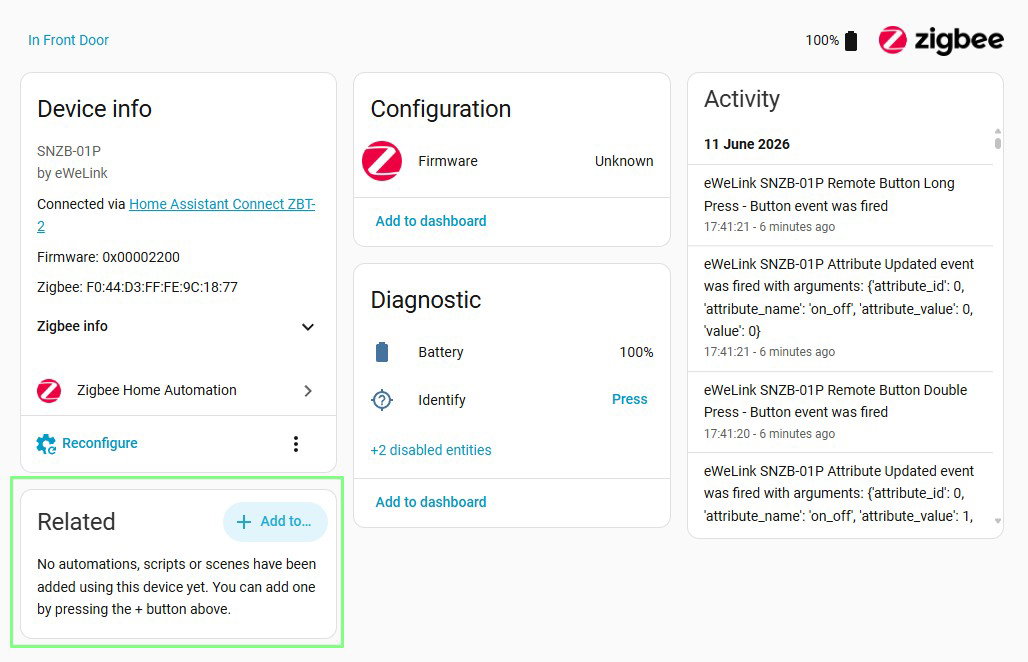
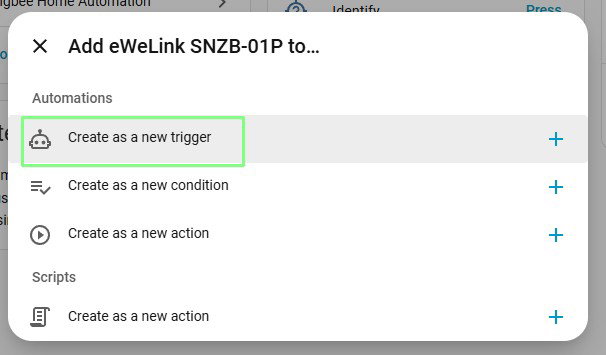
- Click on Create a New Trigger. In Home Assistant parlance, this is called an Automation.
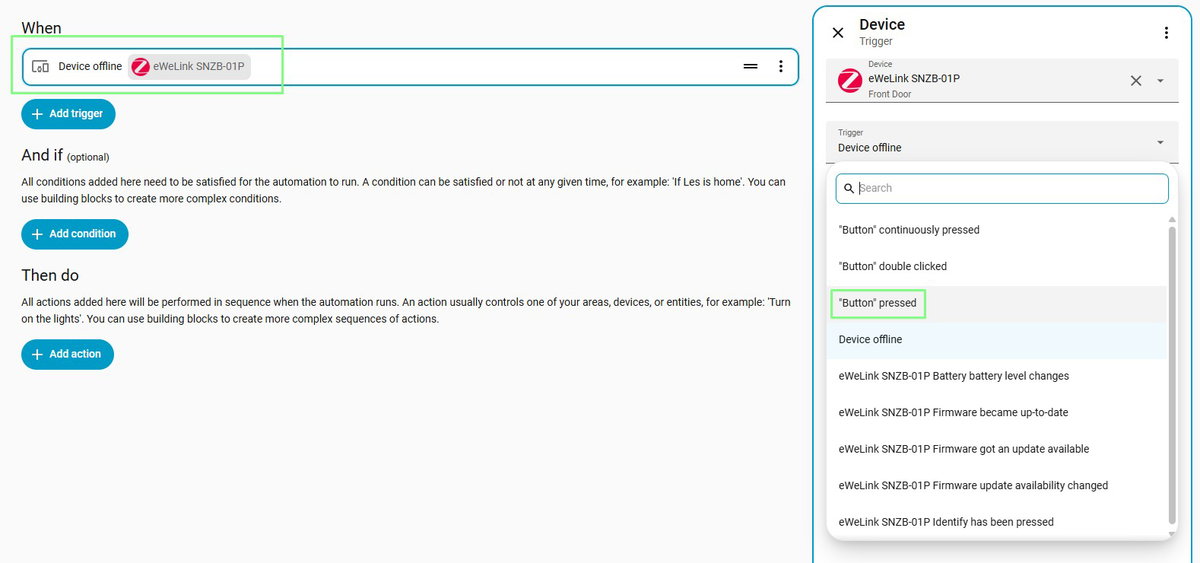
- Set "When" the button is pressed.
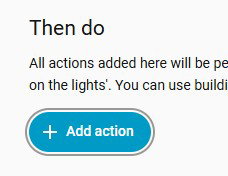
- Click on Add Action which is under "Then Do".
- Scroll down the list to MQTT and select MQTT Publish
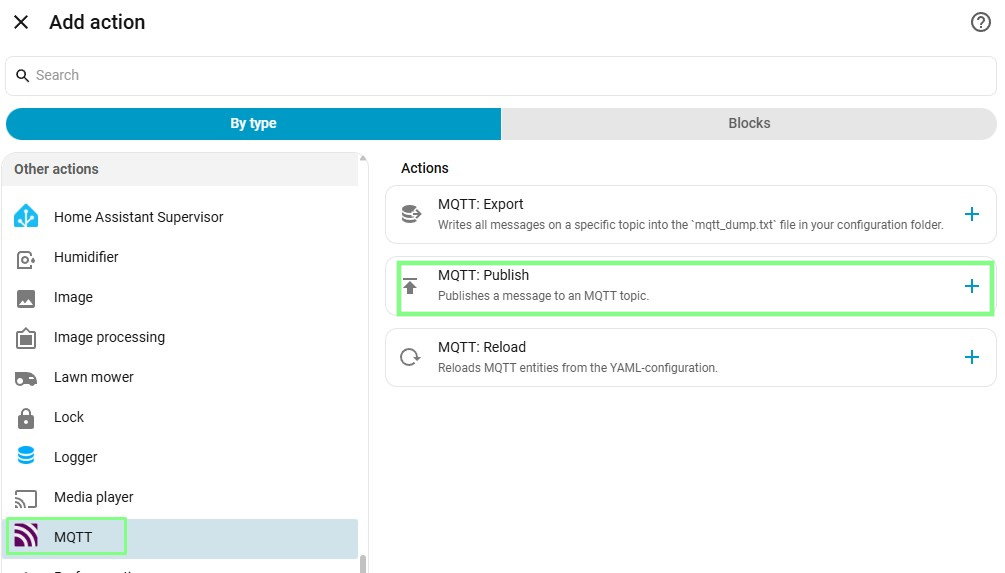
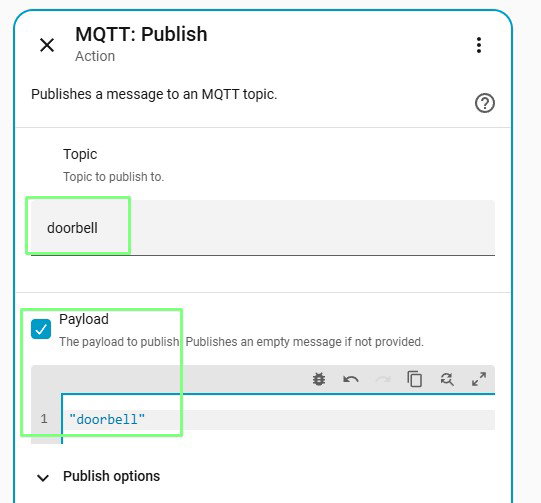
- Set the topic to doorbell and the payload to doorbell. Click on Save.
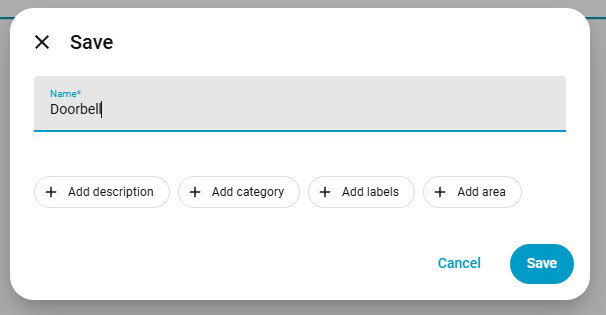
- Name the automation "Doorbell" and click Save.
That is all of the MQTT broker setup complete. We have a device, our Sonoff button, which when pressed will trigger Home Assistant to publish an MQTT message to the broker.
Writing The Code
Before we can write any project code, we first need to edit a file called secrets.py.
This file contains all of our secret information, passwords, API keys, Wi-Fi credentials.
The file lives in the root of Presto's file system and it should not be shared or placed in a public version control system.
In Thonny, click on
File >> Openand selectRaspberry Pi Pico.Select
secrets.py.Tweak the file to have four constants for your
WIFI_SSID,WIFI_PASSWORD,MQTT_USERNAMEandMQTT_PASSWORD.WIFI_SSID = "YOUR WIFI AP SSID" WIFI_PASSWORD = "YOUR WI-FI PASSWORD" MQTT_USERNAME = "YOUR MQTT USERNAME FROM HOME ASSISTANT" MQTT_PASSWORD = "YOUR MQTT PASSWORD FROM HOME ASSISTANT"Click on
File >> Saveto save thesecrets.pyto Presto.In a new blank file, start with three lines that create an icon, name and description that are displayed on Presto's launcher.
# ICON lightbulb
# NAME Home Assistant Controller
# DESC Control your smart home
Import a series of modules (pre-written code) to add the following features to the code.
- Presto: This module enables us to control and communicate with Presto.
- Umqtt: A simplified MQTT client that we will use to publish and subscribe on the MQTT network.
- Time: Used to control the pace of the code using delays.
- Gc: Garbage collection, used when closing the app or when it hits an exception.
- Network: Enables Presto to connect to Wi-Fi.
- Secrets: A file that contains usernames and passwords that we don't want to hard code.
from presto import Presto, Buzzer
from umqtt.simple import MQTTClient
import time
import gc
import network
import secrets
Create variables to use Presto, its display, touchscreen and buzzer.
presto = Presto(full_res=True)
display = presto.display
touch = presto.touch
buzzer = Buzzer(43)
Store the screen width and height in constants. These values will not change, during the operation of the code, so using constants makes sense. Constants are set once and then used, but never updated. Unlike variables, which can be set and updated during the operation of the code.
WIDTH, HEIGHT = display.get_bounds()Generate a series of constants for colours used in the app. These are used to create buttons and backgrounds in the app.
BG    = display.create_pen(20, 24, 32)
WHITE = display.create_pen(255, 255, 255)
GREY  = display.create_pen(60, 60, 60)
RED   = display.create_pen(170, 40, 40)
GREEN = display.create_pen(30, 170, 70)
AMBER = display.create_pen(230, 160, 20)
Create constants for the Wi-Fi SSID and password for your router. These constants are generated from their respective entries in
secrets.py.SSID = secrets.WIFI_SSID PASSWORD = secrets.WIFI_PASSWORDConfigure MQTT using constants for the broker, port, client-id, username and password. The broker is the device running an MQTT service. In this case it is a Home Assistant Green. The broker constant can use the URL or IP address of the broker. If there are issues connecting to the URL, use the IP address. The port is typically
1883but this can be tweaked according to your own setup. The client id must be unique, otherwise errors will occur. The MQTT username and password are those that were set up in the Home Assistant MQTT service. TheDOORBELL_TOPICis the channel that the publisher sends messages to via the broker. The subscriber (Presto) waits for new messages on this channel.MQTT_BROKER = "homeassistant.local" MQTT_PORT = 1883 CLIENT_ID = "presto-office" MQTT_USERNAME = secrets.MQTT_USERNAME MQTT_PASSWORD = secrets.MQTT_PASSWORD DOORBELL_TOPIC = b"doorbell"Create constants for the doorbell button. The button flash animation runs for 15 seconds, 15,000 milliseconds and flashes at 500ms. This gives us a clear on-screen indication that the doorbell has been pressed.
RING_MS = 15000 FLASH_MS = 500Create the doorbell tone and set the duration for which it plays. A middle C is approximately 261 Hz, and it has enough presence to be clearly heard, without becoming shrill. The duration of 100ms is used for the duration of the beep, creating a pleasant ringing sound.
BEEP_HZ = 261 BEEP_MS = 100Use a list,
SWITCHESto store the name of each on-screen button, and its MQTT topic. TheROUTERandSPEAKERSbuttons are placeholders, change these as you see fit. The button name and MQTT topic are stored as tuples that are collected inside the list.SWITCHES = [ ("PC", b"office/pc"), ("PRUSA", b"office/prusa"), ("WORKBENCH", b"office/workbench"), ("DOORBELL", DOORBELL_TOPIC), ("BANANA", b"office/banana"), ("SKULL", b"office/skull"), ("ROUTER", b"office/router"), ("SPEAKERS", b"office/speakers"), ]Create two payloads. One for
on, the other,off. Payloads are the messages sent to an MQTT topic. We're using them to turn devices on / off.PAYLOAD_ON = b"ON" PAYLOAD_OFF = b"OFF"Use a constant,
DOUBLE_TAP_MSto set the delay window to double tap a button. Each of the buttons requires a double tap to turn on / off, and 600ms (0.6 seconds) is just long enough to read the double tap. Why is there a double tap? Because we don't want to accidentally turn off a device if we press the wrong button.DOUBLE_TAP_MS = 600Create a
statesdictionary to record the state of each button. This can be True (on), False (off) or None.states = {topic: None for _, topic in SWITCHES}Create a dictionary to store the sockets for which we want to monitor the power. In the office, we have three sockets, PC, Prusa and Workbench that we want to monitor the power consumption. These MQTT topics will enable the live power data to be read and used in the app.
POWER_TOPICS = { b"office/pc": b"home/devices/pc/power", b"office/prusa": b"home/devices/prusa/power", b"office/workbench": b"home/devices/workbench/power", }Store the latest power reading for each device in
POWER_TOPICS.watts = {topic: None for topic in POWER_TOPICS}Create a dictionary called "ring" and use it to store the doorbell alert status. This is
untilwhen idle, andphaseis used to flash the button using quick colour swaps between amber and grey.ring = {"until": None, "phase": 0}Create the columns and rows that will make up the button layout. Then set the gap for the top of the screen and the space around the buttons The height of the gap is 44 pixels and each button on the display has a 10 pixel buffer around it. This provides a clear distinction between the buttons.
COLS = 2 ROWS = 4 TOP = 44 GAP = 10Using basic maths skills we calculate the button width
BTN_Wand heightBTN_H.BTN_W = (WIDTH - GAP * (COLS + 1)) // COLS BTN_H = (HEIGHT - TOP - GAP * (ROWS + 1)) // ROWSSet the status text and colour before they are used. The "Starting..." text is used when the app first starts up.
status = "Starting..." status_pen = AMBERCreate a function
button_rect()that turns a button’s number into its position in the grid. The buttons fill left to right, then down. The same function is also used for drawing and working out which button was touched, so the two always match.def button_rect(i): col = i % COLS row = i // COLS return (GAP + col * (BTN_W + GAP), TOP + GAP + row * (BTN_H + GAP), BTN_W, BTN_H)Create a function to control the buzzer's tone and duration. This uses the
BEEP_HZandBEEP_MSto set the tone (middle C, 261 Hz) and the duration (100ms).def beep(): buzzer.set_tone(BEEP_HZ) time.sleep(BEEP_MS / 1000) buzzer.set_tone(0)Another function, this time it controls the seven RGB LEDs on the rear of Presto. This will set the LEDs to amber when the doorbell is pushed.
def set_leds(r, g, b): for n in range(7): presto.set_led_rgb(n, r, g, b)Create a function,
draw()to handle the following tasks.- At the top of the screen, clear to the background colour and write the status line.
- Work out the colour and state text for each button.
- For the doorbell button if the doorbell has been pressed, set the button colour to amber and grey. This creates the flashing effect. If idle, it shows a dark grey button with
Readytext. - For every other button, the colour green means the device is on, and red means off. Grey is used if the status is unknown.
- Draw the button rectangle and the device name in the centre.
- Power topic buttons show Watts to one decimal place and the device's state (on, off). If there is no data, it displays
-- W. - The entire screen is updated to show the data.
def draw(): display.set_pen(BG) display.clear() display.set_pen(status_pen) display.text(status, GAP, 8, WIDTH - 2 * GAP, 3) for i, (name, topic) in enumerate(SWITCHES): x, y, w, h = button_rect(i) if topic == DOORBELL_TOPIC: if ring["until"] is not None: colour = AMBER if ring["phase"] else GREY state = "RINGING!" else: colour = GREY state = "Ready" else: on = states[topic] colour = GREEN if on else RED if on is False else GREY state = "ON" if on else "OFF" display.set_pen(colour) display.rectangle(x, y, w, h) display.set_pen(WHITE) display.text(name, x + (w - display.measure_text(name, 3)) // 2, y + h // 2 - 24, w, 3) if topic in POWER_TOPICS: w_val = watts[topic] state += " " + (f"{w_val:.1f} W" if w_val is not None else "-- W") display.text(state, x + (w - display.measure_text(state, 2)) // 2, y + h // 2 + 6, w, 2) presto.update()Update the status line at the top of the screen and redraw.
def set_status(text, pen=WHITE): global status, status_pen status = text status_pen = pen draw()Create a function to handle when the doorbell is pressed. This function will set the deadline
RING_MSfrom the time the button is pressed. Then it sets the phase to amber which turns the LEDs on the rear of Presto amber and shows “Doorbell!” at the top of the screen.def start_ring(): was_amber = ring["until"] is not None and ring["phase"] == 1 ring["until"] = time.ticks_add(time.ticks_ms(), RING_MS) ring["phase"] = 1 set_leds(230, 160, 20) set_status("Doorbell!", AMBER) if not was_amber: beep()Create a function to handle the end of ringing the doorbell. This will clear the deadline, and swap the "Doorbell!" status text at the top of the screen for "Connected". The LEDs and onscreen Doorbell button are reset to their defaults.
def end_ring(): was_amber = ring["phase"] == 1 ring["until"] = None ring["phase"] = 0 set_leds(0, 0, 0) set_status("Connected", GREEN) if was_amber: beep()Use a function to connect to Wi-Fi. This function takes arguments for the Wi-Fi SSID and password. It creates an object,
wlanthat is used to communicate with the Wi-Fi chip and make a connection to our Wi-Fi router. It handles timeout errors, and will keep trying to connect every 0.5 seconds for 20 seconds. For debug purposes, it prints the connection details to the Python shell.def connect_wifi(ssid, password, timeout=20): wlan = network.WLAN(network.STA_IF) wlan.active(True) if not wlan.isconnected(): wlan.connect(ssid, password) start = time.time() while not wlan.isconnected(): if time.time() - start > timeout: raise RuntimeError("WiFi timeout") time.sleep(0.5) print(f"Connected! IP: {wlan.ifconfig()[0]}") return wlanCreate a function that handles receiving messages and reacting accordingly. If the message is
DOORBELL_TOPICa message is printed to the Python shell for debug, before calling thestart_ring()function.def on_message(topic, msg): if topic == DOORBELL_TOPIC: print(f"Doorbell: {msg}") start_ring() returnStill inside the function, create a
forloop that iterates overPOWER_TOPICSentries. It rounds the returned values to one decimal place, and writes the values on the corresponding buttons. It also handles value errors by printing an error message to the Python shell.for sw_topic, power_topic in POWER_TOPICS.items(): if topic == power_topic: try: value = round(float(msg.decode()), 1) except ValueError: print(f"Bad power payload: {msg}") return if value != watts[sw_topic]: watts[sw_topic] = value draw()The
main()function is where we call the other functions to run the code. First we create aclientobject that handles the MQTT connection details. We also set the MQTT callback function, used when a message arrives, to call theon_message()function.def main(): client = MQTTClient( client_id=CLIENT_ID, server=MQTT_BROKER, port=MQTT_PORT, user=MQTT_USERNAME, password=MQTT_PASSWORD, ) client.set_callback(on_message)Inside a
try / finallystatement, connect to the MQTT broker, printing a success message to the Python shell. Then subscribe to theDOORBELL_TOPIC.try: client.connect() print(f"Connected to MQTT broker {MQTT_BROKER}") client.subscribe(DOORBELL_TOPIC) print(f"Subscribed to: {DOORBELL_TOPIC.decode()}")Using a
forloop, iterate over thePOWER_TOPICSitems and subscribe to the relevant power_topic value and then set_status to print a green "Connected" message to the top of the screen.for power_topic in POWER_TOPICS.values(): client.subscribe(power_topic) print(f"Subscribed to: {power_topic.decode()}") set_status("Connected", GREEN)Create three variables that are used to store the status of the touchscreen, which button was recently touched, and the last time that button was tapped.
was_touching = False last_tap_index = None last_tap_time = 0Using a
while Trueloop, check for any messages.while True: client.check_msg()Animate the doorbell button by swapping its colour for 15 seconds and playing the
beep()function. When the time is up, theend_ring()function is called.if ring["until"] is not None: remaining = time.ticks_diff(ring["until"], time.ticks_ms()) if remaining <= 0: end_ring() else: phase = (remaining // FLASH_MS) % 2 if phase != ring["phase"]: ring["phase"] = phase draw() beep()Check for touch input and locate where the touch was on the screen. Holding a finger on the screen will count as one touch. We have to remove the finger and press the screen again for a double tap. This section also handles cancelling the doorbell alert early. Touching the DOORBELL button while it is flashing will cancel the doorbell.
touch.poll() if touch.state and not was_touching: for i, (name, topic) in enumerate(SWITCHES): x, y, w, h = button_rect(i) if x <= touch.x < x + w and y <= touch.y < y + h: if topic == DOORBELL_TOPIC: # Indicator only: a tap just clears the alert if ring["until"] is not None: end_ring() breakGet the current time (in ticks) and save it to a variable called
now.now = time.ticks_ms()Use the current time and an
ifconditional test to check if the button has been double tapped. If so send the correct payload to turn the device on / off and then change the status text for the relevant button.if i == last_tap_index and time.ticks_diff(now, last_tap_time) < DOUBLE_TAP_MS: last_tap_index = None on = not states[topic] payload = PAYLOAD_ON if on else PAYLOAD_OFF client.publish(topic, payload) print(f"Sent {topic.decode()} {payload.decode()}") states[topic] = on set_status(f"{name} {'ON' if on else 'OFF'}", GREEN)Add an
elsecondition which will advise the user to double tap the buttons.else: last_tap_index = i last_tap_time = now set_status(f"Double tap {name}", AMBER)Break out of the loop, update the
was_touchingvariable with the current touch state, then pause for 0.02 seconds.break was_touching = touch.state time.sleep(0.02)End the
try / finallystatement, close the MQTT connection and then handle any errors when closing the connection.finally: try: client.sock.close() except Exception: passCall the
draw()function to update the screen.draw()Inside a
while Trueloop, usetryto set the text at the top of the screen to show "Wi-Fi", then connect to Wi-Fi. Next we update the text at the top of screen to show "MQTT..." and then call themain()function.while True: try: set_status("Wi-Fi...", AMBER) connect_wifi(SSID, PASSWORD) set_status("MQTT...", AMBER) main()Capture any exceptions and print them to the Python shell. We then use garbage collection to free-up memory before the code pauses for five seconds.
except Exception as e: print(f"Error: {e}") set_status("Retrying...", RED) gc.collect() time.sleep(5)Save the code to Presto as
HA-Controller.pyPress RESET on Presto and when it has rebooted, scroll to and select the Home Assistant Controller.
When Wi-Fi and MQTT are connected, the status text (top of screen) will show "Connected"
Double-tap the relevant buttons to control your devices. The buttons will all be grey until they are pressed. Buttons which are set to show power stats will show either a blank
-- Wor the real-time power consumption data.Ask someone to trigger your doorbell. You will see the
DOORBELLbutton flash, the LEDs will light-up and the buzzer will sound. You can touch the button to cancel the doorbell, or wait 15 seconds for it to automatically end.
Complete Code Listing
# ICON lightbulb
# NAME Home Assistant Controller
# DESC Control your smart home
from presto import Presto, Buzzer
from umqtt.simple import MQTTClient
import time
import gc
import network
import secrets
presto = Presto(full_res=True)
display = presto.display
touch = presto.touch
buzzer = Buzzer(43)
WIDTH, HEIGHT = display.get_bounds()
BG = display.create_pen(20, 24, 32)
WHITE = display.create_pen(255, 255, 255)
GREY = display.create_pen(60, 60, 60)
RED = display.create_pen(170, 40, 40)
GREEN = display.create_pen(30, 170, 70)
AMBER = display.create_pen(230, 160, 20)
SSID     = secrets.WIFI_SSID
PASSWORD = secrets.WIFI_PASSWORD
MQTT_BROKER = "homeassistant.local"
MQTT_PORT = 1883
CLIENT_ID = "presto-office"
MQTT_USERNAME = secrets.MQTT_USERNAME
MQTT_PASSWORD = secrets.MQTT_PASSWORD
# Doorbell button config.
# Lights up when any message is received on `doorbell` topic.
# Tapping the button clears the alert.
DOORBELL_TOPIC = b"doorbell"
RING_MS = 15000 # how long the button keeps flashing (ms)
FLASH_MS = 500 # flash speed (ms)
BEEP_HZ = 261 # buzzer pitch
BEEP_MS = 100 # buzzer beep length
# The buttons that appear on Presto's screen.
# One button per topic: (label, topic)
SWITCHES = [
    ("PC",        b"office/pc"),
    ("PRUSA",     b"office/prusa"),
    ("WORKBENCH", b"office/workbench"),
    ("DOORBELL",  DOORBELL_TOPIC),
    ("BANANA",    b"office/banana"),
    ("SKULL",     b"office/skull"),
    ("ROUTER",    b"office/router"),
    ("SPEAKERS",  b"office/speakers"),
]
PAYLOAD_ON  = b"ON"
PAYLOAD_OFF = b"OFF"
# Two taps on the same button within this time (ms) will publish the message via MQTT
DOUBLE_TAP_MS = 600
# Smart Plug status
# True = on, False = off, None = not known yet
states = {topic: None for _, topic in SWITCHES}
# Power consumption: Topic that reports its power draw in watts (plain number payload)
POWER_TOPICS = {
    b"office/pc":        b"home/devices/pc/power",
    b"office/prusa":     b"home/devices/prusa/power",
    b"office/workbench": b"home/devices/workbench/power",
}
watts = {topic: None for topic in POWER_TOPICS}
# Doorbell alert: "until" is a ticks_ms deadline (None = not ringing)
# "phase" 1 = button amber, 0 = button grey
ring = {"until": None, "phase": 0}
COLS = 2
ROWS = 4
TOP = 44
GAP = 10
BTN_W = (WIDTH - GAP * (COLS + 1)) // COLS
BTN_H = (HEIGHT - TOP - GAP * (ROWS + 1)) // ROWS
status = "Starting..."
status_pen = AMBER
def button_rect(i):
    col = i % COLS
    row = i // COLS
    return (GAP + col * (BTN_W + GAP),
            TOP + GAP + row * (BTN_H + GAP),
            BTN_W, BTN_H)
def beep():
    buzzer.set_tone(BEEP_HZ)
    time.sleep(BEEP_MS / 1000)
    buzzer.set_tone(0)
def set_leds(r, g, b):
    for n in range(7):
        presto.set_led_rgb(n, r, g, b)
def draw():
    display.set_pen(BG)
    display.clear()
    display.set_pen(status_pen)
    display.text(status, GAP, 8, WIDTH - 2 * GAP, 3)

    for i, (name, topic) in enumerate(SWITCHES):
        x, y, w, h = button_rect(i)

        if topic == DOORBELL_TOPIC:
            if ring["until"] is not None:
                colour = AMBER if ring["phase"] else GREY
                state = "RINGING!"
            else:
                colour = GREY
                state = "Ready"
        else:
            on = states[topic]
            colour = GREEN if on else RED if on is False else GREY
            state = "ON" if on else "OFF"

        display.set_pen(colour)
        display.rectangle(x, y, w, h)

        display.set_pen(WHITE)
        display.text(name, x + (w - display.measure_text(name, 3)) // 2, y + h // 2 - 24, w, 3)
        if topic in POWER_TOPICS:
            w_val = watts[topic]
            state += "  " + (f"{w_val:.1f} W" if w_val is not None else "-- W")
        display.text(state, x + (w - display.measure_text(state, 2)) // 2, y + h // 2 + 6, w, 2)
    presto.update()
def set_status(text, pen=WHITE):
    global status, status_pen
    status = text
    status_pen = pen
    draw()
def start_ring():
# Button goes amber: beep if that is a colour change
was_amber = ring["until"] is not None and ring["phase"] == 1
ring["until"] = time.ticks_add(time.ticks_ms(), RING_MS)
ring["phase"] = 1
set_leds(230, 160, 20)
set_status("Doorbell!", AMBER)
if not was_amber:
beep()
def end_ring():
# Button goes back to grey: beep if it was amber
was_amber = ring["phase"] == 1
ring["until"] = None
ring["phase"] = 0
set_leds(0, 0, 0)
set_status("Connected", GREEN)
if was_amber:
beep()
def connect_wifi(ssid, password, timeout=20):
    wlan = network.WLAN(network.STA_IF)
    wlan.active(True)
    if not wlan.isconnected():
        wlan.connect(ssid, password)
        start = time.time()
        while not wlan.isconnected():
            if time.time() - start > timeout:
                raise RuntimeError("WiFi timeout")
            time.sleep(0.5)
    print(f"Connected! IP: {wlan.ifconfig()[0]}")
    return wlan
def on_message(topic, msg):
    if topic == DOORBELL_TOPIC:
        print(f"Doorbell: {msg}")
        start_ring()
        return
    for sw_topic, power_topic in POWER_TOPICS.items():
        if topic == power_topic:
            try:
                value = round(float(msg.decode()), 1)
            except ValueError:
                print(f"Bad power payload: {msg}")
                return
            if value != watts[sw_topic]:
                watts[sw_topic] = value
                draw()
def main():
    client = MQTTClient(
        client_id=CLIENT_ID,
        server=MQTT_BROKER,
        port=MQTT_PORT,
        user=MQTT_USERNAME,
        password=MQTT_PASSWORD,
    )
    client.set_callback(on_message)
    try:
        client.connect()
        print(f"Connected to MQTT broker {MQTT_BROKER}")
        client.subscribe(DOORBELL_TOPIC)
        print(f"Subscribed to: {DOORBELL_TOPIC.decode()}")
        for power_topic in POWER_TOPICS.values():
            client.subscribe(power_topic)
            print(f"Subscribed to: {power_topic.decode()}")
        set_status("Connected", GREEN)
        was_touching = False
        last_tap_index = None
        last_tap_time = 0
        while True:
            client.check_msg()
# Doorbell Notification: Flash the doorbell button (beep on every colour change), stop after RING_MS
            if ring["until"] is not None:
                remaining = time.ticks_diff(ring["until"], time.ticks_ms())
                if remaining <= 0:
                    end_ring()
                else:
                    phase = (remaining // FLASH_MS) % 2
                    if phase != ring["phase"]:
                        ring["phase"] = phase
                        draw()
                        beep()
            touch.poll()
            if touch.state and not was_touching:
                for i, (name, topic) in enumerate(SWITCHES):
                    x, y, w, h = button_rect(i)
                    if x <= touch.x < x + w and y <= touch.y < y + h:
                        if topic == DOORBELL_TOPIC:
                            # Indicator only: a tap just clears the alert
                            if ring["until"] is not None:
                                end_ring()
                            break
now = time.ticks_ms()
if i == last_tap_index and time.ticks_diff(now, last_tap_time) < DOUBLE_TAP_MS:
# Second tap in time: toggle and send
last_tap_index = None
on = not states[topic]
payload = PAYLOAD_ON if on else PAYLOAD_OFF
client.publish(topic, payload)
print(f"Sent {topic.decode()} {payload.decode()}")
states[topic] = on
set_status(f"{name} {'ON' if on else 'OFF'}", GREEN)
else:
# First tap: wait for the second
last_tap_index = i
last_tap_time = now
set_status(f"Double tap {name}", AMBER)
                        break
            was_touching = touch.state
            time.sleep(0.02)
    finally:
        try:
            client.sock.close()
        except Exception:
            pass
draw()
while True:
    try:
        set_status("Wi-Fi...", AMBER)
        connect_wifi(SSID, PASSWORD)
        set_status("MQTT...", AMBER)
        main()
    except Exception as e:
        print(f"Error: {e}")
        set_status("Retrying...", RED)
        gc.collect()
        time.sleep(5)
What Have We Learnt?
- How to connect Zigbee devices to Home Assistant.
- How to set up and connect to an MQTT broker.
- How to publish and subscribe to MQTT topics.
- How to write a user interface for Presto.