Getting Started with Enviro (Pico W Aboard)
Enviro is a family of programmable data logging boards, powered by Raspberry Pi Pico W. They're designed to be easy to use and unobtrusive to have around your house, garden or workplace. They all have a deep sleep mode so that they can be run off battery for a long time without any annoying wires.
This beginner level tutorial has been written to help folks who are brand new to the Pico/RP2040 ecosystem get to grips with how to assemble Enviro kits and how to communicate with Enviro boards using Thonny. There's also a quick start guide on Github, which covers some more advanced usage.
This guide will cover:
A quick tour of Enviro's features
How to power Enviro
How to assemble the Enviro accessory kits
How to set up (provision) Enviro boards
How to communicate with your Enviro using Thonny and what to do if things go wrong!
What you'll need
An Enviro Indoor, Weather, Grow or Urban.
A micro-USB cable (for programming)
A computer to program from (Windows, Mac or Linux/Raspberry Pi).
Board Overview
Here's a quick tour of the common functions you can find on all Enviro boards so you can find your way around!
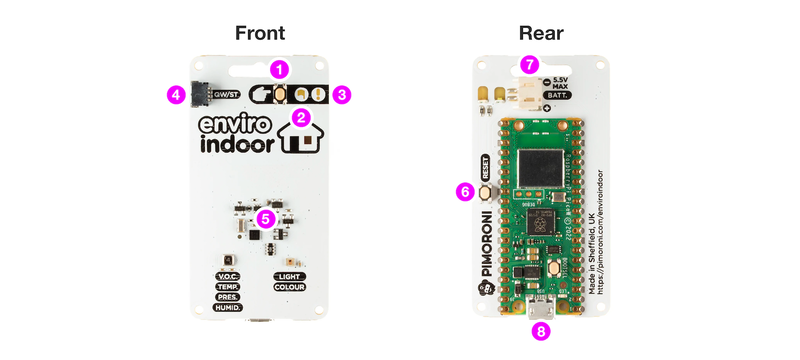
- POKE button: wakes the board from sleep to take a reading (if on battery power)
- ACTIVITY LED (white): pulses gently when the board is awake, blinks quickly when in provisioning mode
- WARNING LED (red): lights up or flashes if an error occurs
- Qw/ST connector: a convenient way to add extra sensors
- Sensors: the collection of sensors that the board gathers data from (these vary depending on board type)
- RESET button: resets the board
- Battery connector: compatible with many battery holders and cells
- USB connector: for communicating with the board using your computer
Powering Enviro
AA or AAA batteries
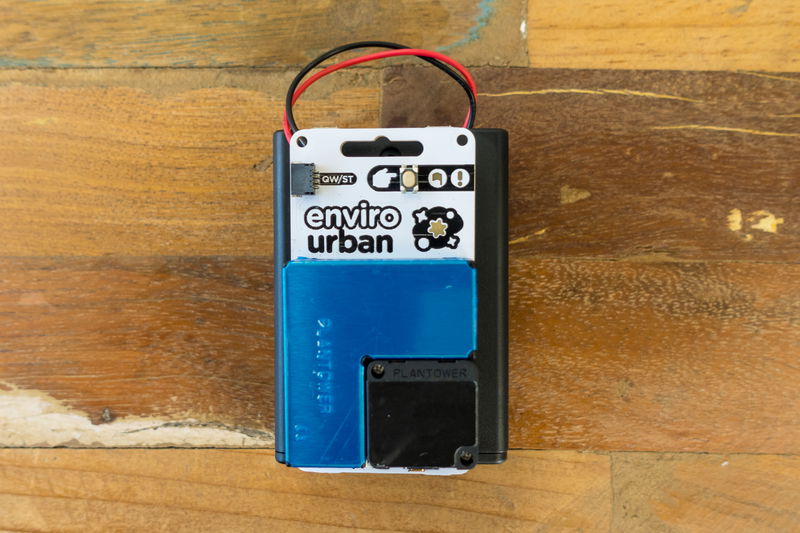
If you got an Accessory kit with your Enviro, it will come with a suitably sized AA or AAA battery pack and a square of Velcro so you can stick it to the back of Enviro if you want.
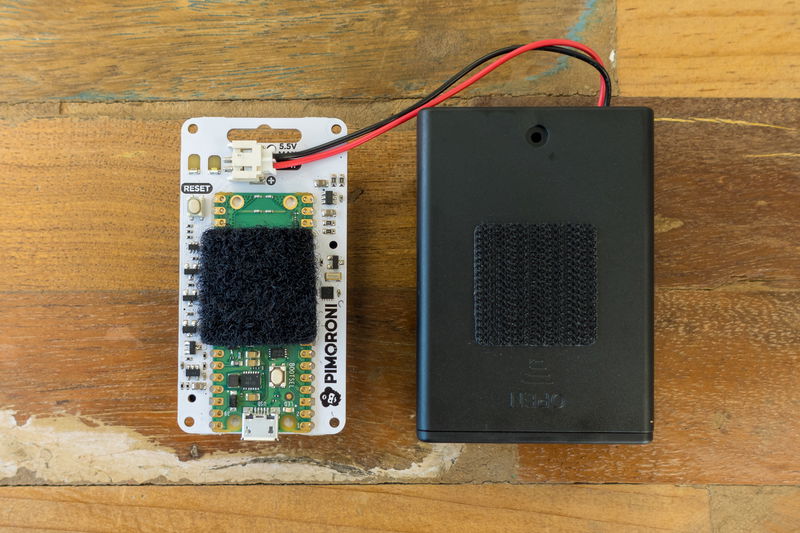
Bear in mind that the Pico W's wireless antenna is also on the back, so if you're planning on putting your Enviro somewhere with a weak wireless signal you might not want to position your battery pack directly over the antenna. Also consider that you will need access to the Pico W's BOOTSEL button in the future if you want to update the firmware.
Once you're happy with the placement of your Velcro, press it down and then wait 10 minutes for the adhesive to set. If you have an on/off switch on your battery holder, make sure it's set to 'on'!
LiPo batteries
Enviro has an accommodating input voltage (5.5V max), so you're not limited to AA and AAA batteries. You can also use LiPo batteries to power it, though you should consider the following things:
- LiPos are not always the best option for really long battery life, as they discharge naturally over time.
- If you're using a soft LiPo and are putting your Enviro somewhere where it might get knocked or bashed, it's probably a good idea to fashion a backplate or enclosure to protect the battery.
- If you've sourced a battery from elsewhere, check that the connector has the red wire going to + and the black wire going to - on our board. Not all batteries have their connectors attached the same way up!
- Enviro boards don't have battery charging circuitry onboard. You'll need to plug your battery into an external LiPo charger (like a LiPo Amigo) to charge it.
USB power
You don't have to power Enviro by battery of course, you can just feed it with power using a USB micro B cable or charger if you have one handy. Its power demands are modest, so any charger will work (maybe you have an old mobile phone one that can be repurposed?)
Assembling Accessory Kits
This section will show you how to put everything in the kits together. For the outdoor Enviros (Urban and Weather) you might want to come back to this section when you've got to grips with the software and are ready to install your Enviro in its final location. Troubleshooting hardware at the top of a pole is no fun at all!
Enviro Urban
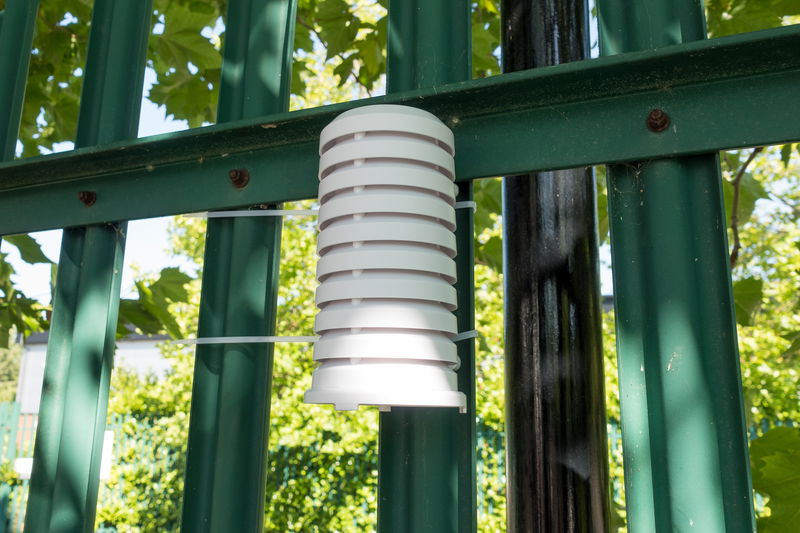
Enviro Urban comes with a weatherproof enclosure, so you can put it outside without it getting damaged by the elements. It has a bunch of slots in the side to ensure that the outside air gets to the sensors. We used the velcro that comes with the enclosure to stick our Enviro Urban and battery combo onto the base of the enclosure.
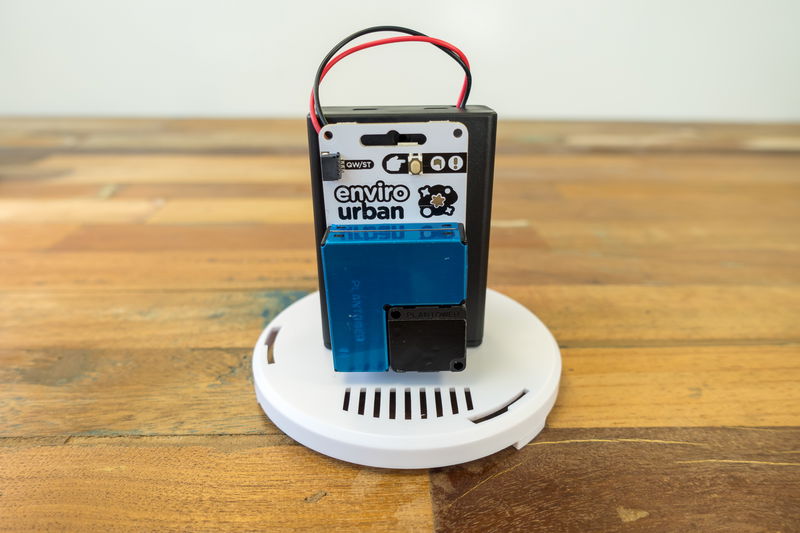
We then used the cable ties to attach it to the fence outside Pirate Towers, ready for checking up on the particulate emissions of passing shipping.
Enviro Weather
The big white box that comes with Enviro Weather contains the wind and rain sensors, you'll first need to attach them to their pole. The wind sensors mount on the double ended arm that goes on the top of the pole (note that the anemometer has a short cable which plugs into the wind vane, so that both wind sensors can then share the same long cable). The rain sensor is mounted on its own arm that comes out of the side of the pole. If you need step by step instructions (with photos) for assembling the sensors, check out Sparkfun's excellent hook-up guide!
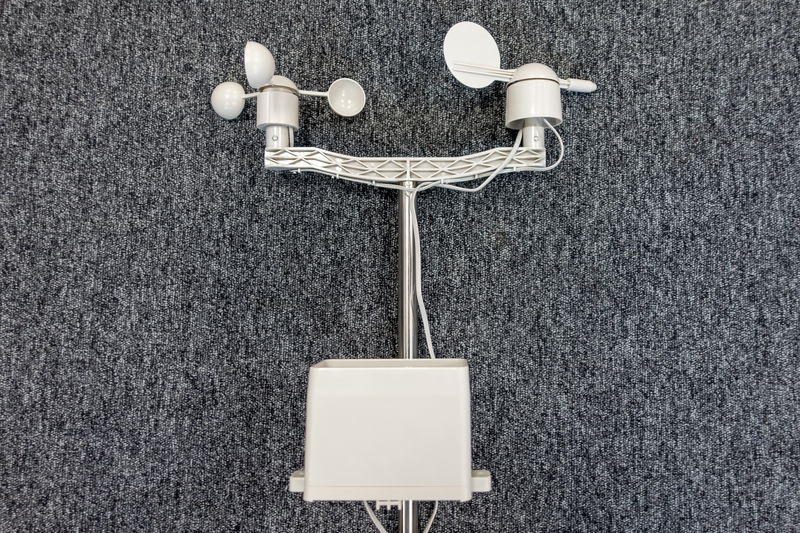
We left some space in between the wind and the rain arms so we could attach our enclosure on the pole as well, but you might want to go for a different formation - just make sure nothing overhangs the rain sensor, as this will stop it from reading correctly.
It comes with the same weatherproof enclosure as Urban, but with Weather you'll need to mod it a little to be able to plug in the RJ11 connectors from the wind and rain sensor. We used side cutters to remove a few struts from one of the grills one the base of the enclosure to give us room to poke the connectors through, but you could enlarge the existing cable hole with a dremel or a drill if you prefer (mind your fingers).
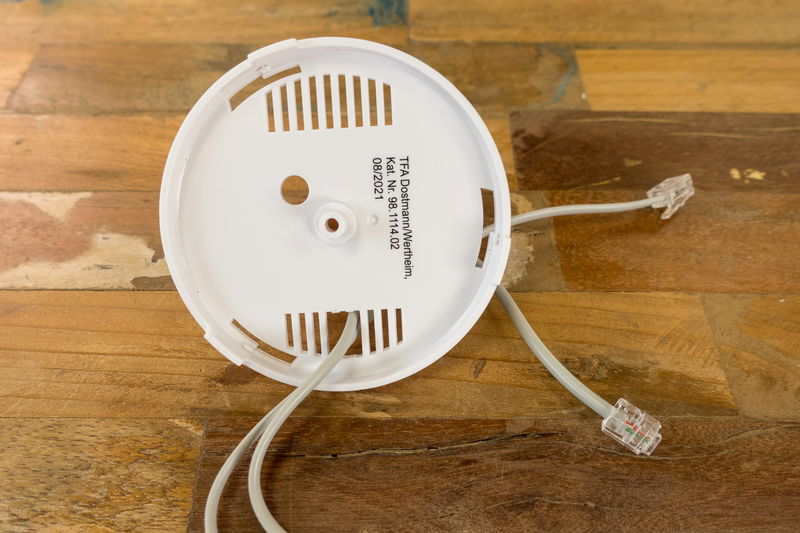
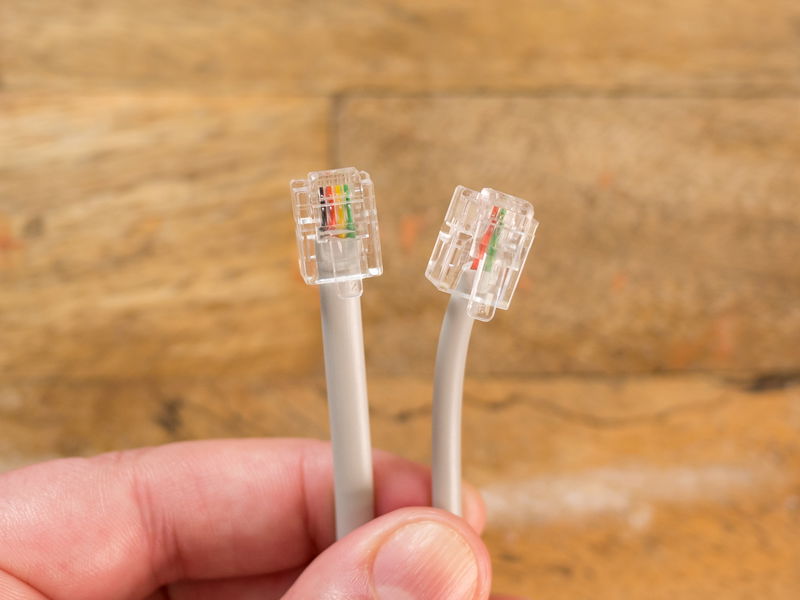
Plug the wires from the wind and rain sensors into the labelled connectors on Enviro Weather. You can tell which sensors the wires come from by peering at the connectors - the RJ11 connector that comes from the wind sensors will have four wires inside it (two for each sensor!) while the rain sensor connector only has two. The wind cable is a bit thicker than the rain cable, because of the extra wires.
We used the velcro that comes with the enclosure to stick our Enviro Weather and battery combo onto the base of the enclosure...
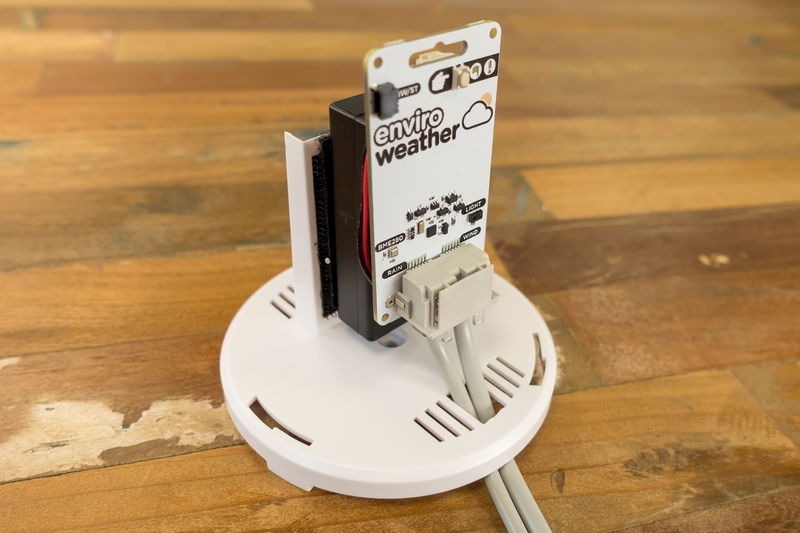
... and mounted the enclosure bracket onto the wind and rain sensors pole using the cable ties that are included. We also tidied up the wires.
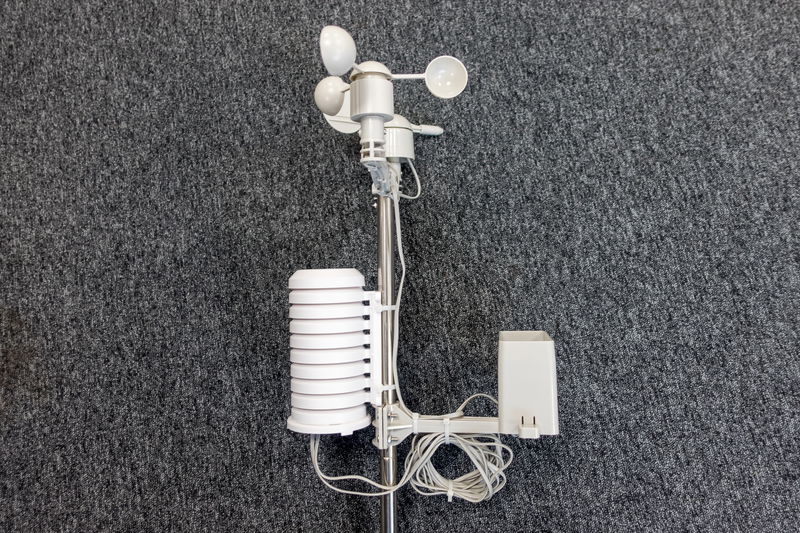
We then used Jubilee clips to attach the pole to a structure in front of Pimoroni HQ. When you install the wind/rain sensors in their final location, make sure you align the markings on the wind vane to North and that the rain gauge is level.

We're hoping the weather will clear up!
Enviro Grow
We're planning on making a separate tutorial on Grow in the future to show you how to set up auto-watering and buzzer alerts and such. For the moment though, know that the moisture sensors plug into the three connectors on top of Enviro using the 3 pin cables. The two pin connectors on the underside are for attaching the pumps.
MicroPython and Enviro
Enviro comes with MicroPython firmware pre-installed. It uses our special custom build of MicroPython which includes some tweaks to support fast wakeup, plus built in drivers to read the sensors.
It also comes with some software pre-loaded so you can get started logging your data super fast. A neat thing about Enviro is that all the software is stored on the device as MicroPython scripts, so it's easy to open them up and look at every bit of how they work, and change things if you want to!
Adafruit.io?
In this tutorial, we'll be posting our data into adafruit.io, an easy to use cloud data service. If you want to do the same, we'd suggest signing up for an adafruit.io account before you start setting up your Enviro. You'll need two things during setup: your username and your Adafruit.io key. You can find both of these by clicking on the yellow key at the top right of the adafruit.io site when you're logged in.

The key is a long number, so we'd recommend copying it to the clipboard of your device now, so you don't have to write it down/type it in later.
Provisioning
To set Enviro up and start logging/posting data places you'll need to go through the provisioning process. You can do this from your phone or other wifi-enabled device like a tablet or laptop thanks to Enviro's state of the art captive portal technology.
Make sure Enviro has battery or USB power. If it's not been through the provisioning process already, it should automatically go in to provisioning mode and the white ACTIVITY LED will start flashing rapidly (if it's not doing that, try pressing RESET on the back of the board).
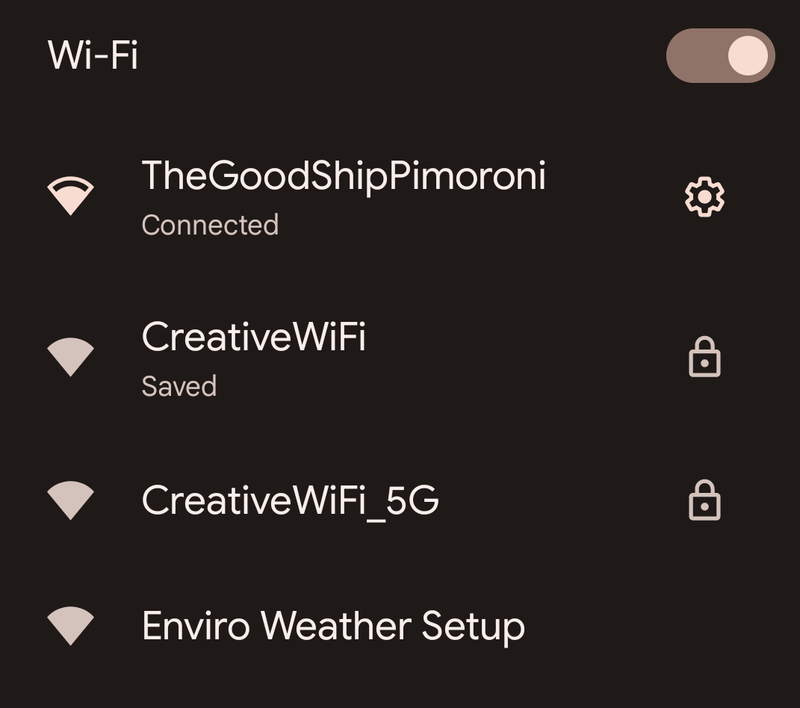
On your phone (or other wireless device) go into your internet/wireless settings, and find and connect to the wireless network called "Enviro
For us, a browser window opened automatically once our phone was connected to the Enviro network, but on some devices you might need to click on a message that says 'sign in to network' or similar to get it to pop up (you won't actually have to sign into anything).
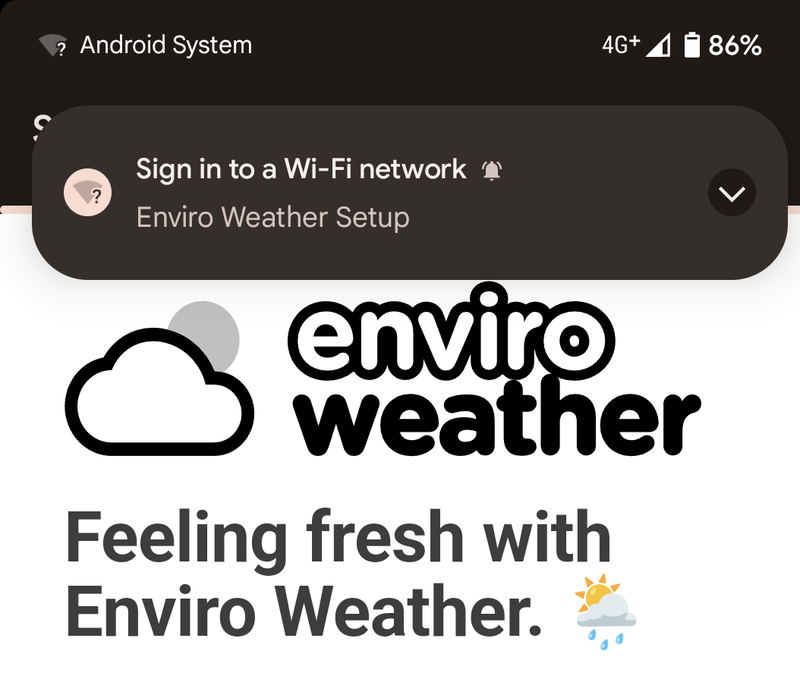
⚠ If you've having trouble with your phone or tablet staying connected to the Enviro network, try turning off your mobile internet connection temporarily - your device might be searching for an internet connection and automatically switching to mobile internet.
Once you're connected, the web pages (which are all being served from the Pico W itself) will walk you through how to set up your Enviro. There's more info about what each step does in the quickstart guide.
In our case, we're:
- Choosing a nickname for our device.
- Giving Enviro our wireless network details so it can talk to the internet.
- Choosing how often to take readings, and how often to report them to your endpoint. We're choosing to take a reading every 15 minutes, and upload every reading for now- this is quite a battery intensive schedule, but good for testing and seeing immediate results! We'll show you how to change it later.
- Telling Enviro what endpoint we want to use, we're choosing Adafruit IO. This is where you'll need your username and key from earlier.
Once you've reached the end of the provisioning process, you'll get a 'Reset the board' button. Once you press that, the board will go to sleep for the interval you specified above, and then wake up and take a reading.
⚠ You might occasionally find that the provisioning website hangs when you move between steps. If this happens, you can refresh the step you're on by clicking on the Enviro banner at the top of the page.
Viewing your data in adafruit.io
To start seeing your readings in Adafruit IO, you'll need to go onto the Adafruit.io website and, on the 'Feeds' tab, create a new group called 'enviro'. Once you've done that, readings should start showing up on this page when your board next posts them. Simples!
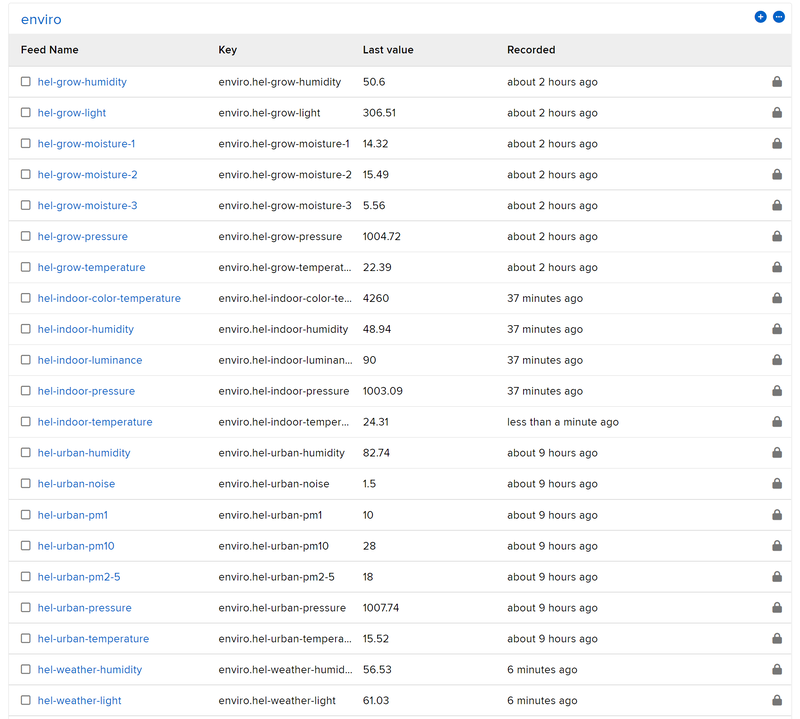
(note that we've got a lot of feeds going on here - if you have a free account you won't be able to create this many).
Configuring a dashboard
Looking at a list of numbers is all very well, but for our human brains to process them usefully, you'll probably want to set up some graphs.
Open up the 'Dashboards' tab in adafruit.io and create a new dashboard. There's nothing here right now, so lets make it a bit more interesting! Click on the cog icon in the top right of the screen, and select 'Create New Block'. There are a bunch to choose from, here we've got some line charts:
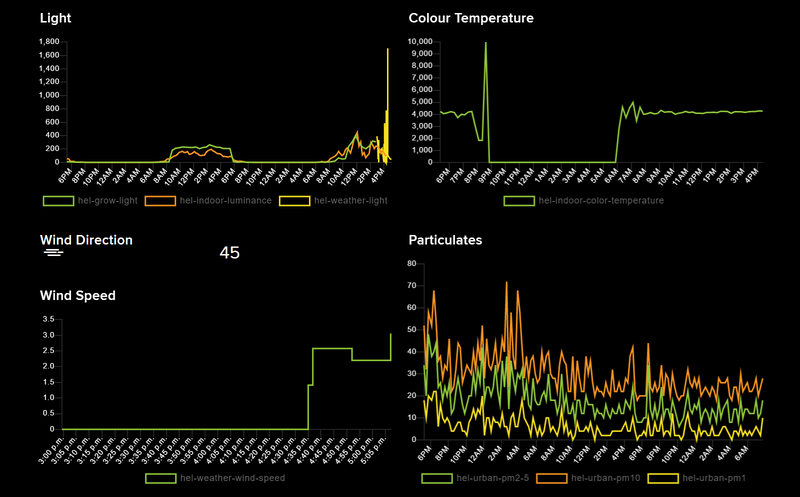
Once you select a type of block you'll get asked what feed/s to associate it with. You can move blocks around and resize them with 'edit layout'.
We've also used some gauges here to keep track of external and internal air temperature at Pirate Towers, and a stream block with all our feeds added to it to see exactly what's been posted in:
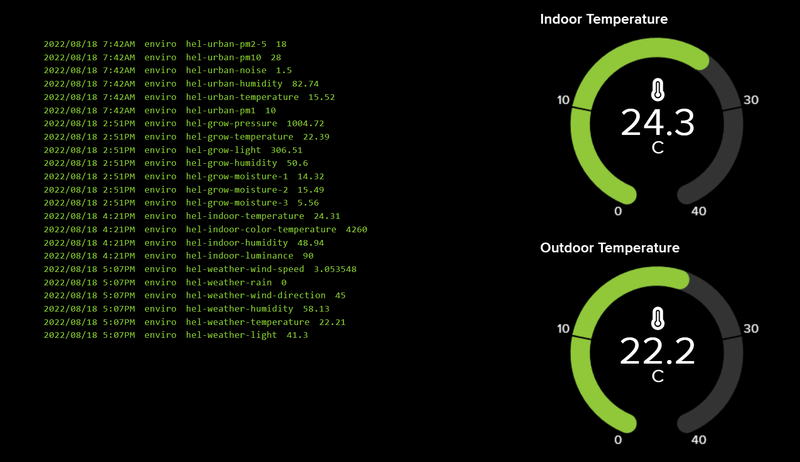
Adafruit IO's free tier lets you store data for 30 days and lets you post up to 30 data points a minute. This sounds like a lot, but bear in mind Enviro returns 7 or 8 different sensor readings at a time and it bundles multiple sets of readings together (so you might be submitting readings for a couple of hours, but they're all being posted in the same minute). If you exceed this limit you may see throttling errors start showing up in Enviro's log.
If you want to learn more about Adafruit IO, check out this getting started tutorial.
Troubleshooting
Connecting to Enviro with Thonny
But what if something isn't working and you have a red light, a static white light or no readings showing up? Here are some things that might help.
Enviro logs everything it does in a file, so you can plug it into your computer to view any errors. To view the files (and program it in MicroPython) you'll need to talk to it through an interpreter - we're using Thonny, which is available for Windows, Mac or Linux. Here's how to get Enviro and your computer talking to each other.
- Install the latest version of Thonny. We'd suggest downloading it from the Thonny website, as package managers don't always have the most up to date versions.
- Plug Enviro into your computer, if it's not plugged in already.
- Open up Thonny. Make sure the interpreter (shown in the box on the bottom right corner) is set to 'MicroPython (Raspberry Pi Pico)'.
- The MicroPython prompt and >>> in the 'Shell' box tells you that Enviro is talking to your computer and is ready to accept instructions. If you don't see the MicroPython prompt in the shell box, try pressing the red stop button in Thonny to interrupt whatever it's doing.
- You'll want the Files window visible so you can see the files on Enviro. If you can't see it you can open it up with 'View > Files'.
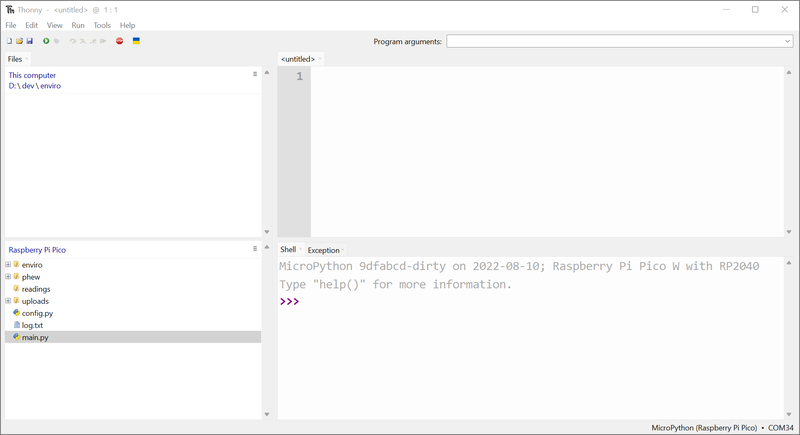
The files in the top box are the ones on your computer, and the ones in the bottom box are the ones on Enviro.
⚠ Couldn't find the device automatically?
If your version of Thonny doesn't manage to detect our board automatically (or if you have more than one Pico/RP2040 device connected) you might have to specify what port the device is using manually. You can do this by clicking on 'MicroPython (Raspberry Pi Pico) at the bottom right, and selecting 'Configure Interpreter'. Select your device under 'Port'.
Viewing the logs
Enviro logs everything it does in a file called log.txt - to view it, double click on it (you might need to click the stop button first if Enviro is in the middle of doing something). If you can't find any obvious errors in there, try opening up main.py and running it using the green run button - you will then be able to view the output of the code in the 'Shell' window. main.py is the file that runs every time Enviro wakes up.
Restarting the provisioning process
Incorrect wi-fi details are a common reason why you might get errors. If you get errors that mention the clock, that might also mean that your Enviro hasn't been able to connect to the internet to set the time. If you want to try entering your details again, you can restart the provisioning process. Hold down the POKE button on the front of Enviro and tap the reset button on the back. Release the POKE button when the ACTIVITY light starts flashing rapidly - you should now be able to reconnect to Enviro with your phone and enter different details. If you've followed our instructions above, you might want to take this opportunity to change your upload schedule to one that will make your battery last longer.
Editing the config file manually
You can also change the provisioning details by manually editing config.py using Thonny. Double click on this file to open it up, and when you're done changing things, make sure to save your changes by clicking the save button in the menu bar.
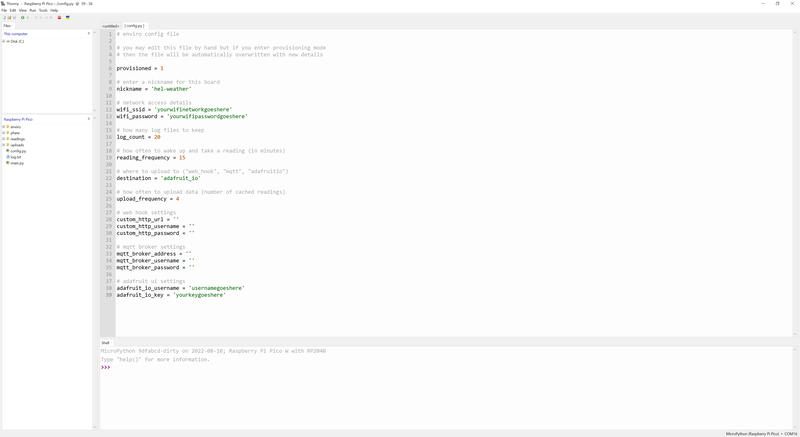
We edited our config.py to change our upload_frequency to uploading every four sets of readings - with readings every 15 minutes, that will post our data to Adafruit.io every hour. That should make our battery last a bit longer!
⚠ If you're posting into a free adafruit.io account, we'd recommend setting upload frequency to a maximum of 3 to avoid running into upload limits.
Further troubleshooting
You can find more troubleshooting suggestions here.
If they don't solve your issue, we'd recommend downloading and flashing the latest version of the Enviro firmware so that you have access to all the latest bug fixes.
Note that this process will delete all the files from your Enviro, so you might want to back up config.py and any saved readings first. You can also follow these instructions to reset your Enviro to factory settings, if you accidentally delete or change something.
Next steps
We hope this guide helps you get started with Enviro! We'll hopefully have more Enviro content for you in the future, we want to hook them up to all the things. Drop us a line on Twitter or the forums and let us know how you're getting on :)
Search above to find more great tutorials and guides.