Getting Started with Inky Frame
Inky Frame is a luscious, 7 colour, programmable E Ink display, powered by Raspberry Pi Pico W and available in 4.0" (640 x 400), 5.7" (600 x 448 pixel) and 7.3" (800 x 480) varieties. It can go into a deep sleep mode between updates to preserve battery and can be woken back up with a button press or on a timer using the onboard Real Time Clock (RTC).
This beginner friendly tutorial will cover:
how to plug everything in
how to get started programming Inky Frame with MicroPython and Thonny
how to get to grips with our launcher and examples
how to display images
some troubleshooting suggestions
Revision History
- 2024/12 - Guide updated to work with the new Pico 2 W Aboard version of Inky Frame and the new separate Inky Frame repo. The instructions should still work with previous versions of Inky Frame!
- 2025/09 - Guide updated to work with the new Spectra 6 display variant.
What you'll need
A micro-USB cable (for programming)
A micro SD card (required for some of the wireless examples)
Some sort of battery if you want to disconnect Inky Frame from your computer - we'll discuss a few options and their pros and cons!
A computer to program from (Windows, Mac or Linux/Raspberry Pi).
Batteries
AA or AAA batteries
The easiest way to supply Inky Frame with power is via some good old fashioned double or triple A batteries, connected in series. You'll need a battery holder with a JST-PH connector to be able to plug it in. We'd recommend a 3 x AA or 3 x AAA battery pack which should give you plenty of juice to keep going for a good long time.
LiPo / LiIon batteries
Alternatively, you could power Inky Frame from a LiPo battery. Our hard case Galleon LiPo batteries make for a really neat power solution combined with Inky Frame's deep sleep capability, though you might prefer something with more capacity for longer battery life.
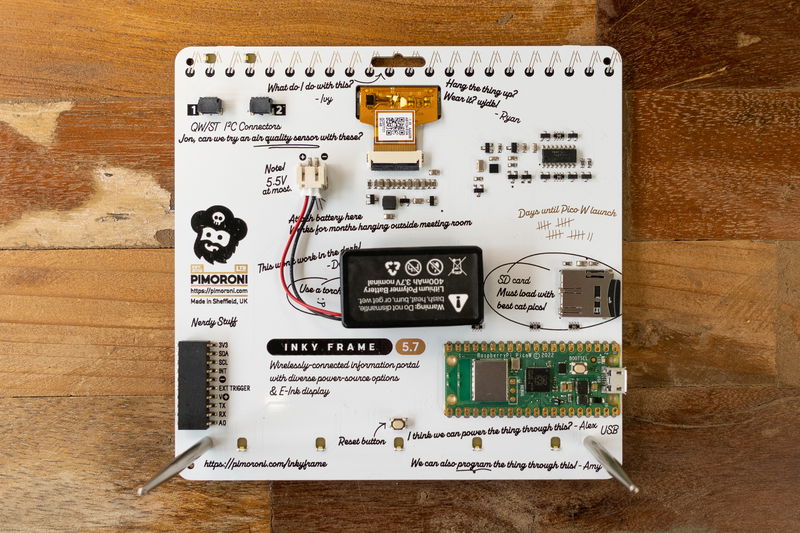
A few more things you should consider if you're using a LiPo:
- If you're using a soft LiPo battery you might want to consider fashioning a backplate or case to protect it.
- There's no battery protection included on Inky Frame, so you should only use it with LiPo batteries that include internal protection (all ours do).
- If you've sourced a battery from elsewhere, check that the connector has the red wire going to + and the black wire going to - on our board. Not all batteries have their connectors attached the same way up!
- Inky Frame doesn't have battery charging circuitry onboard. You'll need to plug your battery into an external LiPo charger (like a LiPo Amigo) to charge it.
- If you wanted to add USB-C battery charging capability (and a power button!) to Inky Frame you could add a LiPo Amigo Pro to the back (you'll also need one of these cables).
Assembling the Inky Frame Accessory Kit
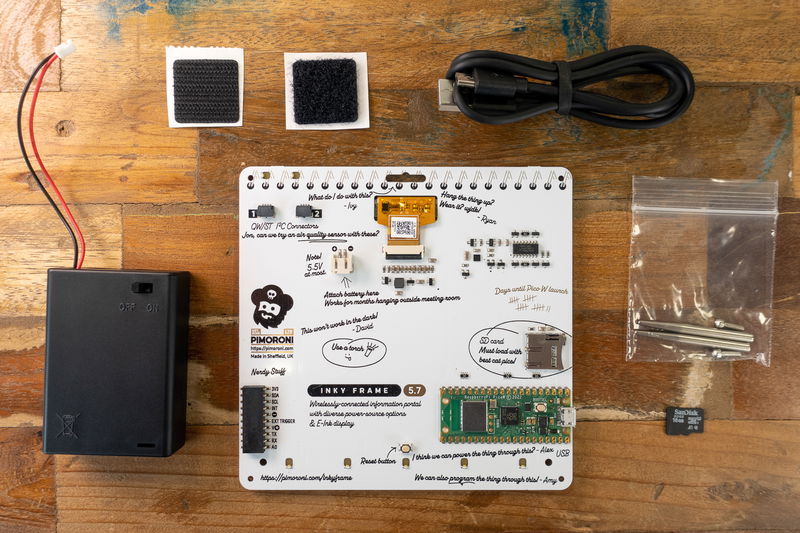
Our Accessory Kit contains legs to let your Inky stand up, an AA battery pack and fixings, a USB cable and an SD card. Here's how to put it all together!
Attaching the legs
From the front, poke the rounded screws through the larger set of holes at the bottom of Inky Frame.
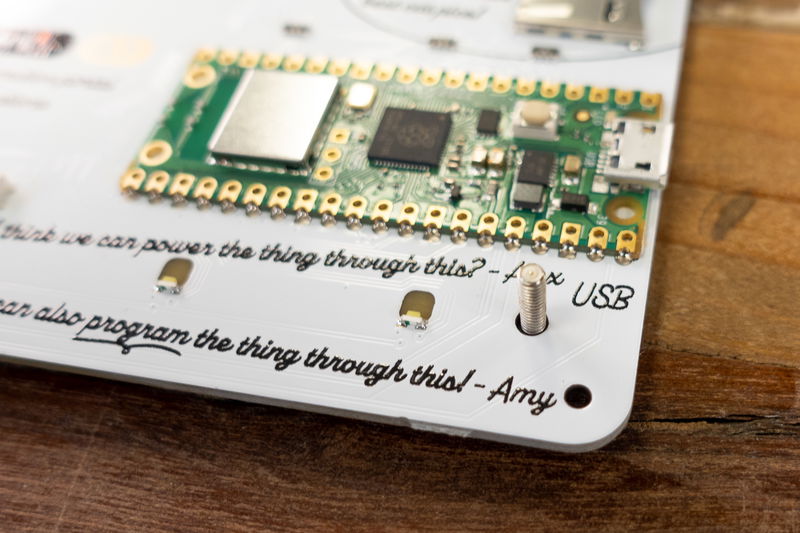
Then screw the legs onto the screw threads!
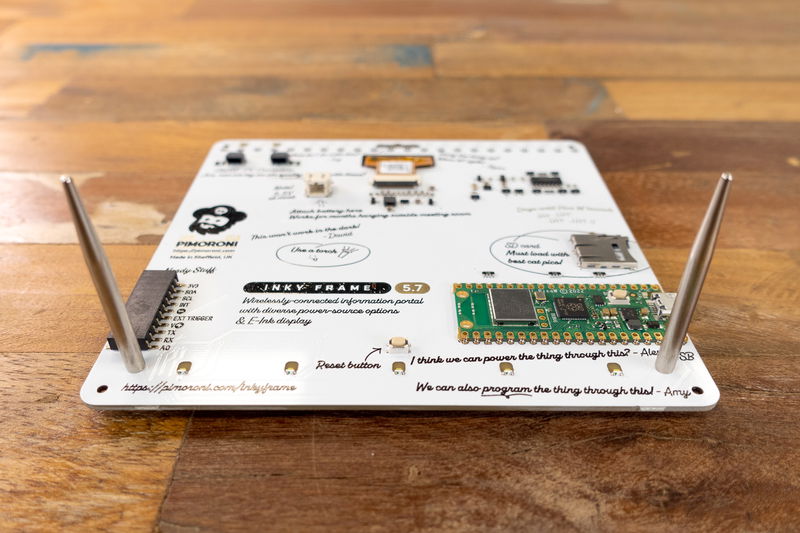
Inserting the SD card
Our microSD cards come preloaded with Raspberry Pi OS. You don't need this for Inky Frame, so as first order of business we'd suggest popping your card into a computer and formatting it as FAT, so you start from a nice clean slate.
The SD card goes into the slot on the back of Inky Frame (it will only go in one way). It's a spring loaded slot, so should you ever want to remove it you'll need to push it in to get it to pop out.
Attaching the battery pack
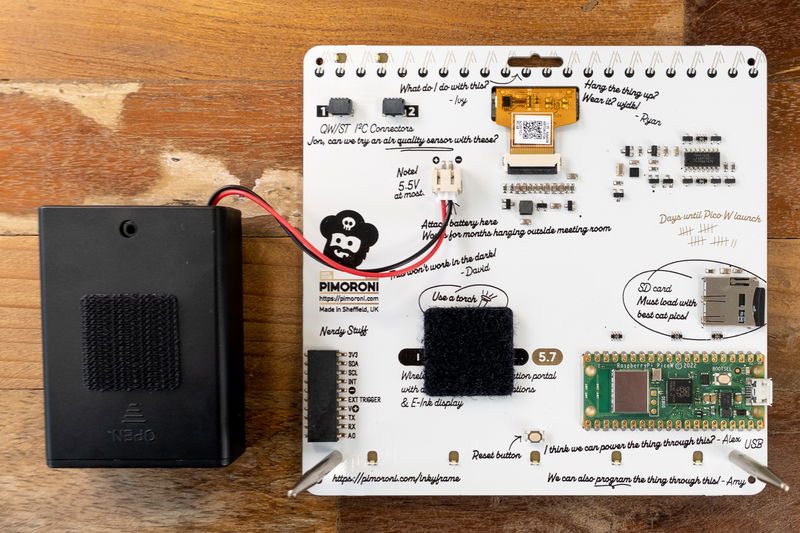
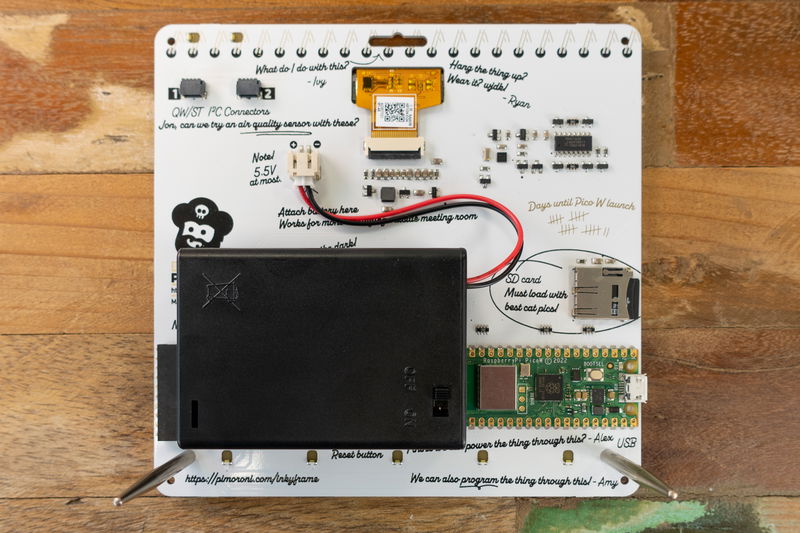
Our Inky Frame accessory kit comes with some Velcro for sticking the battery pack on. Before you start sticking things down, experiment a little bit with the positioning of the battery pack:
- If you're planning on hanging Inky Frame from a hook you'll want to make sure the battery pack is balanced in the middle to avoid it hanging lopsided.
- If you want to be able to use the on/off switch on your battery pack make sure you stick the Velcro to the other side!
- Make sure the reset button is accessible and not squashed down by the battery pack.
- Once you're happy with the placement, press the squares down (avoiding pressing directly on the screen) and then wait 10 minutes for the adhesive to set.
MicroPython and Inky Frame
Our custom MicroPython build is the easiest way to get started with Inky Frame. It comes with a built in tiny graphics library called PicoGraphics, which contains lots of tools for drawing on Inky Frame's screen, including drawing text and shapes, rendering images and generating QR codes!
All sizes of Inky Frame now ship with MicroPython and a set of examples preloaded.
Using the Inky Frame launcher
Plug Inky Frame into your computer. Once it gets USB power, the screen should start refreshing - it refreshes each colour one at a time, and the refresh cycle takes between 20 and 40 seconds, depending on what screen variant you have.
Once it's done, you should see something like this:
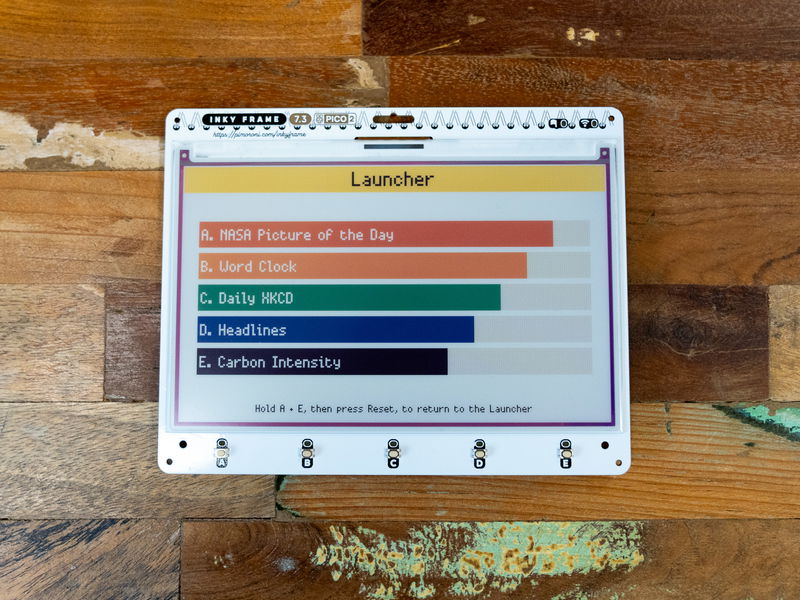
Pressing each of the buttons will take you to a different example, and to return to the launcher you can hold down front buttons A and E whilst tapping the reset button on the back of the board.
Most of the examples will need access to the internet to do anything interesting. Read on to learn how to give Inky Frame your wifi details!
⚠️ If your examples look different (or you don't see the launcher at all), you're probably not on the most recent version of the Inky Frame launcher. We'd recommend updating to the most recent version of the firmware and examples (scroll down to the troubleshooting section for instructions for how to do that).
Talking to Inky Frame with Thonny
To program Inky Frame (or to edit the files on it), you'll need to talk to it through an interpreter. We're using Thonny, which is available for Windows, Mac or Linux.
- Install Thonny
- Open up Thonny. Make sure the interpreter (shown in the box on the bottom right corner) is set to 'MicroPython (Raspberry Pi Pico)'.
- Plug Inky Frame into your computer, if it's not plugged in already. Because Inky Frame is busy running the launcher program, main.py will already be running, you'll need to stop it with the stop button in Thonny before sending it any instructions.
- After you press stop, you should get a MicroPython prompt that looks something like this. The >>> in the 'Shell' box tells you that Inky Frame is talking to your computer and is ready to accept instructions.

If you're having trouble using Thonny to communicate with your board, there's some troubleshooting suggestions at the link below:
Editing Files
Using Thonny, you can open up the .py example files on the device and edit them. To see the files on your board, you will need to have the Files window visible - if you can't see it, you can make it show up with View > Files.
The top box can be used to browse the local files in on your computer, and the bottom box shows the files on your board. If you want to transfer files to (or from) your board, right click on the file you want to copy and select 'upload to /' or 'download to /'.
Adding your wireless credentials
For the launcher examples that use wireless to work, your Pico W will need to know your wireless network details - these will be stored in a file called secrets.py. On newer Inky Frames we've created this file for you - luxury!
If secrets.py is already present:
Double click on it in the bottom Files window to open it up.
Enter your own wifi SSID and password between the quote marks. Note that both of these are case sensitive!
Click the save icon in the toolbar to save your changes.
To create secrets.py yourself:
Click on the 'New' icon in Thonny's toolbar to open up a new tab.
Copy and paste the following lines into the new tab, replacing the SSID and password with your own wifi details.
WIFI_SSID = "Your WiFi SSID"
WIFI_PASSWORD = "Your WiFi password"
Note that SSID and password are case sensitive, and that they need to be surrounded by quote marks as above.
Once that's done, click the save icon in the toolbar and save the file to the 'Raspberry Pi Pico' device as
secrets.py.
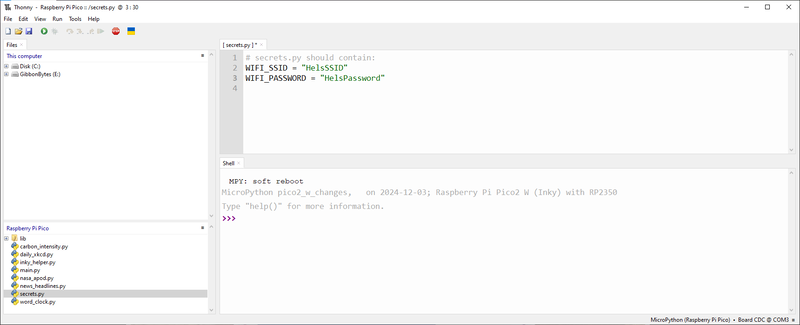
Hit the reset button on the back of your Inky Frame to reload the launcher or open up and 'run' main.py through Thonny - hopefully now the examples will be able to show you some interesting stuff from the internet!
Writing your own code
Ready to start writing your own code? Here's how to do some basic stuff with Inky Frame!
⚠️ For the inky_frame helper functions to work as described, you'll need to be running pirate-brand MicroPython v1.19.16 or later. Scroll down to the 'troubleshooting' sections for instructions on how to install it.
Lighting up the busy LED
Inky Frame has a bunch of white LEDs to play with. To light up the busy/warning LED (that's the one with the flag next to it) using vanilla MicroPython commands you can enter the following code line by line in the REPL (that's the bottom 'Shell' box in Thonny). Remember you'll need to hit stop first if you have the launcher or another main.py running.
from machine import Pin

led = Pin(6, Pin.OUT)
led.value(1)
Let's turn off the LED again, to be tidy!
led.value(0)
You can also set the brightness of the LEDs to values between 0 and 1 using PWM (that's turning them on and off again really quickly, so it creates a dimming effect for our feeble human eyes).
Because having to type in a load of numbers isn't very fun, we've included some helper functions in our inky_frame module which provide handy shortcuts for interacting with the LEDs (and the other board functions on Inky Frame). So instead of the code above you can just use:
import inky_frame

inky_frame.led_busy.on()
It knows about PWM too, so you can do this to set an LED to half brightness:
import inky_frame

inky_frame.led_busy.brightness(0.5)
Reading the buttons
The buttons on Inky Frame are connected to the Pico W via a shift register. Our helper functions deal with this in the background to to make it simple to read button presses - you can use it to turn the button LEDs on and off too. This short program lights up the 'A' LED when the 'A' button has been pushed.
import inky_frame

while True:
    if inky_frame.button_a.read():
        inky_frame.button_a.led_on()
You can find out more about how to use the LED and button helper functions at the link below.
Because the inky_frame module is baked into the MicroPython firmware it won't show up as a file you can view in Thonny, but you can view it on Github if you'd like to see what it does.
Writing text on the screen
Here's a simple example of how to display text on the E Ink screen using the PicoGraphics library. Copy and paste this code into a new tab in Thonny, and then click on the 'run' button.
⚠ When importing PicoGraphics you'll need to specify what size Inky Frame you have. The code below is for an Inky Frame 7.3" with Spectra 6 display. Use DISPLAY_INKY_FRAME_7 if you have a older 7.3" Inky without 'Spectra' printed on it, DISPLAY_INKY_FRAME_4 for a 4" Inky, or just DISPLAY_INKY_FRAME for the 5.7" version.
import inky_frame
from picographics import PicoGraphics, DISPLAY_INKY_FRAME_SPECTRA_7 as DISPLAY

graphics = PicoGraphics(DISPLAY)

graphics.set_pen(inky_frame.WHITE)
graphics.clear()
graphics.set_pen(inky_frame.BLACK)
graphics.text("Hello Inky", 0, 0, 600, 4)
graphics.update()
The first two lines set up the Inky display - you'll need to start any code that uses the screen like this.
The rest of the code does this:
- The
set_penline tells your program what pen you want to start writing with. Spectra displays have six 'pure' colours to play with - WHITE, BLACK, RED, BLUE, GREEN and YELLOW. If you have an older seven colour Inky you also get ORANGE and the mysterious eighth 'cleaning' colour, which is a TAUPE colour on the 4.0" and 5.7" screens and a strange green/yellow gradient on 7.3". graphics.clear()fills the whole screen with the last selected pen colour - we're using it here to start with a white background.graphics.textwrites text to the screen buffer. When using a bitmap font, the '0, 0' is the x/y co-ordinates of the top left of the text. '600' is when text will start wrapping onto the next line (so needs to be the width of the screen in most cases). The final number '4' is the scale of the text, reduce or increase it to shrink or embiggen!graphics.updateupdates the screen. You can (and probably should, given the lengthy refresh time) draw multiple things to your screen buffer before triggering anupdate.
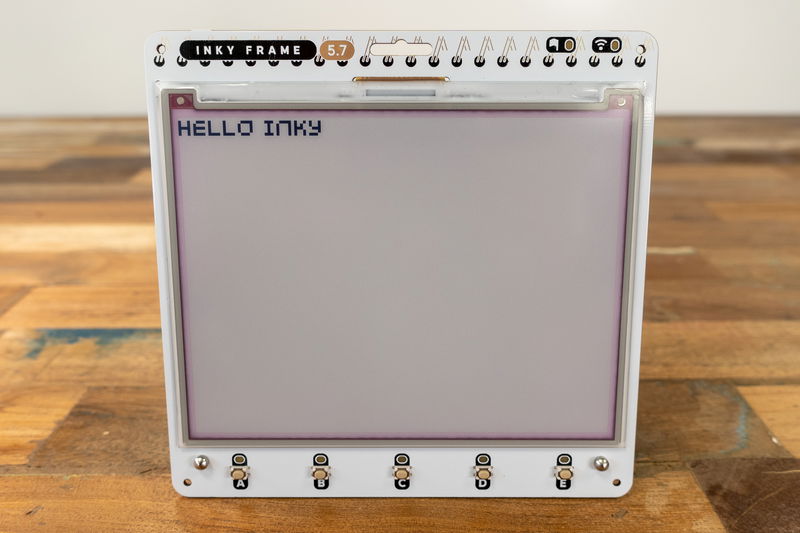
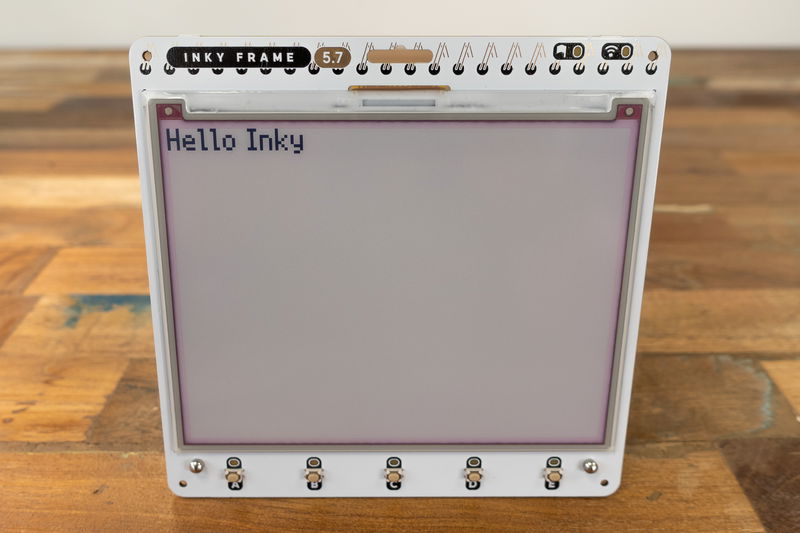
The default font is bitmap6, which is all uppercase and a little small and blocky. Switching to bitmap8 gives you upper and lower case and a bit more definition (it also includes more special characters like °).
import inky_frame
from picographics import PicoGraphics, DISPLAY_INKY_FRAME_SPECTRA_7 as DISPLAY

graphics = PicoGraphics(DISPLAY)

graphics.set_pen(inky_frame.WHITE)
graphics.clear()
graphics.set_pen(inky_frame.BLACK)
graphics.set_font('bitmap8')
graphics.text("Hello Inky", 0, 0, 600, 4)
graphics.update()
More drawing functions
There are more functions in the library for using vector fonts and drawing individual pixels, lines and shapes. As of v1.19.16, you can also create custom, dithered pen colours to display colours outside of the magic 6/7 - these work well with blocks of colour and large text. Check out the PicoGraphics function reference for more info!
Displaying images
Pirate flavour MicroPython can now decode jpegs, woohaa! Here's how to get an image onto that beautiful Inky Frame screen.
You should resize your images to 640 x 400 (for 4.0"), 600 x 448 pixels (for 5.7") or 800 x 480 pixels (for 7.3") using an image editor (we're using GIMP, which is free) before copying them across to Inky Frame. When exporting your jpeg, we found we had to open up 'advanced options' and untick the 'progressive' option for it to work with jpegdec. We saved our images at 70% quality to help keep the file size down.

Navigate to your jpeg in the top Files window, right click on it and upload it to your Pico W. Here's how to show the image:
⚠ Remember to replace DISPLAY_INKY_FRAME_SPECTRA_7 if you have another version of Inky Frame!
from picographics import PicoGraphics, DISPLAY_INKY_FRAME_SPECTRA_7 as DISPLAY
from jpegdec import JPEG

graphics = PicoGraphics(DISPLAY)
j = JPEG(graphics)

j.open_file("jwst1.jpg")
j.decode()
graphics.update()
You can find demo images to use, plus an offline photo frame example which switches between images and goes to sleep when on battery power here. Thanks Webb Space Telescope, we really loved your photos. Who'd have thought it would be possible to see the Raspberry Pi Picow from 1.5 million kilometers away?
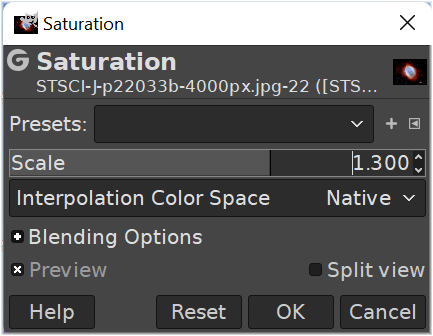
PicoGraphics will dither your image into the eight colours that are available on Inky Frame to save RAM. When prepping our images, we found we got best results by boosting the saturation and black levels up a bit. In GIMP, you can do this with 'Colors' > 'Saturation' and 'Colors' > 'Exposure'.

Going to sleep (and waking up again)
Because E Ink screens retain images when unpowered, we can update the screen and then turn off the Pico W completely to save on battery. As with life, the bigger challenge is waking up again from a powered down state - Inky Frame has a built in RTC (Real Time Clock) that makes this possible.
The easiest way of interacting with deep sleep/RTC wakeup on Inky Frame is by using the helper function in inky_frame that handles all the hardware nitty gritty for you. If it's powered by battery, the code below will make Inky go into deep sleep mode and set a timer to wake up in ten minutes. When it wakes up, it will run whatever instructions are stored in main.py.
import inky_frame

inky_frame.sleep_for(10)
If plugged into USB power, Inky Frame will never go into deep sleep mode, but if you use this sleep function whilst on USB power it will do a standard MicroPython time.sleep.
Running the other examples
You can find some more Inky Frame examples at the link below:
Click on one to open it up, and copy and paste the code into a new tab in Thonny (if you click the 'raw' button on Github first it will make it easier to copy and paste). Press the green run button in Thonny to run the code.
Next steps
Hopefully this tutorial will have helped you understand the basics of getting text and images onto Inky Frame - next stop The Interwebs! Drop us a line on BlueSky or on our forums and let us know what you're using it for - we'd love to know!
Troubleshooting
How do I make an example run whenever Inky Frame's powered up?
Save your example as main.py if you want it to run automatically every time Inky Frame is powered up or reset. It's a good idea to test your code is working as expected before you do this, as a malfunctioning main.py can lock up your Pico and stop it from communicating with Thonny.
How do I factory reset?
If you do find yourself in a sticky main.py situation, you can delete all your programs from Inky Frame's flash memory and start again from scratch by downloading this special .uf2 file and copying it to Inky Frame whilst it's in bootloader/DFU mode. Once you've done that, you'll need to copy the MicroPython image across again - read on for how to do that.
You may also find clearing the flash to be useful if you encounter problems after upgrading to the newest version of MicroPython - just make sure you save any code you've been working on to your computer first!
How do I install MicroPython (and the examples)?
If you have an older Inky Frame that doesn't come with MicroPython and the launcher pre-installed, you'll need to do that yourself. You can also follow these instructions if something goes wrong, and you need to reinstall the files.
First of all you'll need to download our most recent batteries included MicroPython image, and copy it to the Pico W (or Pico 2 W).
If you're brand new to Raspberry Pi Pico/RP2040/RP2350, you might find the step by step instructions in our Getting Started with Raspberry Pi Pico tutorial useful - it will show you how to install our custom MicroPython build and goes into more detail about how to use Thonny . Here's a quick TLDR!
- Download the most recent MicroPython .uf2 from the Releases page of our Inky Frame Github repository. Click on 'assets' to expand the list of files. The 'with-filesystem' builds include the Inky launcher examples and supporting libraries, which is very convenient. Note though, that they might overwrite your existing filesystem, so if you have any custom code you've been working on make sure to back it up to your computer first.
- There are builds for Pico W and Pico 2 W - make sure you download the one that matches your board!
- Connect Inky Frame to your computer with a USB cable.
- Hold down the BOOT button of Inky Frame, and then tap the RESET button. This will put it into bootloader mode, and it should appear as a drive on your computer called RPI-RP2.
- Copy the .uf2 file to the RPI-RP2 drive - once you've done that Inky Frame will reboot.
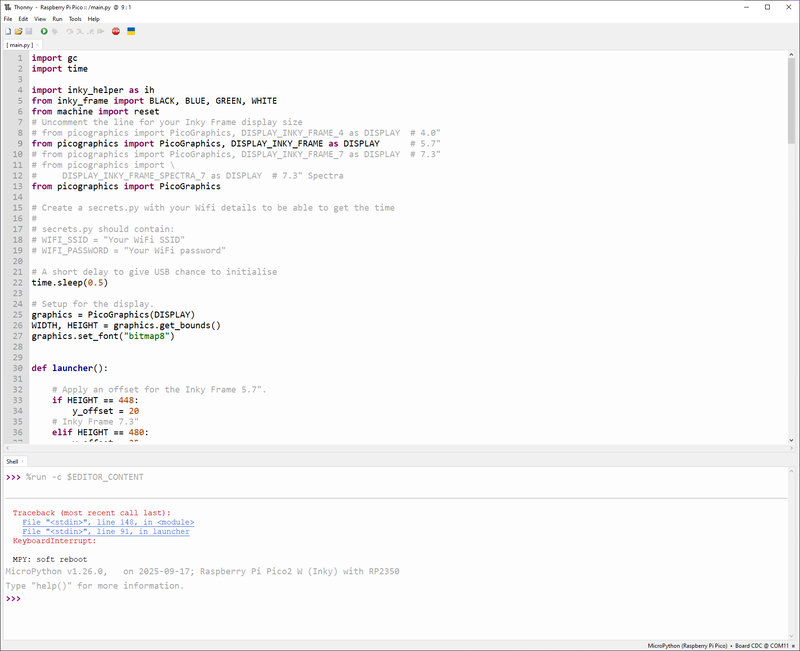
⚠ These builds are pre-configured for an Inky Frame 7.3" with Spectra display. If you have a different kind of Inky Frame you'll need to edit main.py with Thonny and uncomment the line with the correct screen size - here's what it should look like if you have an Inky Frame 5.7", for example:
Deep sleep mode and battery behaviour
If Inky Frame is plugged in via USB, it will never go into deep sleep mode. It will spring into life and attempt to run main.py as soon as it has USB power, just like any Pico/RP2040 board running MicroPython.
However, if you're powering Inky Frame by battery things will work a little differently. The hardware level power saving features will kick in, which can be a bit confusing and make it look like you have a duff battery.
Once you hit reset on a battery powered Inky, you'll have to press one of the buttons to trigger it to wake up and run main.py. It needs a fairly solid press to wake it up (this is because there's a short delay whilst MicroPython starts up, so it can miss quick button presses).
SD card problems?
We've found that MicroPython can be slightly fussy with SD cards, especially larger ones. If you're having trouble reading from your SD card, try reformatting it with FAT and a small block size - we managed to get most SD cards we tried working like this (though we did find a few that stubbornly refused to play).
RAM problems?
If you have a Pico W Inky Frame the wireless module firmware uses lots of the Pico W's available RAM - which can be a problem when driving a large display. You'll need to be conscious of RAM usage when using wireless and Inky Frame together - the good news is that PicoGraphics is written with conservation of RAM in mind!
Things that we've found that help avoid memory errors (such as the dreaded ENOMEM) include:
making sure you close HTTP sockets after opening them
downloading images to your SD card rather than straight into RAM
incorporating garbage collection (
gc.collect) into your code - see this example for a demonstration!If you're running on USB power, try resetting the Pico W with a
machine.reset()at the end of each program iteration instead of using awhile True:loop. This means your program starts from a clean slate (and a full complement of RAM) every time.
Search above to find more great tutorials and guides.