Getting Started with Pimoroni Presto
Presto is a RP2350, 4" square touchscreen built into a tidy metal stand, with some snazzy built in RGB ambient lighting. Here's how to make it do some stuff in MicroPython!
This beginner friendly tutorial will cover:
how to plug everything in
how to get to navigate our launcher and examples
how to get talking to Presto with Thonny
how to get started with Pico Graphics and Pico Vector - our tiny graphics and vector libraries
how to add your own apps to the launcher
What you'll need
If you didn't get the starter kit, you'll also need
- A USB-C cable for power and programming
Assembling the Presto Starter Kit
Here's what you get in the Starter Kit:
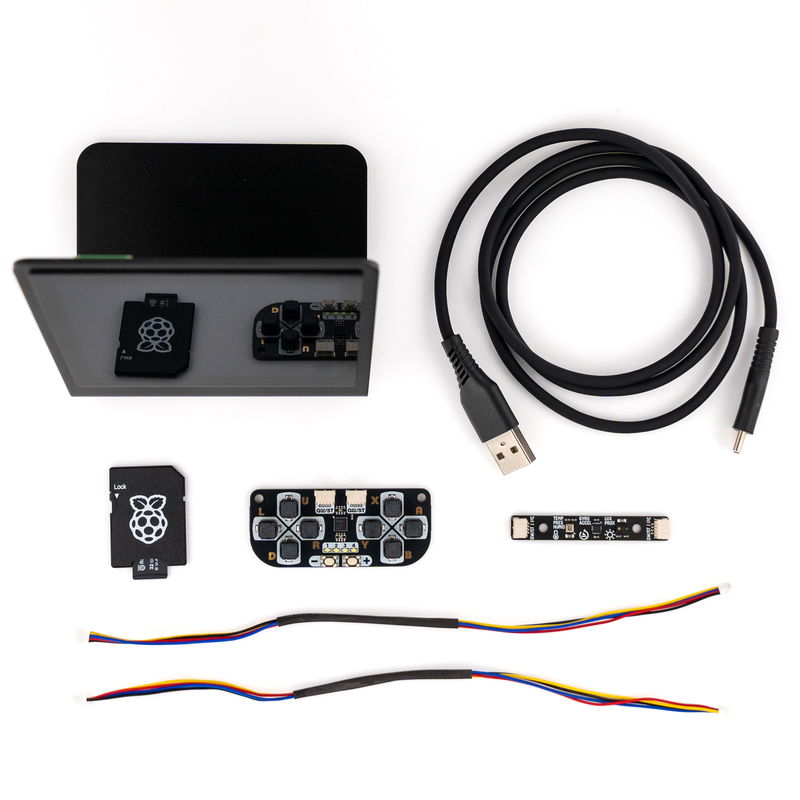
A micro SD card (and a full size SD adaptor)
Two JST-SH to JST-SH cables AKA Qw/ST
Newer starter kits include a long and a short Qw/ST cable, for maximum flexibility.
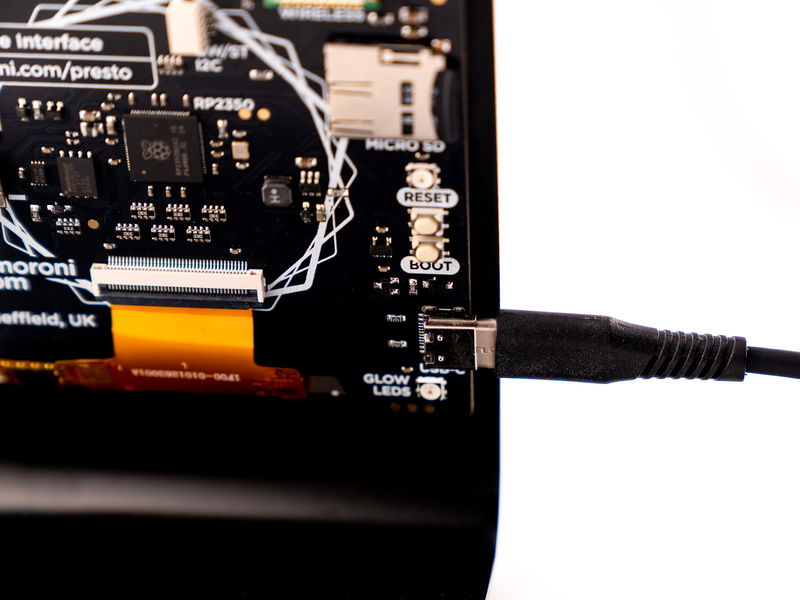
To get started, plug the USB-C end of your USB cable into Presto. This is how we'll provide it with power and also how we'll program the board. The other end goes to your computer, but if you're just checking out the pre-loaded examples and aren't planning on programming the board just yet you could plug it into any convenient USB power source.
How to use the launcher
The retail version of Presto comes with MicroPython, examples, and a launcher pre-installed to help you get going super quickly.
The Presto launcher features a carousel of icons representing the different examples. Tap the coloured squares to navigate around the carousel. Once the icon for the example you want to run is showed in the foreground, tap it again to open the example.
Hit RESET when you're done with an example and want to return to the menu.
⚠ I don't see the launcher
If you have an beta Presto (manufactured before April 2025) it may not have the launcher preloaded. Not to worry, here's how to install the latest MicroPython build and launcher.
- Hop over to the Releases page of our Presto Github repo, and download the most recent 'with-filesystem' .uf2 file. Note that flashing a 'with-filesystem' build will overwrite Presto's existing filesystem, so if you've got important code saved to your Presto be sure to back it up to your computer before continuing.
- Connect Presto to your computer with a USB-C cable, if it's not already.
- Put Presto into bootloader mode by holding down the BOOT button whilst tapping RESET.
- Drag and drop the downloaded .uf2 file to the "RP2350" drive that appears.
- After a few moments your device should reset, and you should then see the launcher.
Running the examples
Here's a quick overview of the examples you'll find in the launcher, and what you can do with them.
Basic Examples
These examples use Presto's core functionality, so are a great place to start!
Flying Cubes
This example draws some rainbow cubes, using Pico Graphics's line function to draw lines of pixels.
Analog Clock
This example demonstrates how to draw a clock with vector shapes, using our new vector graphics Pico Vector.
Vector shapes are drawn from a list of points, rather than from individual pixels.
Stopwatch
A simple stopwatch that demonstrates how to use Presto's touch inputs.
Tomato Timer
The Pomodoro technique is a time management technique that breaks work into short intervals. This example uses Presto's buzzer to alert you after each Pomodoro has finished to tell you it's time to switch focus. You can change the duration of the intervals by editing the code and changing the values under 'Time Constants' - the default is 25 minutes for a task, and 10 and 30 minutes for a short and long break.
Notice how the LEDs on the back of Presto light up in relation to what's on screen? Presto can do this automatically, we'll show you how later on.
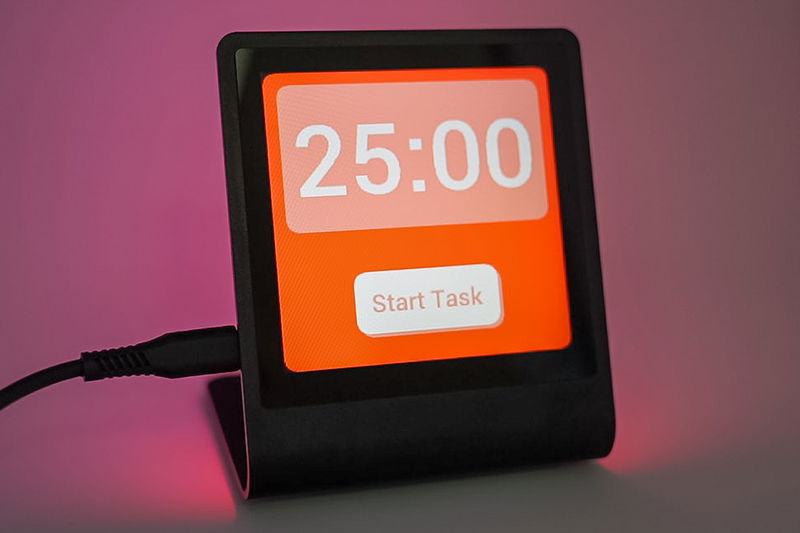
Photo Frame
The photo frame example lets you display all your favourite photos on Presto. We've added a few images to start you off, but we'll show you how to add more later. It will cycle to the next image after a certain amount of time (the default is 5 minutes) or you can tap the left and right edges of the screen to change the displayed photo.
This example manually tells the LEDs on the left and right of the screen to show when a touch has been registered.
Examples That Use Additional Hardware
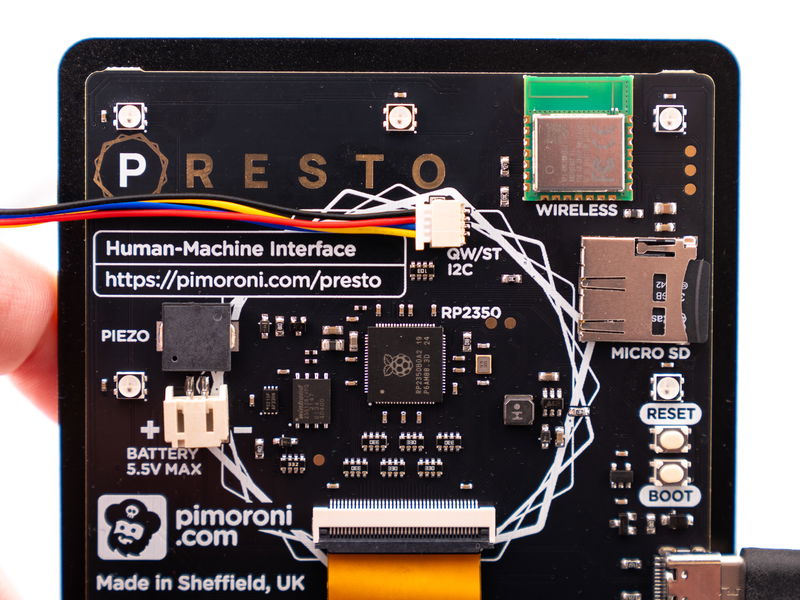
You'll need a Multi-Sensor Stick and a Qw/ST Pad to be able to run these examples. Using a Qw/ST cable, plug them in to the 'Qw/ST I2C' connector on Presto. Hit the reset button once you've done that, to make sure they're detected properly.
Both devices connect via the I2C bus (all aboard!) and have different I2C addresses, so you can have them both connected at the same time if you want. We've added two Qw/ST connectors to each breakout to make it easy to chain 'em with other I2C breakouts.
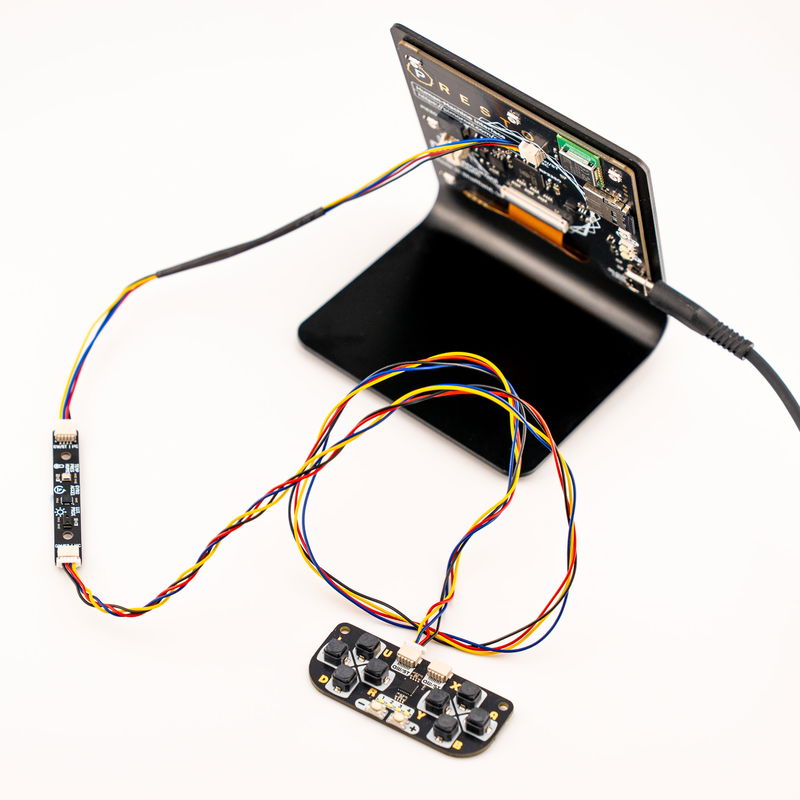
Attitude Indicator
This example uses the accelerometer on the Multi-Sensor Stick to simulate the attitude of a plane. For full immersion, we 3D printed a little Cessna to attach to our Multi-Sensor Stick. If you'd like to do the same you can find the model we used here.
Note that the roll angle of the horizon may appear to not match-up to the roll-angle of the plane - this is counter-intuitive but technically correct. Imagine you're inside the plane looking out of the window at the ground!
Documentation for the LSM6SD3 gyroscope and accelerometer can be found here.
Temperature
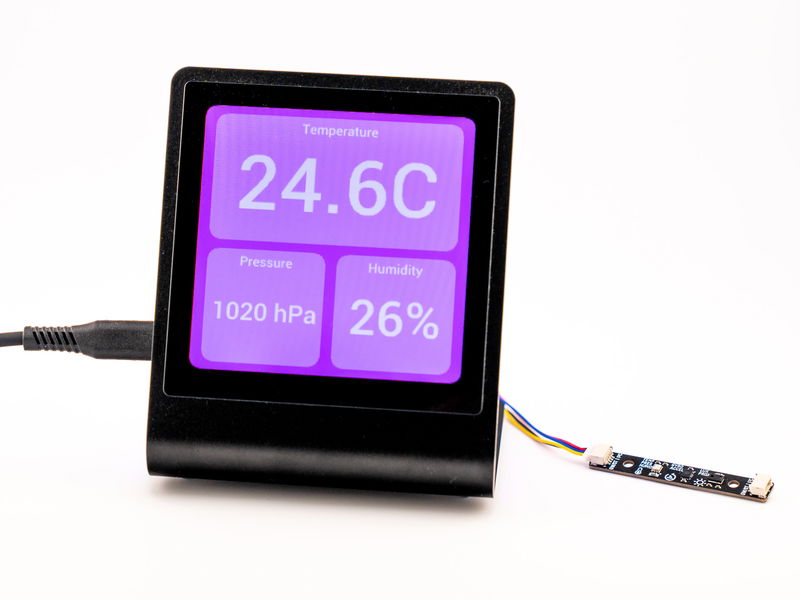
This example shows you the temperature, humidity and pressure readings from the BME280 environmental sensor on Multi-Sensor Stick. It uses a handy Widget class for displaying multiple sensor readings.
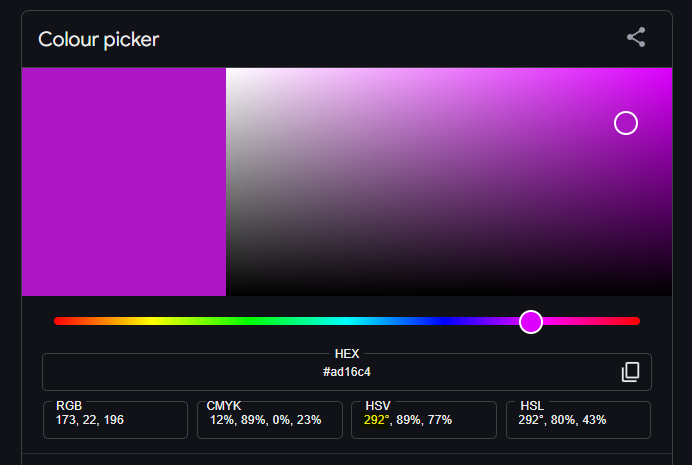
You can change the colours by altering the value of the hue variable. This is a value between 0 and 360°, mapped to a value between 0.0 and 1.0. So find your desired hue on a HSV (Hue, Saturation, Value) colour picker, and then divide it by 360 to provide you with a value between 0.0 and 1.0. This fetching magenta hue was 0.81.
Random Maze
This example shows how to use Qw/ST Pad as a game controller. Use the U, D, L and R buttons to move the yellow square to the green square. Once you've completed a maze, press the + button to move to the next level. The procedurally generated mazes increase in complexity everytime a level is completed.
If you'd like to learn more about how to read the inputs on Qw/ST Pad, check out the Qw/ST Pad documentation.
Wi-Fi Examples
The following examples connect to Wi-Fi to do their thing, so for them to work you will need to edit secrets.py add your Wi-Fi credentials. We'll show you how to do that step by step later on in this guide.
Word Clock
A stylish way of displaying the time on Presto. This example will attempt to connect to an online NTP (Network Time Protocol) server to update the time stored in Presto's RTC (Real Time Clock).
We wanted to make connecting to Wi-Fi super easy with Presto so all the network stuff is handled in the background by our libraries. Assuming you have your WiFi details stored in secrets.py, you just need to include a single line in your code to connect - presto.connect()
Bulb
This desk light example connects to Wi-Fi and shows the current CheerLights colour. Tap the bulb to turn the light on and off!
CheerLights is a global network of synchronized lights that can be controlled by anyone. You can change the colour from the Cheerlights Discord server or by including the #cheerlights hashtag in a BlueSky post, like this:

Talking to Presto with Thonny
To program Presto (or to edit the files on it), you'll need to talk to it through an interpreter - we're using Thonny, which is available for Windows, Mac or Linux.
- Install the latest version of Thonny. We recommend downloading it from the Thonny website as package managers do not always have the newest version.
- Open up Thonny. Make sure the interpreter (shown in the box on the bottom right corner) is set to 'MicroPython (Raspberry Pi Pico)'.
- Plug Presto into your computer, if it's not plugged in already. Because Presto is busy running the launcher program, main.py will already be running, you may need to interrupt it with the stop button in Thonny before sending it any instructions. In recent versions of Thonny, there's an option to interrupt running programs automatically - if you want to turn that on it's under Tools > Options > Interpreter > Interrupt working program on connect.
- After you press stop, you should get a MicroPython prompt that looks something like this. The >>> in the 'Shell' box tells you that Presto is talking to your computer and is ready to accept instructions.
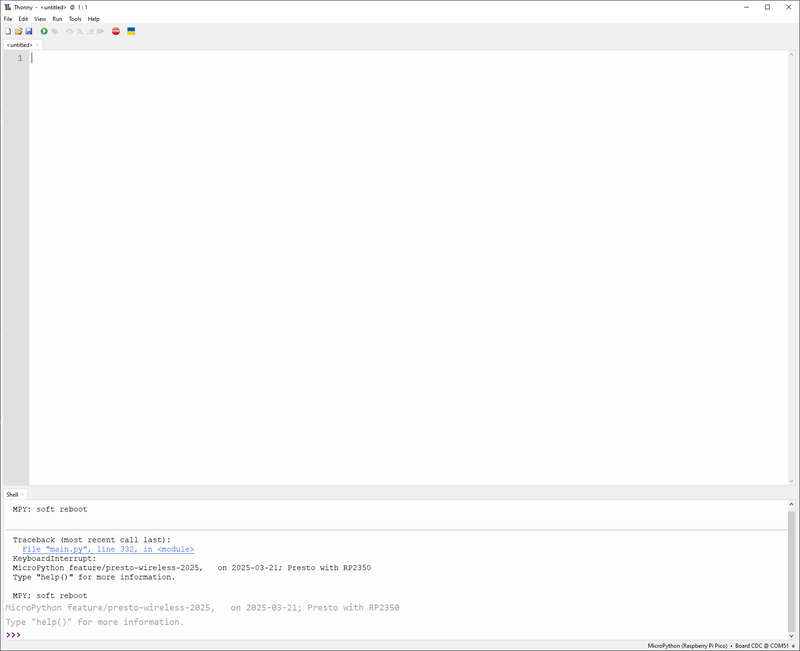
If you're having trouble using Thonny to communicate with your board, there's some troubleshooting suggestions at the link below:
Browsing and editing files
Using Thonny, you can open up the .py example files on the device and edit them. To see the files on your board, you will need to have the Files window visible - if you can't see it, you can make it show up with View > Files.
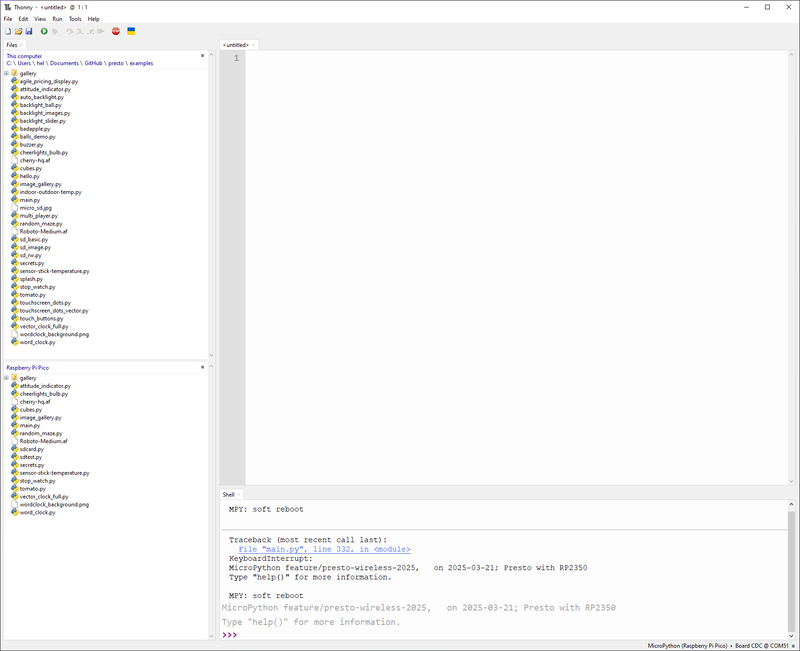
The top box can be used to browse the local files in on your computer, and the bottom box shows the files on your board. If you want to transfer files to (or from) your board, right click on the file you want to copy and select 'upload to /' or 'download to /'.
Adding your Wi-Fi credentials
To be able to connect to your wi-fi network Presto will need to know your wireless network details - these will be stored in a file called secrets.py which should already exist on your board.
Double click on this file in the bottom Files window to open it up, and edit in your network's SSID and password - both SSID and password should be between quote marks "like this". Note that SSID and password are case sensitive!
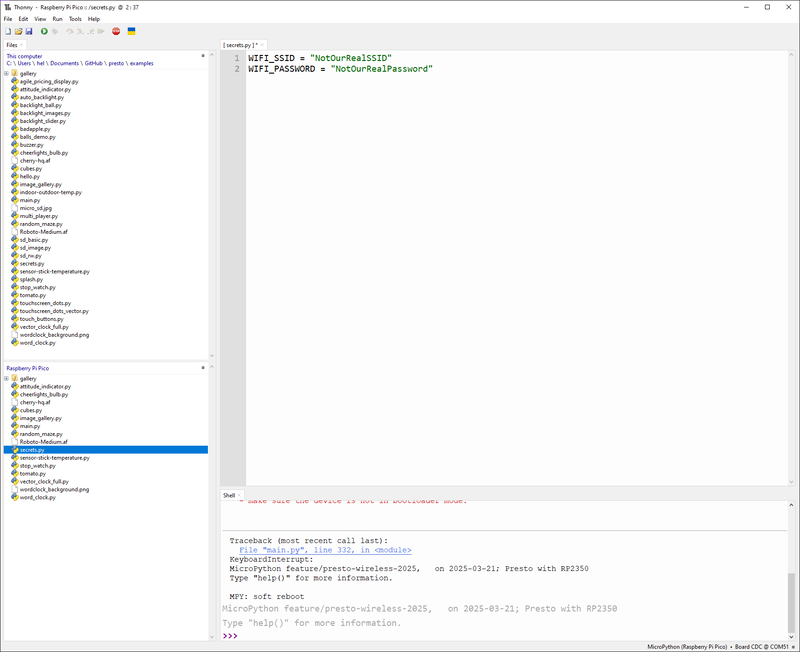
Once that's done, click the save icon in the toolbar to save your changes.
Hit the RESET button on the board to reload the launcher - if you got your credentials correct hopefully now the wireless examples should be able to connect to the internet!
Adding your own photos to the Image Gallery
If you just want to add a few photos to the Image Gallery app, you can upload them to the gallery folder on Presto. For best results, you should pre-process your image files:
- They'll need to be resized to 240 x 240 pixels.
- Make sure they're saved as non-progressive jpegs, with a filename that ends in .jpg.
Saving at 70% or so quality is a good idea - this will reduce the filesize without affecting the quality too much.
Double click on the
galleryfolder in the bottom window to navigate into it, and then right click on the files in the top box and select 'Upload to /gallery'.
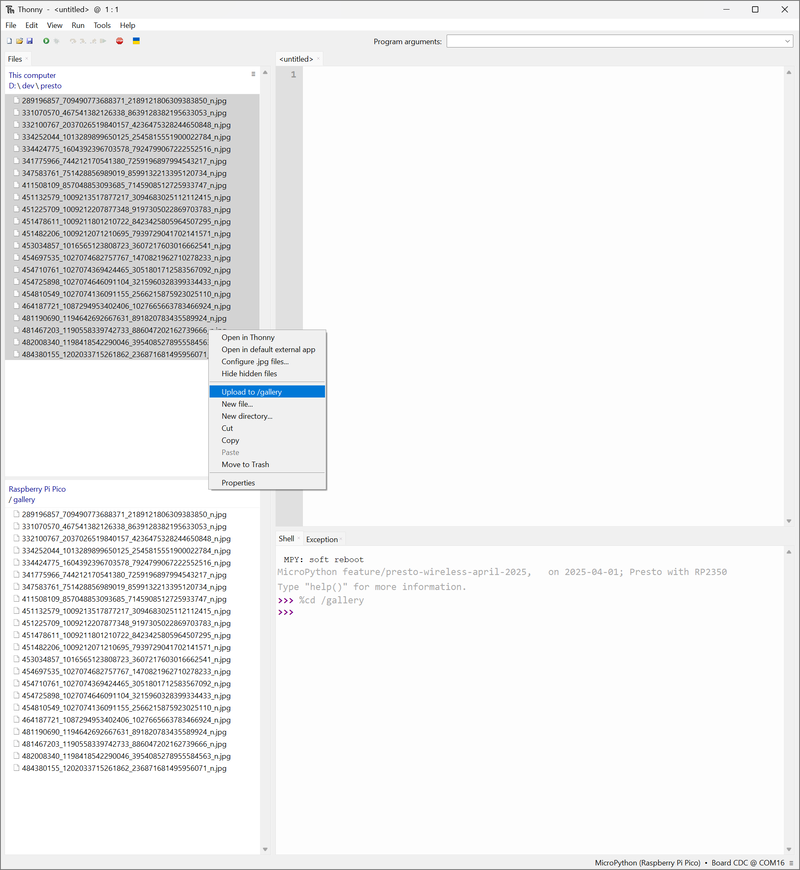
You can delete our sample images from here too, if you wish.
Reset your Presto, and hopefully now your images should be showing up in the Image Gallery.
Adding your own photos via SD card
If you're planning on displaying a lot of images on Presto, you may want to store them on your SD card instead of in your Presto's flash storage. Here's how to do that!
Our SD cards come with Raspberry Pi OS pre-installed on them, so you'll probably want to format it before use so that you don't have a load of unnecessary files cluttering up the place and causing confusion.
Raspberry Pi Imager (available for Windows, MacOS or Linux) is a nice way of doing this as it get rids of any partitions for you as well as formatting the SD card in a Pico-friendly format. After you've downloaded and installed it, click on the 'CHOOSE OS' button and scroll down to the bottom of the list till you get to the 'Erase' option.
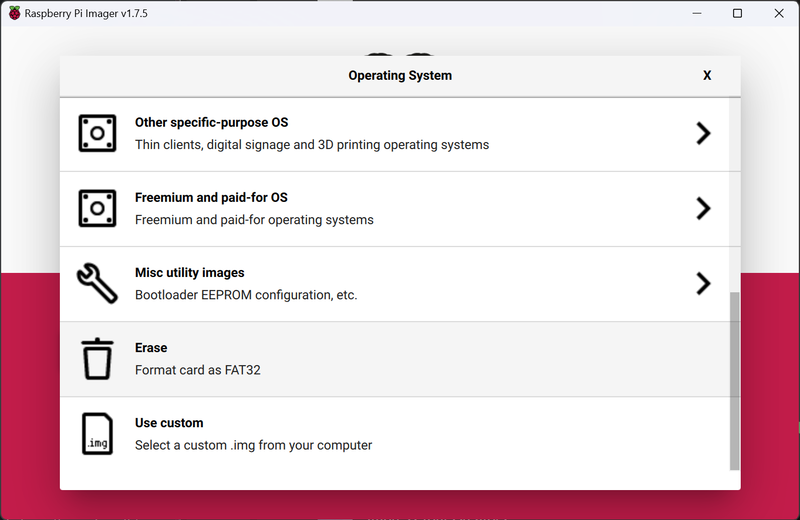
Connect the microSD card to your computer (if you have a laptop with a SD/microSD sized slot this is easy, otherwise you may need to use a USB card reader). Click the 'CHOOSE STORAGE' button, choose your SD card and then click 'WRITE' to start the format.
Once your card is formatted, create a new folder on it called gallery. Copy your prepared images into this folder, then remove it from your computer and plug it into Presto's SD card slot. The Image Gallery example will look in the gallery folder on your SD card for preference, before falling back to using the gallery folder that's on Presto.
Note that the SD card slot on Presto is spring loaded - if you want to remove the SD card to add more photos you'll need to push it in to release the mechanism.
Running examples through Thonny
You can run any of the .py example files stored on Presto by double clicking on them in the Files window to open them up and then pressing the green run button in Thonny. The launcher program is saved to your device as main.py, which means it will run every time your Presto is powered up.
Running files through Thonny instead of through the launcher has the advantage that you can view any console messages and errors that your code produces - this is very useful when writing your own code.
Adding more examples
We include a curated selection of examples with the launcher, but you can find all of the example code at the link below:
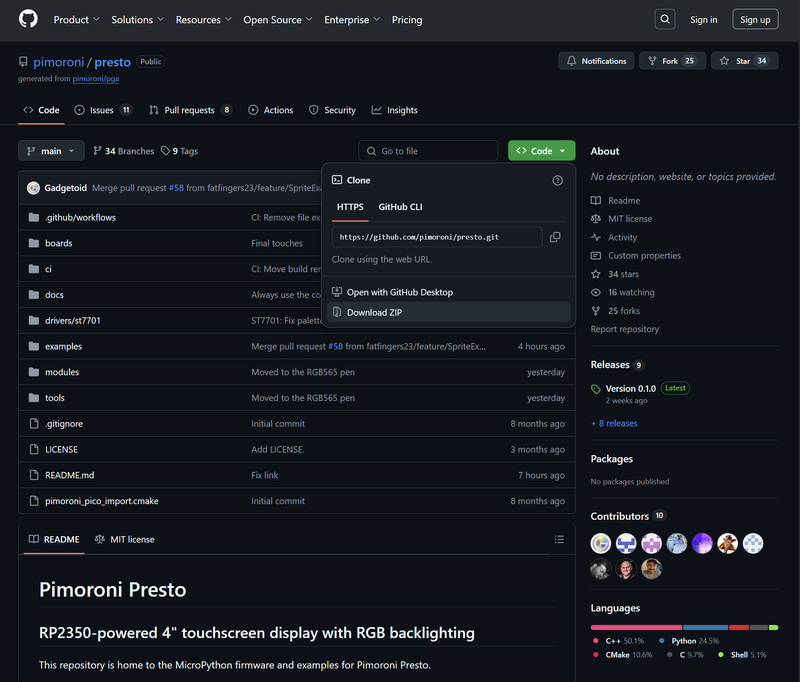
You could copy and paste the examples one by one into Thonny, or you could clone or download the whole repo to your computer and them upload the files all at once.
You can download everything as a zip by clicking the green code button on the front page of the Presto repo, and clicking 'download ZIP'.
Writing your own code
Hello World
Let's get some text on that display, quick stat! Copy and paste it into a new tab in Thonny, and press the green run button.
from presto import Presto

presto = Presto()

display = presto.display

WHITE = display.create_pen(255, 255, 255)

display.set_pen(WHITE)
display.text("Hey Presto!", 0, 0)
presto.update()
Here's what the code does:
- First we import the Presto module and then create a new instance of the Presto class with
presto = Presto(). This sets up Presto's hardware behind the scenes to make it easy to use the LCD display, the touch interface, the ambient lighting and even the WiFi, without you having to set it all up manually every time. presto.displayrefers to our instance of Pico Graphics, our tiny graphics library. We'll be using Pico Graphics functions a lot to draw things, so we're setting up some shorthand so we can invoke it with justdisplay.create_pencreates a pen colour for us to draw with. The numbers specify the RGB colour on a scale between 0 and 255 - in this case white. We then specify what colour we want to draw withset_pen.set_penswitches to our new white pen.textdraws bitmap text to the display buffer. The first argument is the string you want to display, followed by the x/y position of where you want the text to be displayed on the screen.presto.update()updates the screen to show what's stored in the display buffer. You can draw multiple things to the buffer before updating the screen!
The default font is bitmap6, which is all uppercase and a little small and blocky. Bitmap fonts are fast and simple to use, but they're not very pretty to look at.
The following version of the code adds a few more PicoGraphics functions into the mix!
from presto import Presto

presto = Presto()

display = presto.display

BLACK = display.create_pen(0, 0, 0)
CYAN = display.create_pen(0, 255, 255)

display.set_pen(CYAN)
display.clear()

display.set_pen(BLACK)
display.set_font("bitmap8")
display.text("Hey Presto!", 10, 10, scale=3)
presto.update()
Here we've set up a new pen colour and used clear() to fill the display with the currently selected pen colour, to make a cyan background. We've specified a different bitmap font - bitmap8 (more pixels!) and a bigger size - scale=3. We've also adjusted the positioning of the text a little, so it's not right at the edge of the screen.
You can find a full list of PicoGraphics functions in the PicoGraphics documentation.
More about the Presto module
The presto.py MicroPython module that contains the Presto class is present on your device, but it's not visible on the filesystem as it's part of the MicroPython build. If you'd like to see the nitty gritty of what it's doing, you can view the file on Github.
You can specify some options when setting up your Presto instance. Here's one that you might like to try now!
Using presto = Presto(ambient_light=True) instead of presto = Presto() enables automatic ambient lighting. The LEDs on the back of Presto will automatically change colour based on what's showing on the screen, with zero effort required - schweet!
You can find out about the other options you can supply when setting up your Presto instance in the Presto function reference.
Hello World (Vector Edition)
Time to get fancy! This is how you draw vector text using Pico Vector and Alright Fonts:
from presto import Presto
from picovector import PicoVector, ANTIALIAS_BEST

presto = Presto(ambient_light=True)
display = presto.display

MAGENTA = display.create_pen(255, 0, 255)
BLACK = display.create_pen(0, 0, 0)

vector = PicoVector(presto.display)
vector.set_antialiasing(ANTIALIAS_BEST)
vector.set_font("Roboto-Medium.af", 90)
vector.set_font_line_height(80)

display.set_pen(MAGENTA)
display.clear()
display.set_pen(BLACK)
vector.text("Hey Presto!", 0, 160, max_width=240)
presto.update()
Assuming you have the launcher installed, the Roboto-Medium font should already be present on your device.
Vector fonts are slower than using bitmap fonts but you get a ton more customisation and manipulation options, and they're great for large, beautiful text.
You can draw all sorts of shapes with vectors, not just text! Consult the Pico Vector documentation for a full list of options.
More fonts?
You can download more ready to go vector fonts from the link below. It is also possible to convert your own .ttf or .otf fonts from Google Fonts using a Python script!
Using touch
Presto is our first microcontroller with a touch screen and we've tried to make it so that reading touch presses is as simple as possible. It's very similar to reading the input from a button, except you have to draw the button yourself! Here's a simple demo of how to draw and read a touch button:
from presto import Presto
from touch import Button

presto = Presto()
display = presto.display

BLACK = display.create_pen(0, 0, 0)
YELLOW = display.create_pen(255, 255, 0)
MAGENTA = display.create_pen(255, 0, 255)

touch = presto.touch

button_1 = Button(40, 40, 160, 60)

while True:
    touch.poll()

    if button_1.is_pressed():
        display.set_pen(MAGENTA)
        display.rectangle(40, 40, 160, 60)
        presto.update()
    else:
        display.set_pen(YELLOW)
        display.rectangle(40, 40, 160, 60)
        presto.update()
button_1 = Button(40, 40, 160, 60) sets up the dimensions of your touch button (the numbers are an x/y position, followed by width and height). touch.poll() checks for touchscreen updates.
A touch demo that reads multiple buttons can be found here.
Adding your own examples to the launcher
Written a great app? Here's how to customise how it shows up in the Presto launcher.
If you save a .py script to the root directory of your Presto it will show up in the launcher automatically with a generic icon. You can customise the name, description and icon used in the launcher by including this information at the top of your example. Here's what this looks like for the Cheerlights example:
# ICON [[(0.0, 24.0), (-1.93, 23.66), (-3.75, 22.51), (-4.42, 21.69), (-5.11, 20.23), (-5.33, 18.73), (5.33, 18.67), (4.91, 20.77), (4.06, 22.12), (3.34, 22.82), (2.1, 23.58), (0.07, 24.0)], [(-10.67, 16.0), (-10.67, 10.67), (10.67, 10.67), (10.67, 16.0), (-10.67, 16.0)], [(-10.0, 8.0), (-12.44, 6.31), (-15.06, 3.8), (-16.01, 2.64), (-17.3, 0.72), (-18.55, -1.82), (-19.23, -3.78), (-19.81, -6.5), (-20.0, -9.27), (-19.89, -11.51), (-19.37, -14.52), (-18.51, -17.1), (-17.78, -18.66), (-16.29, -21.03), (-14.06, -23.61), (-12.39, -25.08), (-10.53, -26.4), (-8.18, -27.66), (-6.51, -28.31), (-4.11, -28.95), (-2.22, -29.22), (0.14, -29.33), (1.92, -29.25), (4.76, -28.8), (6.5, -28.31), (8.89, -27.32), (10.67, -26.3), (12.4, -25.04), (13.76, -23.84), (15.55, -21.92), (17.31, -19.45), (18.36, -17.41), (18.97, -15.86), (19.6, -13.52), (19.94, -11.05), (20.0, -9.2), (19.79, -6.43), (19.48, -4.78), (18.72, -2.32), (17.93, -0.54), (16.56, 1.79), (15.4, 3.37), (13.36, 5.52), (11.65, 6.91), (10.06, 7.97), (-10.0, 8.0)], [(-8.4, 2.67), (8.4, 2.67), (10.02, 1.35), (10.94, 0.41), (12.14, -1.14), (13.64, -3.98), (14.23, -5.77), (14.51, -7.17), (14.67, -9.27), (14.51, -11.57), (14.19, -13.19), (13.44, -15.35), (12.77, -16.67), (11.72, -18.23), (10.81, -19.31), (9.38, -20.66), (7.64, -21.92), (6.27, -22.66), (4.72, -23.28), (2.72, -23.77), (0.53, -23.99), (-1.72, -23.91), (-3.36, -23.64), (-5.45, -23.01), (-7.77, -21.85), (-9.2, -20.82), (-10.81, -19.3), (-11.81, -18.11), (-12.99, -16.27), (-13.5, -15.21), (-14.28, -12.86), (-14.62, -10.59), (-14.65, -8.58), (-14.21, -5.65), (-13.82, -4.34), (-13.1, -2.66), (-11.6, -0.36), (-10.56, 0.82), (-8.45, 2.63)], [(0.0, 2.67), (0.0, 2.67)]]
# NAME Bulb
# DESC A cheerlight connected desk light.
The numbers next to ICON are a list of points that are used to draw the icon as a vector shape. If you want to generate your own icon the Python script that we used is to convert them from a glyph font is here.
Next steps
Hopefully that's enough to help you start making your first Presto app! If you'd like to share your great app with others, please consider posting about it on the forums, or sending us the link so we can add it to our list on Github :)
Search above to find more great tutorials and guides.