Making a Minecraft Thermometer
In this tutorial we're going to wire up a TMP36 temperature sensor to Explorer HAT Pro, read its value, and display it as a thermometer in Minecraft.
You'll learn how to read analog values from Explorer HAT Pro, and make them do something useful in your Python code!
You'll need
- A Raspberry Pi
- Explorer HAT Pro
- 1x TMP36 ( You can find this in our Explorer HAT Pro parts kit )
- 3x Male to Male Jump Wire ( You can find this in our parts kit, too )
Putting It Together
The TMP36 is a small, unassuming black package with 3 pins that looks a lot like a transistor at first glance. However, it detects the the ambient temperature and turns it into a variable voltage that Explorer HAT Pro's analog inputs can understand.
The TMP36 needs power, and it must be connected to one of the analog inputs. We'll use ANALOG 1.
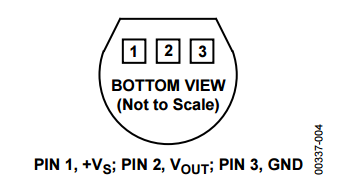
When we want to figure out how to wire up something like the TMP36, we'd use Google to search for the Datasheet and find within it a diagram that looks a little like this:

Pick the TMP36 up and look at the bottom with the pins facing you and the curved side pointing downwards to match the diagram. You know know that the left pin is 5V, the right one is Ground and the middle one is Out. This will still be true when you hold the TMP36 upright with the legs pointed downward and face the curved side away from you. So to keep it simple, this is how we'll plug it into our breadboard.
A quick note about breadboards...
The wiring diagram only shows one possible way out of many that you could position and wire up your thermometer. Inside the breadboard all of the holes running from the top to the bottom are connected to each other, with a gap along the middle. This gives two sets of 5 connected holes in each column. From left to right, the holes aren't connected at all; the 17 holes in each row are isolated from each other.
The image below shows a cutaway of the breadboard on top of Explorer HAT. Notice the silver metal contacts that run from top to bottom. When you plug wires into a breadboard, it's these metal contacts that connect them together.

And back to the wiring...
Now you know the pinout, wire up the TMP36 as pictured below, emember it doesn't matter how close your wire is to the TMP36 as long as it's plugged into the right column and in the same half of the breadboard:

Starting The Python IDE
To follow along with the next section, you should start the Python IDE. While you can normally do this by selecting it from the Programming menu, we need to run it as "root" so it has permission to talk to Explorer HAT. You can do this by going to Menu -> Accessories and clicking on Terminal.

A new black window will pop up. If you haven't already, now's a good time to install the Explorer Craft library.
Make sure your Pi is connected to a network, either via a cable or WiFi. Then, in the new black window type:
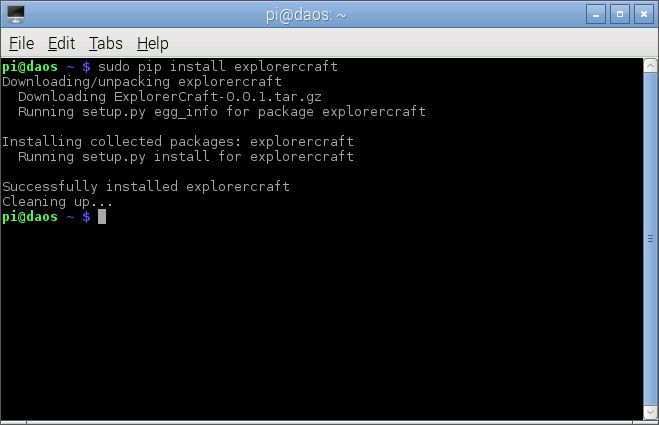
sudo pip install explorercraft
You should see something like this:

Now you can start idle as root, to do this type:
sudo idle
Sudo, "superuser do", is a command that does things as the "root" or "superuser" on the Pi. Running idle with "sudo" will give it all the permissions it needs to talk to Explorer HAT.
Understanding The Code
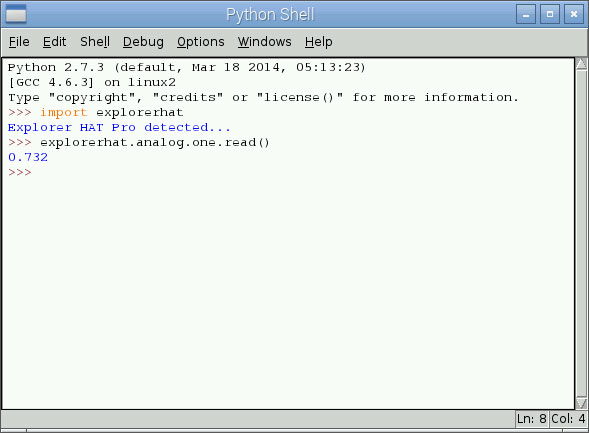
In the new window that pops up, you should type import explorerhat so you can follow along with this section. You should be typing everything below into the white, Python IDE window.

If we were to read the TMP36 datasheet we'd find that our little temperature sensing friend outputs a voltage that's 0.01 volts to each degree celsius. We would also find that at 25 degrees it outputs 0.75 volts ( or 750 millivolts ).
We can use explorerhat.analog.one.read() to read a voltage. Explorer HAT Pro's analog inputs output their values in volts, from 0.0 to 5.0. This means at 25 degrees we'd get:
>>> explorerhat.analog.one.read()
0.75
But we want our temperature in degrees not volts, so let's convert it:
>>> 25 + (explorerhat.analog.one.read() - 0.75) * 100
25.0
We can still simplify this, so let's do so:
>>> explorerhat.analog.one.read()  * 100 - 50
25.0
When you see this line in the code, remember it's our Millivolts to Degrees Celsius conversion.
Note: The order of
* 100 - 50is very important, if you were to use- 0.5 * 100then Python would assume you mean to-50from your reading rather than subtract 0.5 and then multiply it by 100. You can fix this by using brackets, to specify which bits should be added up first, like so:( my_value - 0.5 ) * 100but it's quicker to just type what we have above.
Making Our Minecraft Thermometer
We need a way to represent our thermometer in Minecraft. To do this, we're going to use a stack of red wool blocks that ranges from 1 to 30 blocks tall. This will map to the temperature range we're interested in.
To save time, we'll use some existing Python code to handle drawing the thermometer, and we'll just provide the glue to take Explorer HAT's analog input and feed it to this code.
In the idle editor you launched earlier, click File and then New Window, this new window is where you'll write the Python code.

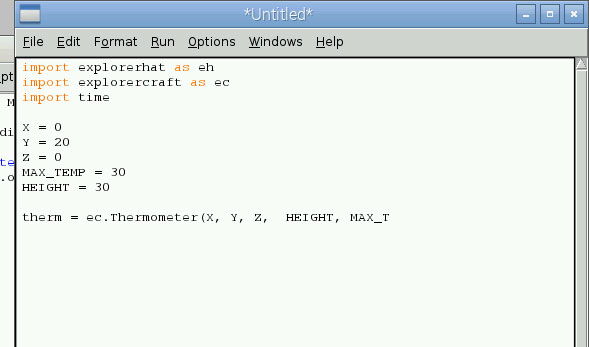
Tip: don't type anything that appears after a #, these are comments, added to help you understand the code:
import explorerhat as eh    # Using `as` allows us to give the
import explorercraft as ec  # libraries short names.
import time

X = 0
Y = 20                      # Y
Z = 0
MAX_TEMP = 30
HEIGHT = 30

# Tip: Purple isn't the only wool colour!
therm = ec.Thermometer(X,Y,Z,HEIGHT,MAX_TEMP,ec.WOOL_PURPLE)

therm.teleport_player()    # Teleport to the thermometer

while True:
    temp = eh.analog.one.read() * 100 - 50
    therm.update(temp)     # Update our thermometer
    time.sleep(0.1)        # Wait a little while
Once you've finished typing use the Menu to launch Minecraft. It's under games. Once it has launched, click Start Game and then Create New.
Now, switch back to your IDLE window ( you can get your cursor back by pressing ESC in Minecraft ) and press F5 to run the code. You'll be asked to save the file- name it something like thermometer.py.
If all goes well when you switch back to Minecraft and click Back to game you should be greeted with something like this:

What Next?
Here's a little challenge; the ExplorerCraft library will let you create bars for any number or analog value, not just a thermometer.
Why not try setting up another bar for one of the little blue components in the parts tin. The little blue things with dials on are known as Rotary Potentiometers. They're very similar to the temperature sensor- they will output a varying voltage depending on how you turn the dial on top.
- You'll need to use
ec.BarGraph(X, Y, Z, HEIGHT, MAX_VALUE, BLOCK_STYLE)to create a Bar Graph. - BLOCK_STYLE should be a choice of block, it doesn't have to be wool!
- MAX_VALUE should probably be 50, the potentiometer will output from 0 to 5.0 volts which you can multiply up to 0-50 like so:
int(ec.analog.two.read()*10) - Remember that in Minecraft the Y axis is up/down
- The 3 pins on the rotary potentiometer are in the same order as those on the TMP36
Search above to find more great tutorials and guides.