Raspberry Pi Zero: Talking Serial
You can use a host Raspberry Pi 2, or a PC to talk to your Raspberry Pi Zero via the oft-overlooked serial console.
This might sound scary and advanced at first, but it's a great way of logging in to your Pi, seeing if any of your code has gone wrong and fixing it. You can also use a serial terminal to configure WiFi, or write whole scripts onto your Pi Zero in Nano.
This guide will walk you through the software and hardware requirements for using Serial/UART on your Pi Zero.
From Your PC
To get up and running on your PC, you'll first need a means of connecting it to your Pi's UART pins (TX for Transmit, and RX for Receive). The easiest way of doing this is with a USB to UART serial cable/
But first you'll need some software to talk to your Pi once it's hooked up. We recommend the PuTTY SSH/Telnet client.
Download the version applicable to you- this is most probably putty.exe under Windows on Intel x86.
Nnext, make sure you've got male pin headers soldered on to your Pi Zero and connect the 5V, Ground, TX and RX lines from the UART cable to your Pi.
The white wire should connect to TX and the green to RX. Red and black are, of course, power and ground.
Finally, plug the USB end of the cable into your computer. If the power is connected up properly then your Pi should power up and boot from your USB ports power supply.
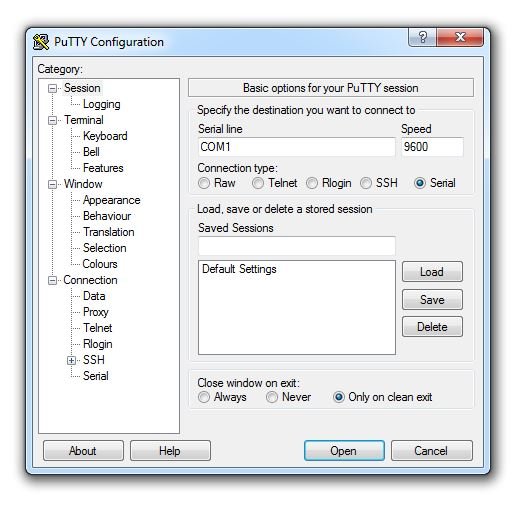
Fire up putty.exe, you should see a window that looks something like this:

Under Connection type: pick Serial. You should then enter the COM port of your UART cable. You can find this by delving into Devices and Printers on your Windows Computer. You should see a list of devices, one of which will be Prolific USB-to-Serial Comm Port (COMXX), the COMXX part, where XX is a number, will be the bit you want. Pop the correct COM port into PuTTY and press Open.
Search above to find more great tutorials and guides.