Setting Up Picade with Raspberry Pi 5
This guide will walk you through installing Raspberry Pi OS and Retropie on your Raspberry Pi 5, and give you some tips for getting it working nicely with Picade. It will also show you how to use PICO-8 on your Picade.
What you'll need
- An assembled Picade kit with a Raspberry Pi 5 installed in it*. If you've not yet assembled your Picade our online assembly guide can be found here.
- A microSD card
- Another computer to flash the SD card and to communicate with the Picade using SSH.
- A USB keyboard may be helpful at certain points.
*If you want to use an older Pi with this kit that's also possible (as long as it's one of the ones with a 40 pin header). These instructions should still work as long as you flash the correct version of Raspberry Pi OS for your Pi. You can also follow these instructions if you have a Picade Console - just skip the parts about setting up the display :)
About RetroPie
RetroPie allows you to turn your Raspberry Pi or PC into a retro-gaming machine. It builds upon Raspberry Pi OS, EmulationStation, RetroArch and many other projects to enable you to play your favourite arcade, home-console, and classic PC games with the minimum set-up. For power users it also provides a large variety of configuration tools to customise the system as you want.
At the time of writing, there's not an official release of RetroPie for Raspberry Pi 5, but you can install it on top of a standard Raspberry Pi OS SD card image. This process takes a bit longer, but means you can easily run other software on your Pi as well as RetroPie / EmulationStation, such as PICO-8 and Pygame - great news for if you're planning on making your own games.
Installing Raspberry Pi OS
First we need to download and install Raspberry Pi Imager on your computer (it's available for Windows, Mac and Linux). We'll be using this program to load Raspberry Pi OS onto your SD card.
Open up Raspberry Pi Imager.
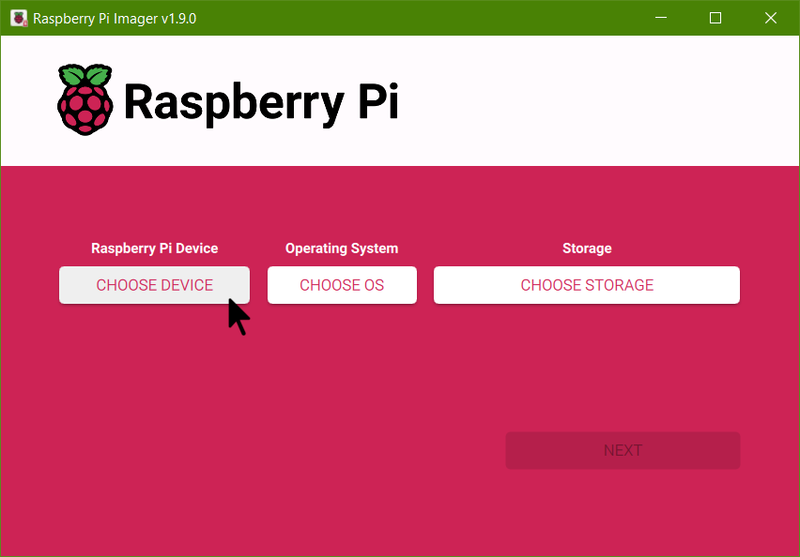
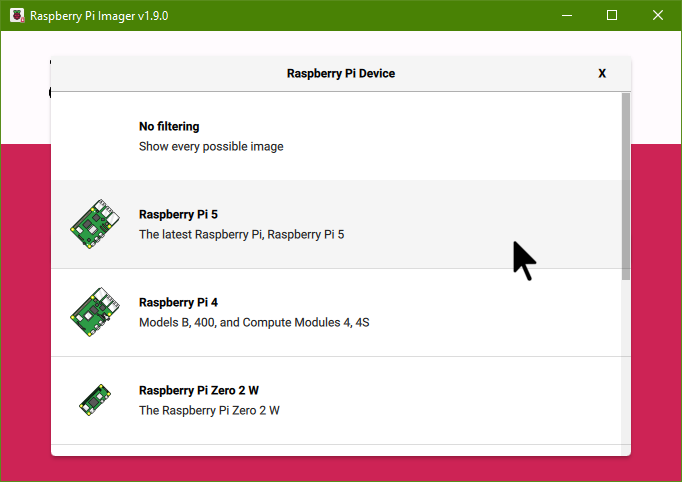
Click on 'Choose Device' and pick 'Raspberry Pi 5'.
Click on 'Raspberry Pi OS (Other)':
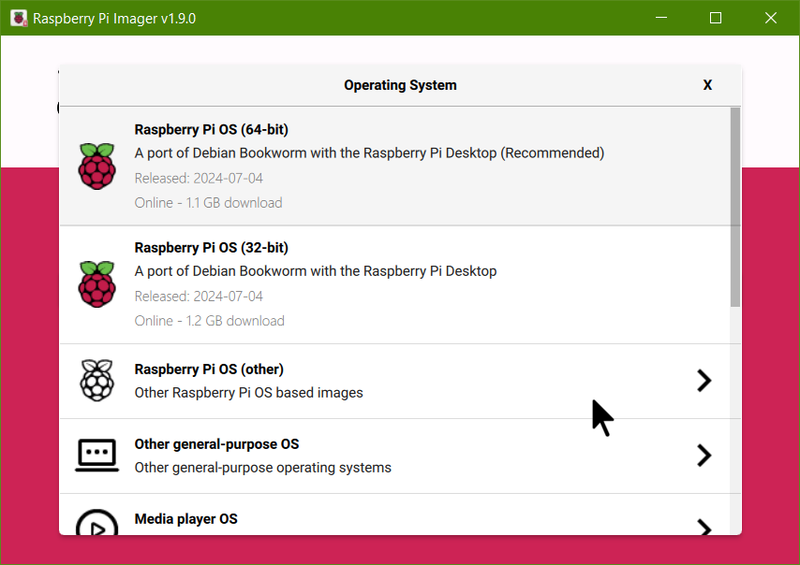
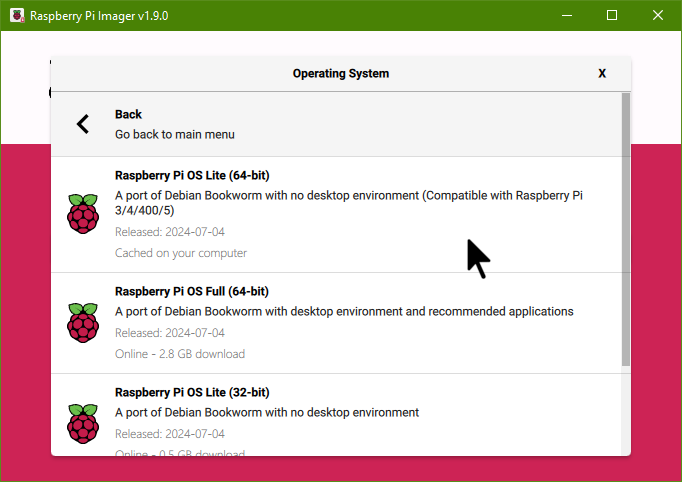
Now it's time to select what version of Raspberry Pi OS you want to use. We'll be using the Lite version, but if you'd like to have the option to use to the Raspberry Pi graphical interface you can use the Full/Desktop version instead.
Select 'Raspberry Pi OS Lite (64-bit)':
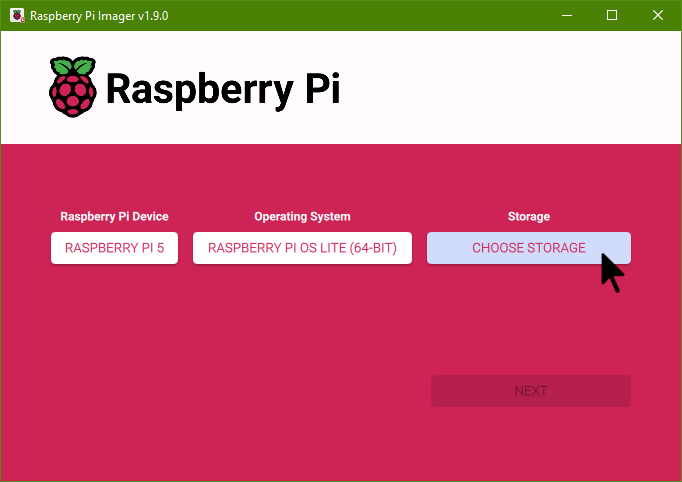
On the next screen, click on 'Choose Storage':
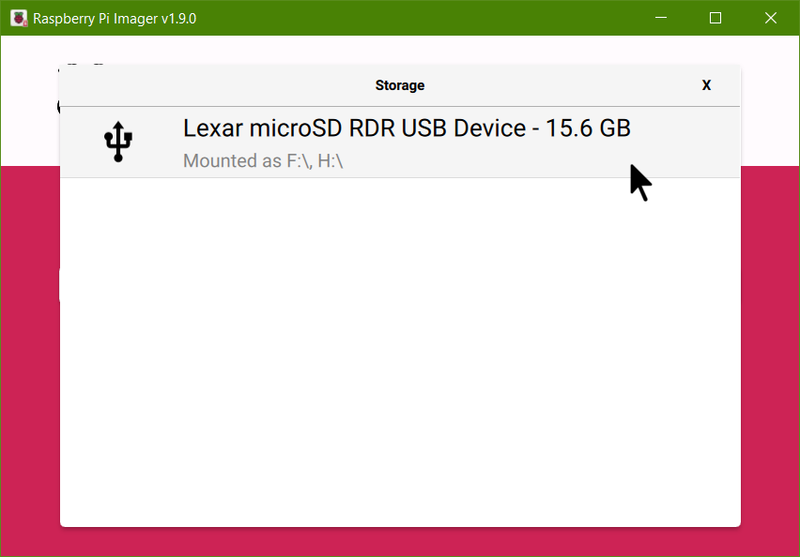
Select your SD card:
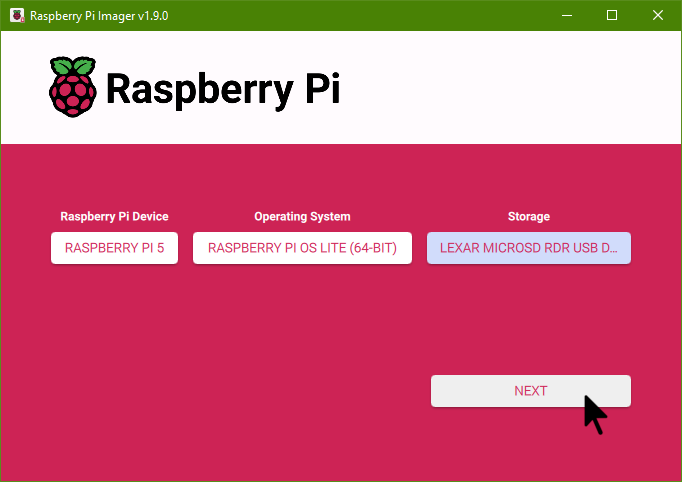
Select 'Next' to start writing the OS to the SD card:
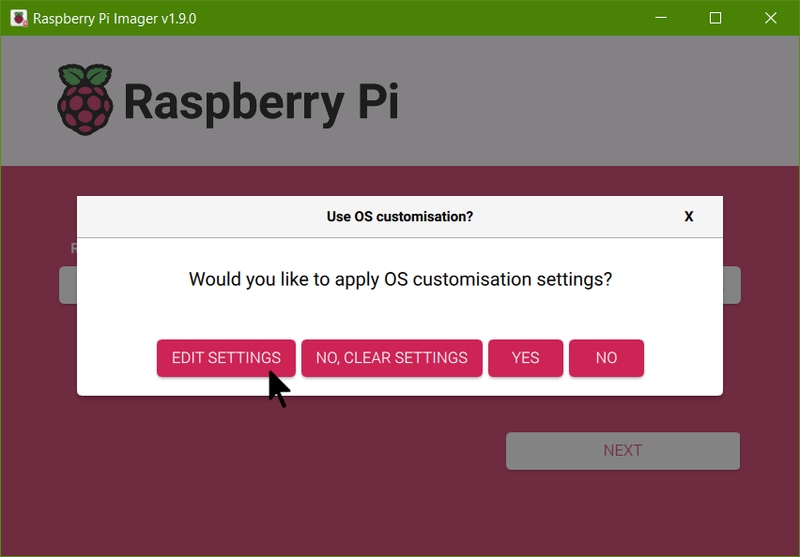
But before you start, you need to set up the operating system so you can log in from another computer using SSH. Click on 'Edit Settings':
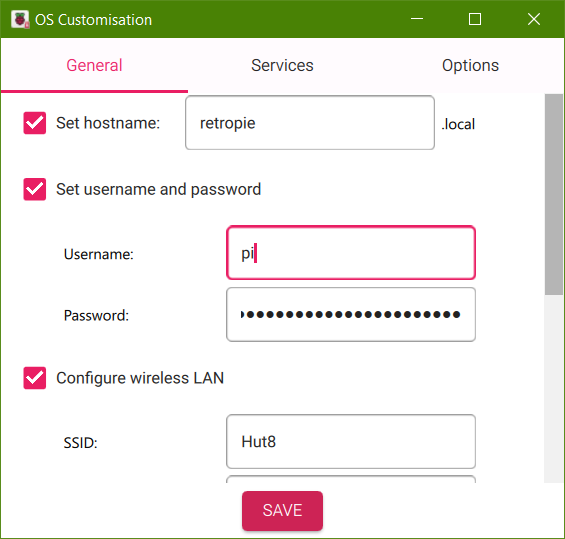
In the 'General' Tab, change the hostname, username and password to something you'll remember, and enter your WiFi details.
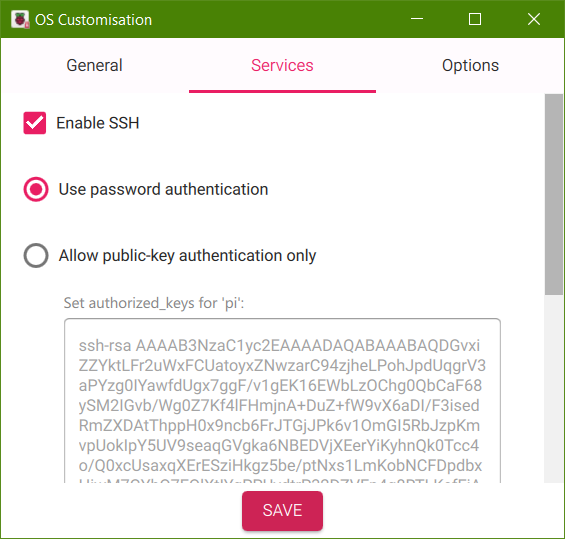
In the 'Services' section, turn on SSH so you can log in from another computer and transfer files using SFTP. Then, click Save.
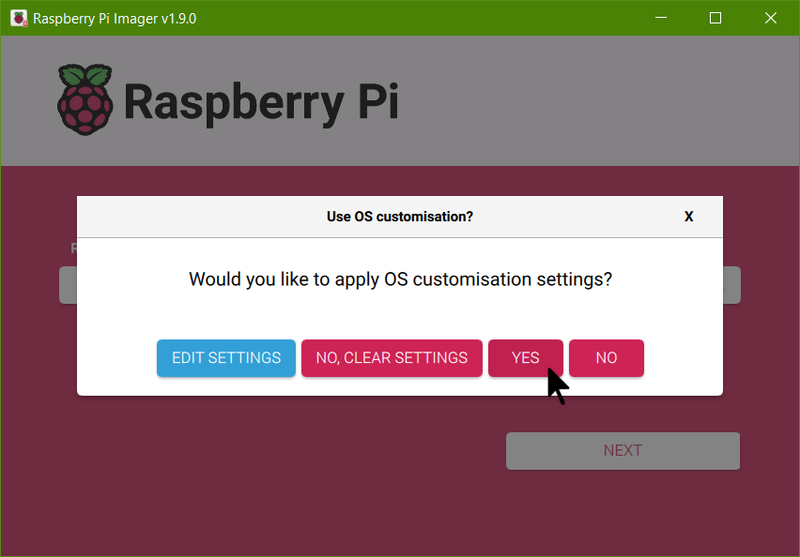
Then click on 'Yes'. Raspberry Pi OS Lite will be written to the SD card:
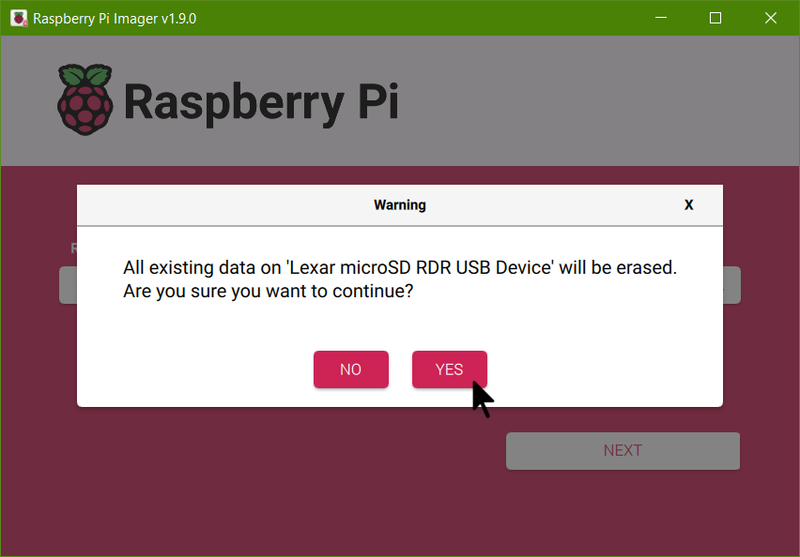
Confirm it is okay to overwrite your SD card:
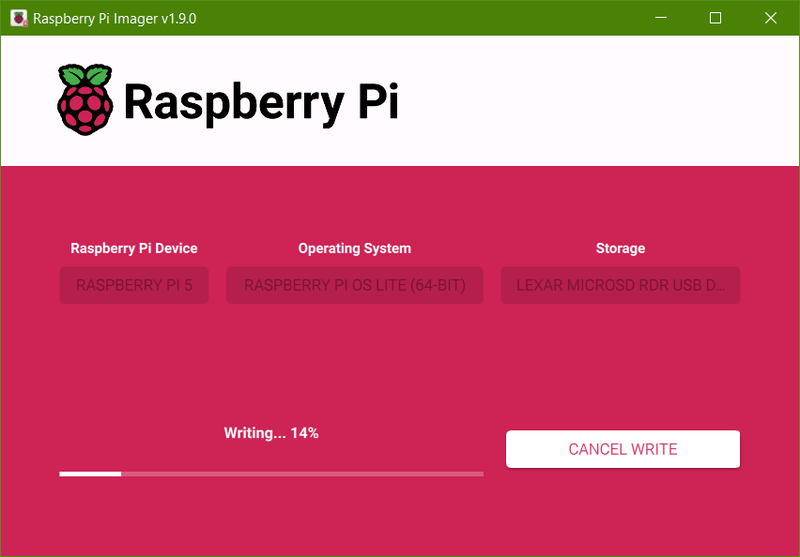
And wait for the OS to be written:
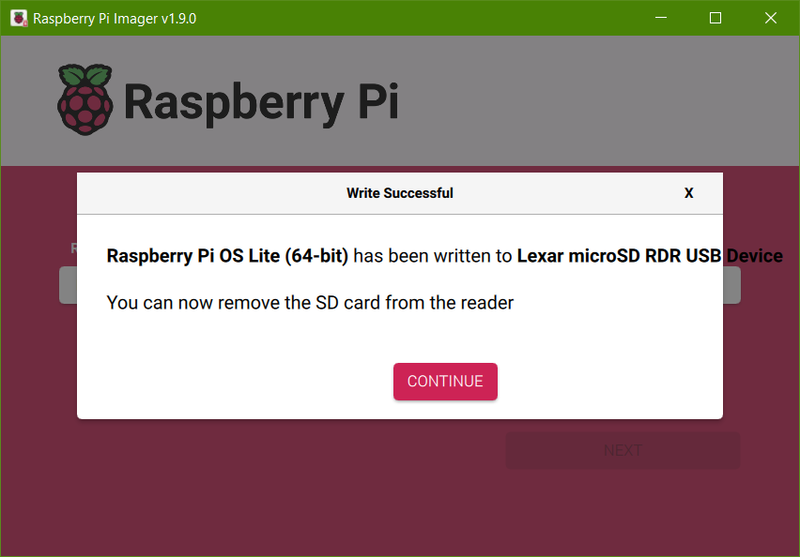
After it's finished writing, you can safely remove the SD card and insert it into your Raspberry Pi's SD card slot.
Installing RetroPie with Raspberry Pi Imager?
If you're not using a Pi 5, you also have the option of flashing the official release of Retropie that's available in Raspberry Pi Imager directly (find it under Emulation and game OS). Installing Retropie this way is much faster on older versions of Pi.
Note that it's not possible to add your SSH details when loading this image so you'll need to plug in a keyboard to set up wi-fi (F4 to exit Emulation Station, then sudo raspi-config > 'System Options' > 'Wireless LAN'). Skip forward to 'Installing the Picade Software' section after once you're done flashing Retropie and configuring wi-fi.
Configuring the display
Press the power button on your Picade. If it's wired up correctly, everything should start up and you should hear your Active Cooler whirr into life. But, oh no:
⚠ My screen is flashing on and off!
If you're using a Pi 5, you may find that the screen keeps flashing on and off, and the purple LED on the screen driver board is flashing instead of steady. This is because the screen panel is not getting enough power from your Pi 5's USB ports - we need to override the default setting and tell the Pi to let it's USB ports provide maximum power.
To edit the config file, we'll be logging in via SSH from another computer. If you'd prefer to plug a keyboard into the Pi and edit the file directly that's possible, but you'll need to either connect the Pi to another HDMI display or power the Picade display from a seperate micro USB power supply to be able to see what you're doing.
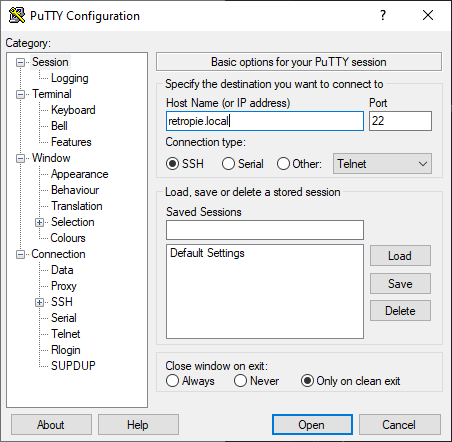
To connect using to the Pi using SSH, you'll need a SSH client. We're using Putty, a free Windows SSH client. Fire it up and enter the hostname that you set up in Raspberry Pi Imager earlier, then click 'Open' to connect.
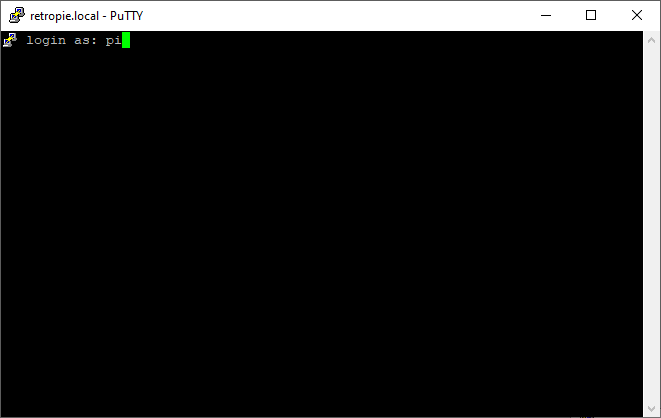
On the next screen you'll be asked for your Pi's username:
And then the password:
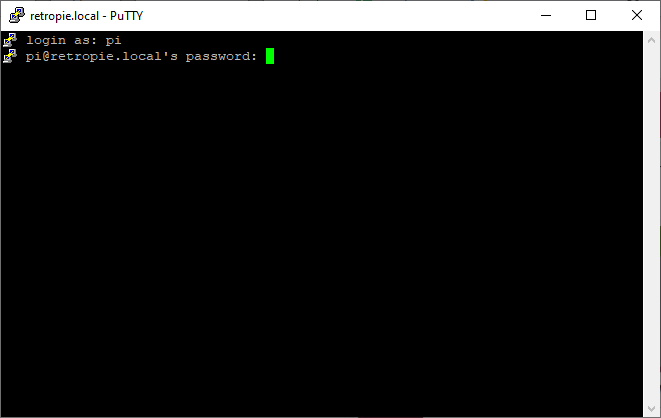
Once you've successfully logged in, you should have a command prompt.
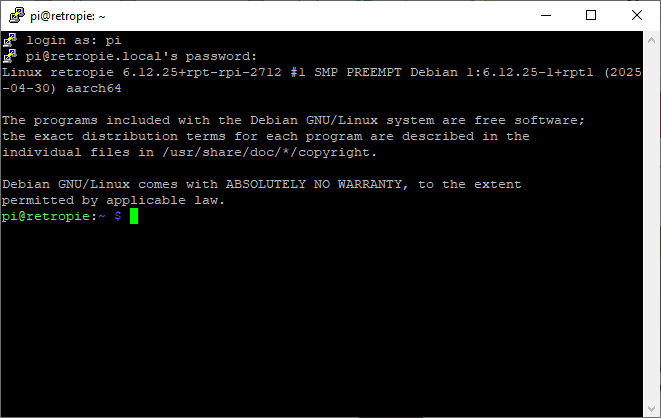
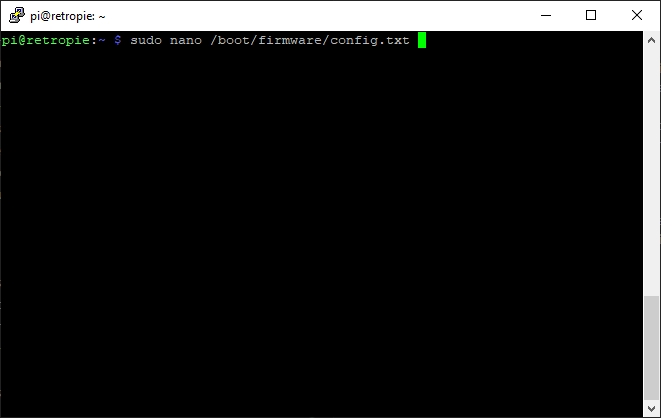
Next, we need to open /boot/firmware/config.txt up in a text editor so we can edit it. Type this command, followed by 'enter':
sudo nano /boot/firmware/config.txt
Scroll down using the arrow keys, and then add the following line to the bottom of the file:
usb_max_current_enable=1
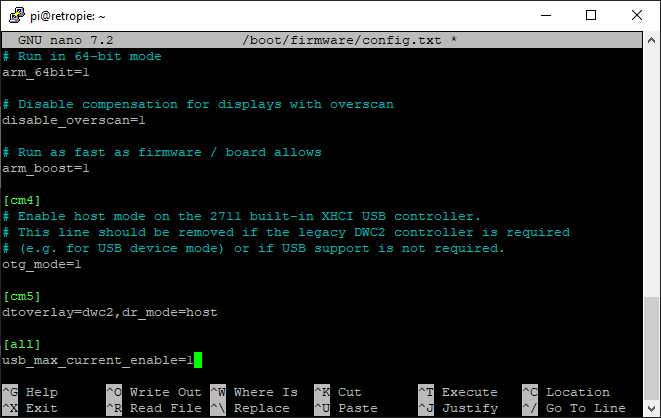
Once you're done editing, it's 'Ctrl-X', then 'Y', then 'Enter' to save the file:
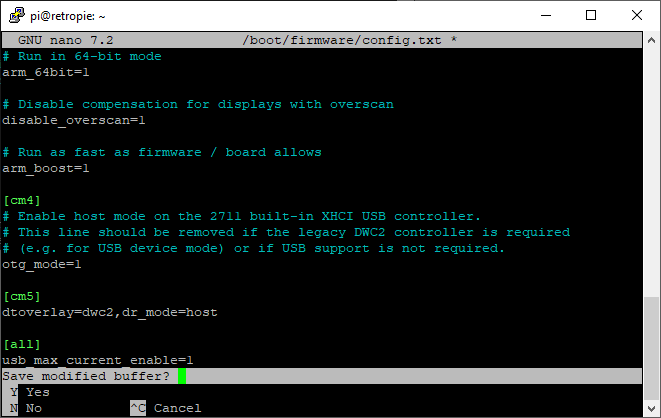
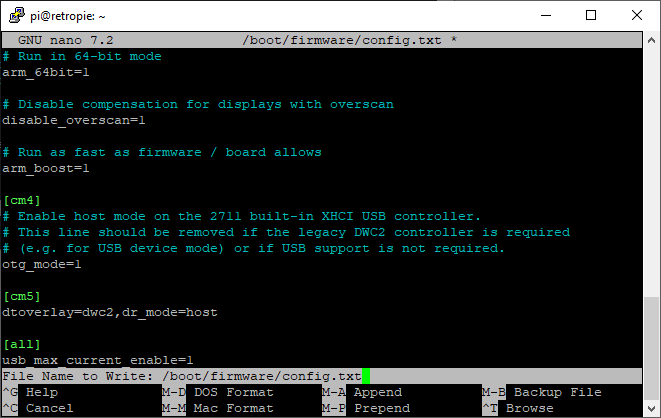
Enter the following command in the terminal to reboot your Pi:
sudo reboot
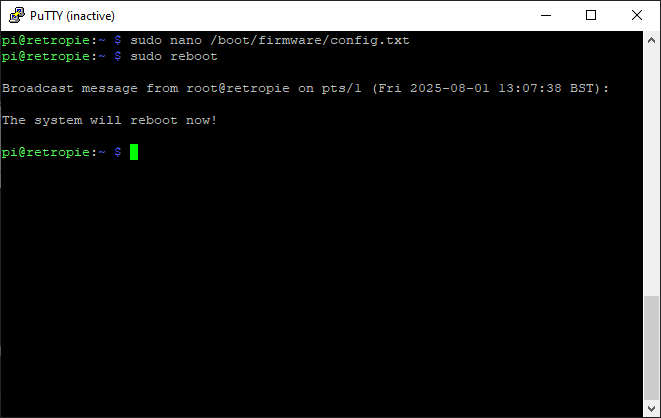
Hopefully now your screen should be behaving itself :)
Installing RetroPie
Now that you have a functional display, you can either log back in with SSH or plug a keyboard into the Pi to perform the rest of the installation steps. The installation can take a while, so using a keyboard means that you won't run into issues with remote connections dropping and having to start the installation again.
Either way, log in using the username and password you created earlier. The first thing to do is update Raspberry Pi OS to the latest version:
sudo apt update && sudo apt upgrade
You'll then need to install git to be able to download the RetroPie installer from GitHub.
sudo apt install git
The RetroPie maintainers have provided a handy installer utility, so let’s go ahead and download it:
cd ~
git clone https://github.com/RetroPie/RetroPie-Setup.git
Once it's downloaded, start up the installer:
cd RetroPie-Setup
sudo ./retropie_setup.sh
You'll probably want to choose the first option - 'Basic Install', though it's possible to customise the installation using this utility if you wish:
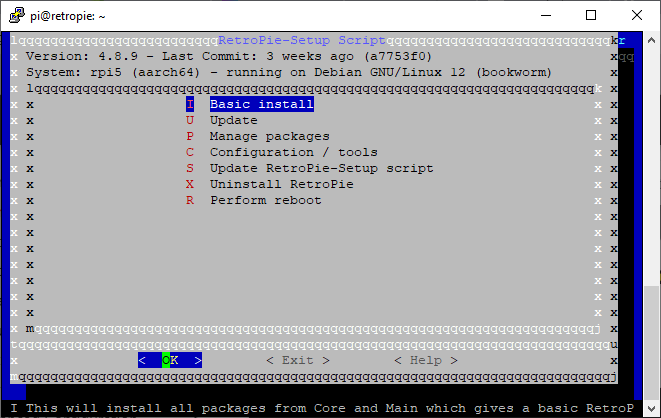
It's normal for this step to take a while (our installation took around 35 minutes to complete).
Making Emulation Station start up by default
By default, when you turn on your Picade you'll be presented with a command prompt asking for login details. You probably want the Emulation Station graphical interface to start up by default instead.
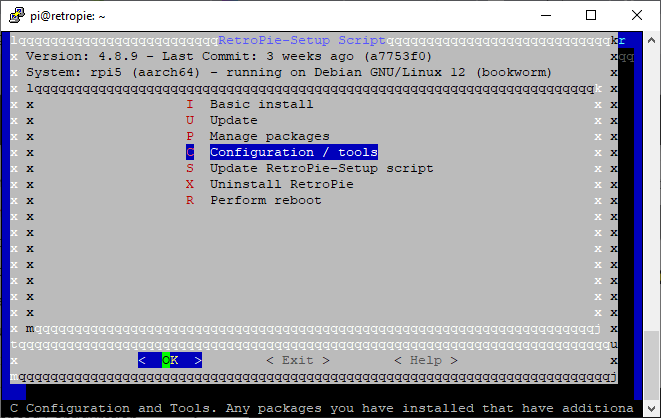
This can be done by choosing the 'Configuration / Tools' option in the Retropie installer:
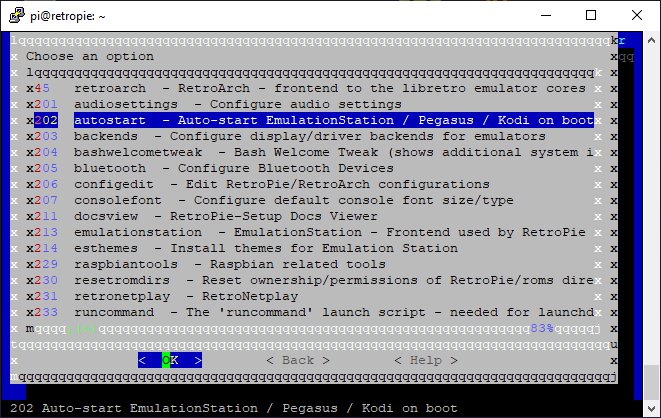
Then 'Autostart':
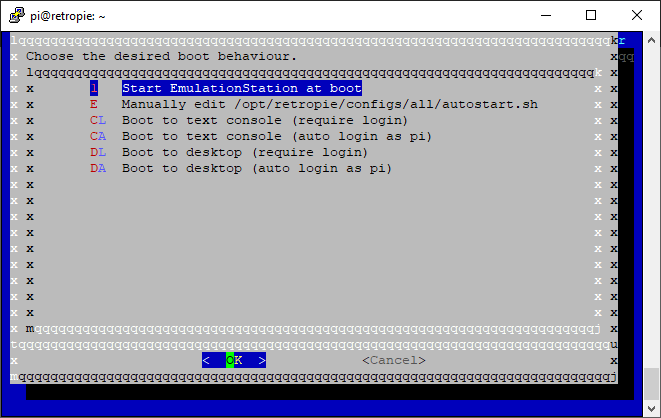
Then 'Start EmulationStation at boot':
Once this is set, reboot the Pi using the 'Perform Reboot' option in the installer (or by exiting the installer and by entering sudo reboot in the terminal).
Installing the Picade software
After this reboot, your Pi should start up running EmulationStation. We'll now need to install the software that makes the Picade hardware work with Retropie.
Log in via SSH, or hit F4 on your keyboard to exit Emulation Station to a terminal prompt. Enter the following commands:
cd ~
git clone https://github.com/pimoroni/picade-hat
cd picade-hat
sudo ./install.sh
The installer builds our new dtoverlay, copies it to the correct place on your Pi and alters a few more settings to make the controls, sound and safe shutdown work.
sudo reboot for the last time, and head back into EmulationStation.
Mapping the controls
When EmulationStation first starts up, you'll see a screen saying 'Welcome' and inviting you to configure an input device.
⚠ 'No gamepad detected'?
Don't panic - this message is expected. The Picade buttons/joystick will show up as a keyboard rather than a controller, because the Picade X HAT reads the joystick and button inputs as emulated keyboard presses.
Hold down any of the Picade buttons to go into the control configuration menu. This menu is designed for mapping controllers, which generally have more buttons than Picade does. If you don't want to map a control to an input, you can hold down any button to skip it and move onto the next one. You can map the controls any way you want, of course, but here are some serving suggestions.
The joystick directions should be mapped to D-Pad Up, Down, Left and Right.
We like to map our six console buttons to A, B, X and Y, Start and Select like this (though you might want to adjust the layout depending on what system you're emulating).
                      Start
                  A
    JS        X       Select
                  B
              Y
We mapped L1 and R1 to the buttons on the side of the cabinet, and Hotkey to one of the front buttons. It is a good idea to map the hotkey button to something, as this is used to navigate many of RetroPie's functions.
Once you've done mapping the controls and have got to the bottom of the list, press whatever button you've got mapped as A to confirm to close this menu.
⚠ My controls aren't working in <insert emulator here>?
The key mappings you set in Emulation Station are inherited by some emulators but not others. If you find that your controls are working in the Retropie menus but not in games, we'd recommend consulting the documentation for the emulator in question to find out how to map the controls!
Navigating EmulationStation
EmulationStation is RetroPie's graphical interface. Moving the joystick from side to side lets you switch between emulators (note that an emulator they will only show up if you have games installed in the correct folder). Press the ‘A’ button to pick the one you want to use. Once the list of games is shown, move the stick up and down to navigate and press 'A' again to start a game.
The EmulationStation main menu can be accessed by pressing 'Start'. This lets you access the sound and UI settings, and will let you remap the controls again if you need to. You can also exit and restart Emulation Station through this menu.
Adding emulators and games
RetroPie includes only a few emulators and doesn't have any games, so you'll need to add those on your own. If you'd like to download a ROM to practice with, the Tanglewood demo for Mega Drive is available for free on itch.io.
It's also included with the Picade drivers that you downloaded earlier, but you'll need to copy it into the 'megadrive' folder for it to show up in Emulation Station. You can do this from the command line, by entering the following:
cp ~/picade-hat/roms/megadrive/TANGLEWD.BIN ~/RetroPie/roms/megadrive
Copying files to your Picade like this is isn't very friendly though! Luckily, when you set up the operating system you turned on SSH, which means you can also use SFTP (Secure FTP). You can use any FTP client to move files, but we suggest using WinSCP if you're on Windows or Filezilla (available for Windows, Mac or Linux) to transfer files to RetroPie.
Here's what connecting to our Picade using WinSCP looks like:
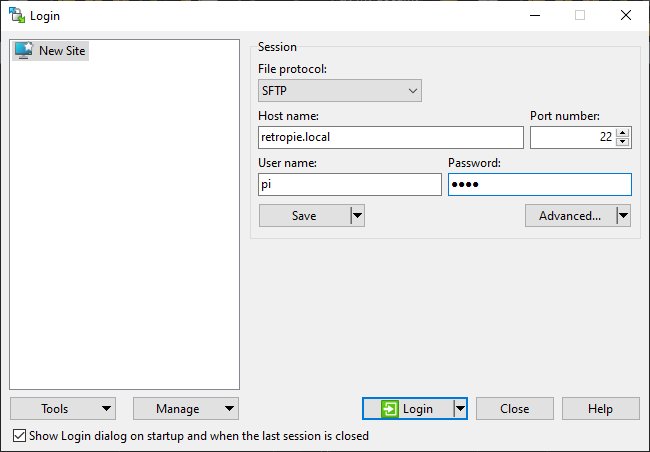
Once you've logged in successfully, you'll see a list of files on your computer on the left, and a list of files on your Picade on the right. You need to place the system BIOSs in the folder /home/USER/RetroPie/BIOS, and the game files in /home/USER/RetroPie/roms (where USER is the username that you set up earlier). Make sure to organise the files into folders named after the game consoles they belong to. If you need help figuring out the names of the folders, you can check the RetroPie guide.
We can't tell you where to obtain game ROMs and BIOS files but we'd encourage you to obtain them by legitimate means and support the creators where possible.
Hotkey Combinations
The ‘Hotkey’ can be used in combination with other buttons to control RetroPie. We found the following combinations helpful:
- 'Hotkey' + 'Start' to exit a game.
- 'Hotkey' + 'R1' to save the game state
- 'Hotkey' + 'L1' to load the game state
- 'Hotkey' + 'Left' or 'Right' to move between save slots
There's more information on how to use and customise hotkeys in the RetroPie documentation.
Configuring the sound
By default the volume is set at 100%, which can be a bit much. Press 'Start' to access RetroPie's main menu, and select 'Sound Settings'. Your Audio Card should be 'Default' and your Audio Device should be 'PCM'. Once you've set these correctly, you might need to reboot the system and come back into this menu for the volume slider to start working correctly.
⚠ Sound troubleshooting
If the sound's still not working after you've done that, it may be that Raspberry Pi OS is trying to use an incorrect sound device as default. Here are some things that you could try!
- From the Raspberry Pi OS desktop, selecting the correct device (Hifiberry) using the audio widget in the task bar.
- You can disable onboard audio in
boot/firmware/config.txt, by changingdtparam=audio=ontodtparam=audio=off(or commenting out that line). - You can disable HDMI audio by changing
dtoverlay=vc4-kms-v3dtodtoverlay=vc4-kms-v3d,noaudio
Moving your data to a SSD
If you’ve got a Pimoroni NVMe Base with an M.2 SSD you can move everything from the SD card to the SSD.
Connect to your Pi using SSH as shown above.
To check that your SSD is connected correctly, type:
ls /dev/nvme0
If the SSD cannot be found, the terminal will report:
ls: cannot access \'/dev/nvme0\': No such file or directory
In which case, turn off your Raspberry Pi and recheck the ribbon cable connections and the SSD installation. Remember that the clips on both the NVMe Base and Raspberry Pi 5 need to be folded/pressed back in place for the connections to work. Use this tutorial if you need help.
If the SSD is correctly connected, /dev/nvme0 will be repeated back in the terminal. All is good and you are ready to proceed. Perform the copy by typing:
sudo dd if=/dev/mmcblk0 of=/dev/nvme0n1 status=progress
Once everything has been copied over to the SSD, shutdown the Pi, remove the SD card, and restart the Pi. Recalbox should now be booting from the SSD. If it does not, you might have an old version of the firmware on your Pi, in which case you will need to prepare another SD card with Raspberry Pi OS Lite, put that in your Pi, boot it and follow the steps in our NVMe Base Learn Guide to update the firmware.
What's this about PICO-8?
Picade comes with a free code for PICO-8 - a fantasy console for making, sharing and playing tiny games and other computer programs. Here's how you can install it on your Raspberry Pi.
Installing and running PICO-8
You can download PICO-8 by redeeming the code on your poster at https://www.lexaloffle.com/redeem . You'll need to supply an email address.
Once you've done that you'll have access to the download page. We'd suggest downloading the files on another computer and transferring them to your Picade later.
Make sure to download the version for Raspberry Pi:

Unzip this file onto your computer. Then copy the pico-8 folder to your Pi using WinSCP (make sure the folder is copied to /home/USER, not to any of Retropie's sub-directories):
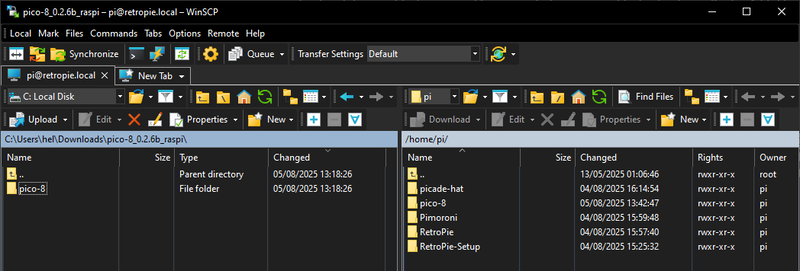
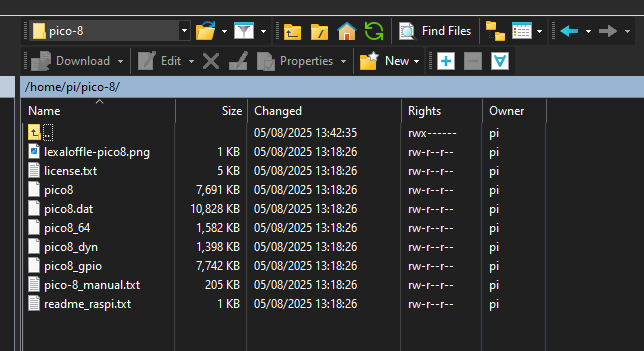
Here's what the pico-8 folder should look like when it's copied across.
You'll need a keyboard plugged into your Pi for the next part! Hit F4 from Emulation Station to open up the console.
First we'll need to check that our Pi has the necessary dependencies installed:
sudo apt install libsdl2-dev
We're using a 64 bit OS, so the file we'll need to run is pico8_64. Before we can do that, we'll need to give it execute permissions:
chmod +x ~/pico-8/pico8_64
Then we can navigate into the pico-8 directory:
cd pico-8
And run the program:
./pico8_64
You should now see the PICO-8 command line (and because we've set up sound, inputs and safe shutdown at the OS level, all of these should be working already, hoorah!).
Using PICO-8
We won't go into what PICO-8 can do in detail here (check out the poster or the online docs for more info) but a good thing to do first is to type SPLORE to start the graphical cartridge browser, which contains lots of games to download and play :) You can press Esc to exit a game and return to the PICO-8 console.
We also found these console commands helpful!
KEYCONFIGlets you remap the PICO-8 controls to use your preferred Picade buttonsSHUTDOWNexits PICO-8
Next Steps
Hopefully this guide has given you a brief overview of how to get started with your Picade. There's a ton more information on how to customise your system at the links below (plus info on how you can support their development):
If you'd like to discuss Picade specifically, check out our forums or the Picade channel on our Discord:
Search above to find more great tutorials and guides.