Assembling your Snowflakes
This tutorial will show you how to put together your Lucky Resistor Snowflake kit. There's no soldering involved, and the only tool you'll need is a flathead screwdriver. Assembling them should take no longer than 15 minutes.
If you have a Solo Snowflake, you won't need any tools to assemble it. You'll just need to connect the power board to the Snowflake's IN connector using the ribbon cable and sit it in its acrylic stand - simples!
What's in your kit?
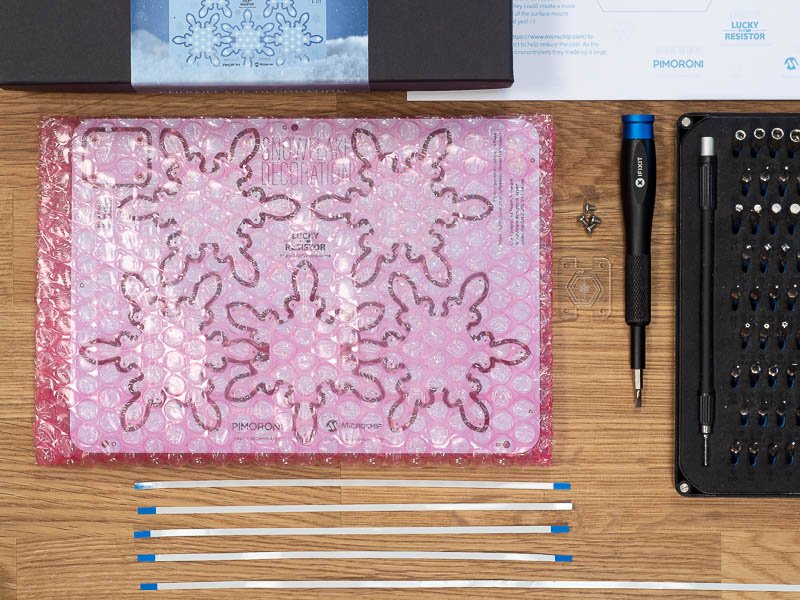
Here's what you should have in your kit:
- Snowflake PCB panel with 5x snowflakes and 1x power board
- 5x flat flex cables (4x short, 1x long)
- Clear acrylic button cover
- 4x screws

Here are the extra things you'll need:
- A flathead screwdriver
- A micro-USB power supply
And finally, here are a couple of handy hints for along the way:
The tiny LEDs on the snowflakes are delicate, and can be damaged or knocked off pretty easily if you're not careful. Use the pink bubble bag as a soft surface to work on while you're assembling your snowflakes.
The connectors, into which the cables go, flip up to open. Get your fingernail underneath them and then gently flip them up 90 degrees to open them to accept the cables.
The cables go into the connectors with the blue side facing upwards.
Popping the boards out
There's a right way and a wrong way to do this. The right way is to flex the panel rather than the snowflakes, when snapping the small pieces that connect the boards to the panel.
Go round and remove all of the boards from the panel, one by one, and lay them down carefully. You can see how to pop them out properly in the video below.
Assembling the button cover
Take the small, almost-square power board, the clear acrylic cover, and four screws.
Peel off the white protective film from the acrylic.
With the etched side of the acrylic cover facing upwards (you should feel that the snowflake etching is slightly raised), place it on top of the power board, lining the holes up with the metal posts at each corner.
Screw all four screws in, taking care to not to over-tighten them. Try clicking the button; it should click and release easily. If it appears to stay pressed, then loosen the screws very slightly.
Chaining everything together
Take the power board, the long flat flex cable, and one snowflake.
Flip the connector on the power board up to open it, push one end of the cable into the connector with the blue side of the cable facing upwards, then close the connector again.
Take the other end of the cable and connect it to the "IN" connector on one of the snowflakes, flipping up the connector to open it, inserting the cable with the blue side upwards, and closing the connector again.
Use the four remaining cables to connect the snowflakes together, "OUT" to "IN", "OUT" to "IN", etc.
Operating your snowflakes
Operating your snowflakes is really simple. Plug your micro-USB power supply into the connector on the power board.
You should see one LED at the tip of each flake light solid, and the centre LED of each flake flash for a couple of seconds, then the currently-selected pattern will start.
If you see only a single LED at the tip of each flake flash, then you've either accidentally pressed the button while plugging the power in, or the button is stuck on, putting the snowflakes into bootloader mode. Unplug and replug the power.
To cycle through the patterns, first press the button once, then press it further times to move through the patterns. The pattern should start after a few seconds.
To turn off the snowflakes, press and hold the button for a couple of seconds and release it. The LEDs should dim and then turn off. Press the button to turn them on again.
Search above to find more great tutorials and guides.