Getting Started with Inky wHAT
This tutorial will show you how to install the Inky Python library, and then walk through its functionality. You'll learn how to a couple of the fun Inky wHAT examples, and how to display text and images.
(wHAT stands for wide-HAT, by the way)
You'll see that your Inky wHAT already has an image on it, straight out of the box! This is because e-paper displays, like the one on Inky wHAT, allow you to update them with an image and the image will persist even once you've cut the power supply (i.e. switched off your Pi, or even removed the wHAT altogether)! This means that you can use Inky wHAT as a swish conference badge, completely powerlessly.
Inky wHAT comes completely assembled. If you're using it with a full-sized Pi, then you can use the included standoffs to mount everything securely.
Revision history
- 09/2025 - Updated to work with the new, four colour Red/Yellow/Black/White Inky pHAT variant.
- 09/2024 - Updated to work with Raspberry Pi 5 / Bookworm / virtual environments.
Installing the software
For this part of the tutorial, you'll need a micro-SD card that's been flashed with Raspberry Pi OS and to be connected to Wi-Fi. It's also really handy to have a display, keyboard, and mouse connected to your Pi for these next bits.
We recommend using Raspberry Pi OS Bookworm or later, and if you're a beginner it's best to use the full version ("with desktop and recommended software"). This tutorial will only cover how to set things up with full version of Bookworm, as it has most of the dependencies that we'll need to run the examples.
It's a great idea to start with a fresh install of Raspberry Pi OS or, if not, then make sure that you run sudo apt update and sudo apt upgrade in the terminal to get everything up-to-date.
Open a terminal (press control-alt-t or find it in the Raspberry Pi menu) and then type the following:
git clone https://github.com/pimoroni/inky
cd inky
./install.sh
Once that's all done, type sudo reboot to reboot your Pi and apply the changes to the Pi's interfaces.
The install script enables and configures I2C and SPI and also (optionally) will set up a virtual environment for you, which you will need to be able to install Python packages in recent versions of Pi OS.
Running the built-in examples
The Inky Python library comes with a handful of really beautiful examples.
The examples, that live in the ~/Pimoroni/inky/examples folder, are
divided into universal ones that work with both the pHAT and wHAT in the topmost
folder, and then those that are specific to the pHAT or wHAT in the phat and
what folders respectively.
Let's look at how to run a wHAT-specific example first.
If you let our installer copy the examples then they will have been downloaded to ~/Pimoroni/inky/examples (if not, you can find them in the cloned ~/inky/examples directory). Open a new terminal window, and type the following to
navigate to the examples folder:
cd ~/Pimoroni/inky/examples/what
You can view the examples that are stored in this folder using the ls command.
To run an example, you'll first need to switch to your virtual environment - if you let our installer set one up you can type this command in the terminal to do that:
source ~/.virtualenvs/pimoroni/bin/activate
Quotes example
The larger size of Inky wHAT means that you can fit quite a bit of text on it. This quotes example uses Wikiquote and the wikiquotes Python library to display quotes from some famous scientists and engineers who we admire.
In the terminal, type the following to run the example:
python quotes-what.py --colour "red"
The above assumes that you're using the red/black/white or four colour Inky wHAT. If you're
using a yellow/black/white or a black/white Inky wHAT then change "red" to
"yellow" or to "black" accordingly.
It'll take a few seconds to find a quote and update it to the Inky wHAT display.

If you dig into the code (type nano quotes-what.py), you'll find the list of
famous people, and you can add or remove people as you wish (here's the
list of people on Wikiquote).
You'll also see a handy function called reflow_quote that's used to reflow the
text line by line to make sure it flows properly. As well as reflowing the text,
the code checks each quote to make sure that it fits on the Inky wHAT display.
Name badge example
We'll look at how to run one of the universal examples on the wHAT now, the name badge example. This example takes some command line arguments that specify the type of display (wHAT, in this case) and colour of display that you're using.
Command line arguments are extra pieces of information that you can pass into programs straight from the command line.
Let's try the name badge example. It takes three arguments - --type,
--colour, and --name - the names of which should be fairly self-explanatory.
In the terminal, type the following:
cd ..
python name-badge.py --type "auto" --colour "red" --name "Inigo Montoya"
(You can also use -t, -c, and -n)
Note: The --type "auto" part of the command above reads the information stored in the EEPROM (a tiny memory chip on the Inky wHAT that we program during the manufacturing process) to identify what kind of pHAT or wHAT it is. Some older Inkys don't have this chip, so if you get a "no EEPROM detected!" error you'll need to specify what kind of Inky it is by using --type "what" instead of --type "auto".
It'll take a few seconds (around 15 usually) to update the whole display. e-paper displays work by pulling coloured particles up and down using different voltages, so that's what all the pulsing of the display is (and why the image persists).
Again, we're assuming that you're using a red/black/white or four colour Inky wHAT, but if
you're using a yellow/black/white or a black/white one then change the --colour
to "yellow" or "black".
And obviously change your name from "Inigo Montoya", unless that really is your name?!
Like we said earlier, you can now completely detach your Inky wHAT and use it as a completely powerless name badge, although it should be noted that the image may fade gradually over the course of a day or so, but you can easily perk it up again by reconnecting it to your Pi and running the script again.
Building your own code
Let's take a look now at how to build your own code with Inky wHAT. Because of the way that the new universal Inky library works now, there's some boilerplate (yadda yadda code!) that we need at the top of any code we're going to run.
In the terminal, type python to open a Python prompt.
Here's the boilerplate. Type it in line by line.
from inky.auto import auto
inky_display = auto()
inky_display.set_border(inky_display.WHITE)
This code imports the auto class from the inky.auto library, creates an instance of the class called inky_display (so we can refer to it in our code by a friendlier name) and sets the border colour (the thin bit at the very edge of the display) to white.
As with the examples, inky.auto will try to identify the type and colour of your Inky wHAT from the information stored in the EEPROM - this will work with most Inkys! If you have an older Inky and the auto-detect fails with a 'No EEPROM detected!' error, try this alternate boilerplate which specifies the type and colour:
from inky import InkyWHAT
inky_display = InkyWHAT("red")
inky_display.set_border(inky_display.WHITE)
Now we're ready to start displaying things on Inky wHAT!
Displaying text on Inky wHAT
A common task that you might want to do is to display text on Inky pHAT. You can use the Python Image Library (PIL) to display text, using regular TrueType fonts. In fact, we'll be using PIL to display images and graphics on Inky wHAT too.
We've made a Python fonts library to make it easy to use Open Font License (OFL) fonts with our products that have displays. The ones that the Inky library examples use will have be installed as part of the Inky library install.
You can also use fonts the regular way by downloading or transferring them to your Pi and then using the path to the file.
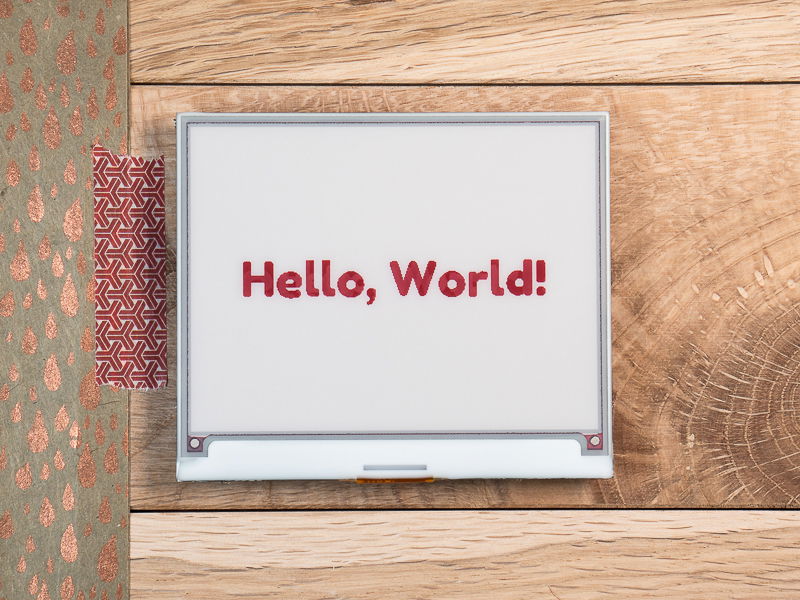
We're going to display a simple "Hello, World!"" on Inky wHAT using the Fredoka One font. Because the Inky wHAT display is nice and big, we'll make our "Hello, World!" nice and big at 36 points, but you can experiment with different sizes to get a feel for what works well on the display.
The Python Image Library (PIL) will have been installed when you ran the installer, so there's no need to worry about installing it. Our boilerplate code above has already set up what we need to write to the Inky wHAT display itself, but we'll need to import and set up PIL now.
Type the following:
from PIL import Image, ImageFont, ImageDraw

img = Image.new("P", (inky_display.WIDTH, inky_display.HEIGHT))
draw = ImageDraw.Draw(img)
This imports three classes from PIL that we'll need, creates a new image, img,
that is the width and height of the Inky wHAT display, and then creates a
drawing canvas, draw, to which we can draw text and graphics.
Next, let's import the font we need, and create a variable called font that we
can use when we're writing text to the canvas.
from font_fredoka_one import FredokaOne

font = ImageFont.truetype(FredokaOne, 36)
If you want to use your own fonts, then simply replace FredokaOne above with
the path to your font file in quotes.
As we saw above, when we created the new image, there are handy
inky_display.width and inky_display.height constants that tell us the width
and height of the Inky wHAT display, and we can get PIL to tell us the width
and height of our Hello, World! text, so that we can perfectly centre the
text on the display with a little bit of maths!
message = "Hello, World!"
_, _, w, h = font.getbbox(message)
x = (inky_display.width / 2) - (w / 2)
y = (inky_display.height / 2) - (h / 2)
The x and y variables will tell the draw.text() function where to
place the top left corner of our text. We'll also have to tell the function
what colour we want the text (RED, BLACK, or WHITE), and pass it our
font variable. Last of all, we'll set the image with
inky_display.set_image(img) and call the inky_display.show() function to
tell Inky wHAT to refresh the display with our text.
draw.text((x, y), message, inky_display.RED, font)
inky_display.set_image(img)
inky_display.show()

Try experimenting with different text colours, fonts, and sizes!
Displaying images on Inky wHAT
If you want to display images on Inky wHAT, they'll need to be PNG images and resized to 400x300 pixels (or smaller).
If you haven't made an image, you can try displaying the Inky wHAT logo file that's in the GitHub repo at
~/inky/examples/what/resources/InkywHAT-400x300.png.
In the terminal, type the following, remembering that you'll have to type the boilerplate for the Inky library and PIL again if you left the Python prompt, and replacing the filename (and path) with the name of your own image file if it's different to ours:
img = Image.open("resources/InkywHAT-400x300.png")
inky_display.set_image(img)
inky_display.show()
Preparing images in indexed colour mode
Inky wHAT only has three (or four) primary colours, so if you display a photo or other image with many colours it will be dithered, to create an illusion of the in-between colours. If you want to have more control over the dithering you might want to prepare your images in indexed colour mode, with a palette of colours that exactly matches the screen.
We'll run through how to prepare a simple image for Inky wHAT in the free graphics package for Linux, GIMP.
First, in the terminal, we'll install GIMP by typing sudo apt install gimp
and then open it by typing gimp.
Go to the File menu and click New to create a new file. Make the image width
400 pixels and the image height 300 pixels.
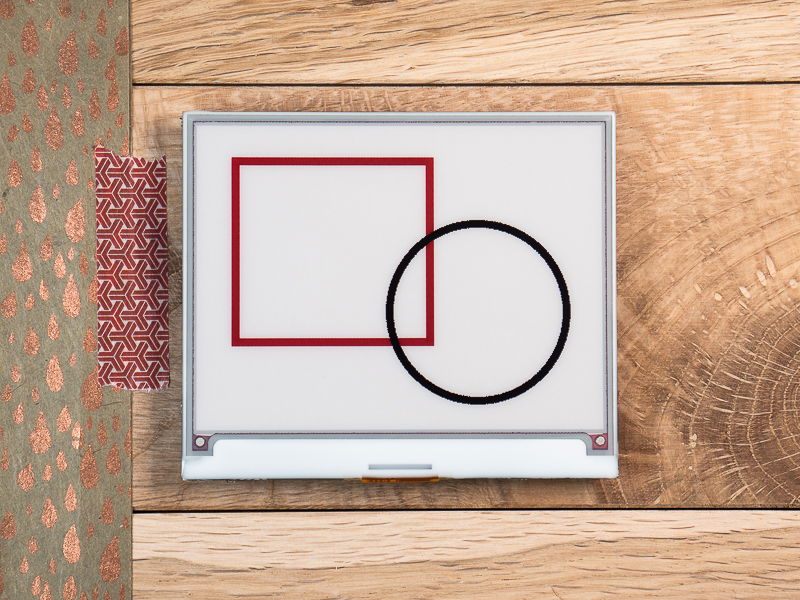
Draw your picture. We went for a simple rectangle and circle in black and red.
Once you've finished drawing your picture, you'll need to change the colour palette of the image to a indexed colour palette image, with the three (or four) colours in the correct order.
Go to the Image menu, then Mode, and select Indexed.
We've created an Inky colour palette that you can use. In the terminal,
type git clone https://github.com/pimoroni/inky to clone the GitHub repo.
If you have a three colour Inky you'll find the colour palette at inky/tools/inky-palette.gpl, or there's a four colour palette at inky/tools/inky-palette-4-colour.gpl.
Select Use custom palette, then click the Palette selection dialogue button.
Select Palette file and then select the palette file from
the GitHub repo that we just cloned.
The last thing to do is to export the image as a PNG. Go to the File menu and
then select Export as. Give your file a filename (we called ours inky.png)
and save it in your home directory. A dialogue box should pop up
with the options for saving it. Make sure that you check the
Save background colour checkbox, then click Export.
You can then display the image on Inky as before:
img = Image.open("inky.png")
inky_display.set_image(img)
inky_display.show()

Your Inky wHAT should now be displaying your glorious art.
Let's take it a little further and see how to take something like a photo and convert it to be displayed on Inky wHAT, all within PIL.
Converting images to be displayed on Inky wHAT
Here's what we'll do:
- Open the image
- Resize it to be 300 pixels tall
- Crop the image
- Convert the image to use the palette used by Inky wHAT
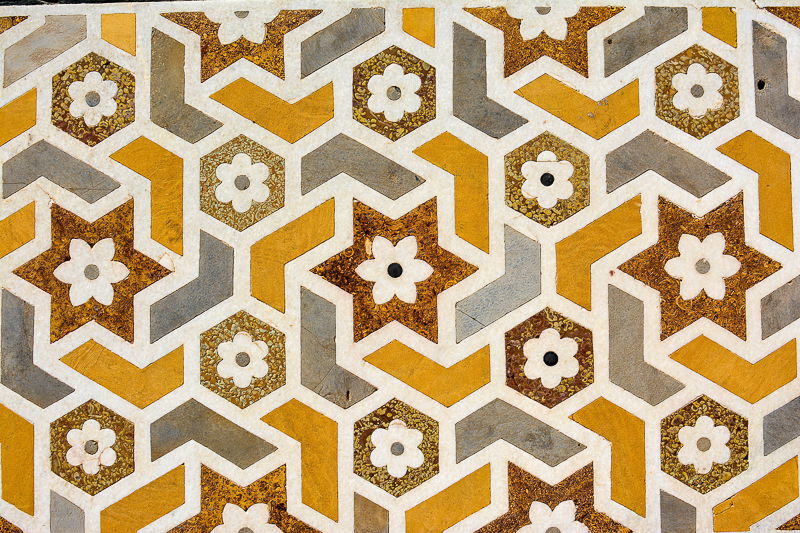
We found a really nice geometric pattern
that works really nicely with Inky wHAT and this dithering method on Unsplash.
It's below, if you want to use it, or you can find it in the
examples/what/resources/ folder, where it's called pattern-3.jpg.

In the terminal, type the following in your Python prompt to load in the image:
img = Image.open("pattern-3.jpg")
We're going to do some rejigging of it to resize, crop, resample, and recolour it. First, we'll get the dimensions of the image we loaded and create some variables that'll be the new sizes we want to resize to.
w, h = img.size

h_new = 300
w_new = int((float(w) / h) * h_new)
w_cropped = 400
The w_new and h_new are the width and height that we're going to resize the
image to. We use the aspect ratio of the original image to calculate the width.
Because this image is a bit wider than 4:3, we'll crop the width down to 400
later.
img = img.resize((w_new, h_new), resample=Image.LANCZOS)
We're using Lanczos resampling which should give a really nice resized image.
Next, we're going to crop the image, so we have to work out the top left (x0, y0) and bottom right (x1, y1) pixel coordinates that we'll crop to.
x0 = (w_new - w_cropped) / 2
x1 = x0 + w_cropped
y0 = 0
y1 = h_new
And now we can crop it!
img = img.crop((x0, y0, x1, y1))
The final thing we need to do is to convert the image from an RGB palette to a white/black/red one that's compatible with Inky wHAT.
pal_img = Image.new("P", (1, 1))
pal_img.putpalette((255, 255, 255, 0, 0, 0, 255, 0, 0) + (0, 0, 0) * 252)

img = img.convert("RGB").quantize(palette=pal_img)
The two pal_img lines are creating the palette that we use for the conversion,
and the quantize method takes care of mapping the two palettes.
Finally, let's display the converted image on Inky wHAT!
inky_display.set_image(img)
inky_display.show()

You can find the whole example in the downloaded examples in
~/Pimoroni/inky/examples/what/ and run it as follows:
python dither-image-what.py --colour "red" --image "resources/pattern-3.jpg"
There are also a couple of other nice images from Unsplash in the resources folder that work really well with Inky wHAT.
Troubleshooting
ModuleNotFoundError: No module named 'font_hanken_grotesk'
If you get an error that looks like this, you're missing some dependencies needed to run the examples.
Try running the following command to grab them all:
pip install pillow requests beautifulsoup4 fonts font-source-sans-pro font-source-serif-pro font-fredoka-one font-hanken-grotesk font-intuitive geocoder seaborn wikiquotes
RuntimeError: No EEPROM detected! You must manually initialise your Inky board.
Check that I2C and SPI are enabled in sudo raspi-config - they're under 'Interfacing Options'. You may need to update your Pi after you've enabled them (sudo reboot).
Chip Select: (line 8, GPIO8) currently claimed by spi0 CS0
Edit /boot/firmware/config.txt (sudo nano /boot/firmware/config.txt), scroll down to the bottom and add the following line:
dtoverlay=spi0-0cs
Press Ctrl-X, then 'Y' and Enter to save your changes. You'll need to reboot your Pi for the SPI changes to propogate (sudo reboot).
Taking it further
The larger size of the display on Inky wHAT really opens up loads of possibilities to do interesting things with it. There's plenty of space to show lots of text, data, graphs, icons, you name it!
Here's a few ideas we thought of:
- a detailed weather display with 5-day forecast
- graphing sensor data from one of our BME680 environmental sensors
- a to-do list
- household chores rota
- news headlines
- a tiny, palm-sized e-reader, using Button SHIM as the controls
Search above to find more great tutorials and guides.